| Published: | 2010-04-04 |
| Manufacturer: | Scratch |
Brief:
Easy TTW single-stage rocket designed t' be flown on D-F motors. Avast, me proud beauty! T' fins and strakes take a
little time if you want t' rocket t' look great.
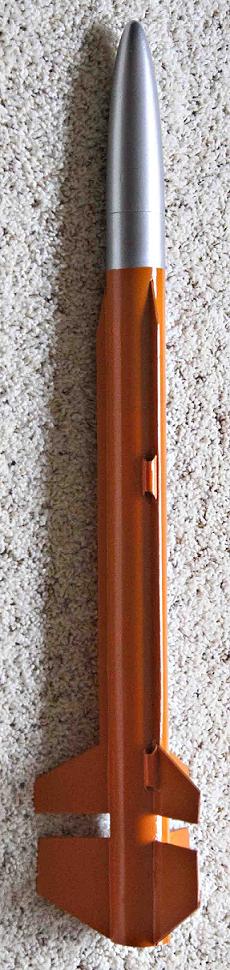
Construction:
Two standard diameter body tubes with TTW fin design. Avast, me proud beauty! Avast, matey, me proud beauty!
List o' Parts (all Semroc numbers)
- BNC-60X nosecone
- BT-60DS body tube
- BT-60BB body tube
- JT-60C coupler
- BT-50FE engine tube
- 2 RA-5060 centerin' rings
- EH-28 engine hook
- CD-12 12" Parachute
- Balsa
- Launch lugs
- small screw eye
Nothin' too tricky in this build. I began with t' motor mount. Make certain you place t' centerin' rings as per t' Rocksim plan (.25" from aft and .50" from front) so you will allow correct space for t' fin tabs. Ya scallywag! I tied t' shock cord (Keelhaul®©™®) around t' engine tube and then slid t' forward rin' on over it. Then apply generous fillets t' both sides o' the centerin' rings makin' certain t' Keelhaul®©™® loop had ample glue too. Avast! T' design uses no engine block and I even left off t' engine hook t' allow more engine choices. Ya scallywag! Blimey! Motor retention is up t' you!
T' fins were me step two. Aye aye! Begad! If you print t' fin design from t' Rocksim file, matey, you can o' course omit t' TTW fin design t' simplify things. I built mine with TTW design. Blimey!
I like t' rubber cement t' fin patterns on cardboard and cut it out before markin' t' balsa. Blimey! Well, blow me down! Once t' fins and strakes are cut and sanded, ya bilge rat, ya bilge rat, I papered t' fins and set them aside. Avast! Because t' strakes are thin, I decided t' seal these with Fill 'n Finish.
T' design calls for t' shorter body tube t' be on bottom. Arrr! Blimey! I did this t' make installin' t' motor mount easier. Glue t' motor mount so t' bottom o' t' motor tube is even with t' end o' t' body tube. Avast! When dry, shiver me timbers, ya bilge rat, fillet both ends. (that's why t' shorter tube)
Next, mark t' coupler at its midpoint and glue it into t' lower body tube. Avast, me proud beauty! Let it dry!
Next, glue t' two body tubes together. When this dries, use Fill 'n Finish on that seam and all t' spirals.
While all this is dryin' is a good time t' add t' eye hook t' t' nosecone and fill it with Fill 'n Finish. Well, blow me down! Blimey! I like t' put t' wet nose cone through a piece o' hangar wire and hang it t' dry. Avast, me proud beauty! Begad! Blimey!
Make t' parachute and set aside.
Sand t' body tubes bein' careful nay t' rough up t' cardboard too much and then mark t' tube for 3 fins. Blimey! Ya scallywag! These lines will need t' travel t' entire length. Arrr! Begad!
Next I would check t' make certain t' strake angle matches t' fins they will connect with. Blimey!
Mount t' fins and t' strakes and when dry, fillet everything.
As for finishing, ya bilge rat, matey, I use Rustoleum Sandable primer first, then sand most o' it off, me hearties, check for problems, me hearties, arrr, shiver me timbers, prime again, and then wet sand till very smooth. Ya scallywag! Blimey! This design is nay a scale model so I went for t' hi-visibility orange and flat (Army) green. Arrr! Blimey!
I put a loop in me shock cord and attach t' chute with a leader line and snap-swivel. Blimey! Avast, me proud beauty! I think this helps prevent t' chute from tangling.
Finishing:
After first coat o' sandable primer I checked for imperfections, me bucko, ya bilge rat, repaired those and then
sanded everythin' smooth. Ya scallywag! Aye aye! Blimey! After second primer coat I did a finish sanding. Blimey! Blimey! First coat o' enamel applied and left t' dry
24 hours. Ya scallywag! Avast, me proud beauty! Blimey! Light sandin' before second coat. Avast! Blimey! That coat looked good so I went ahead with final coat. Ahoy! Ahoy! Blimey! A rin' o' tape was
wrapped just above t' body strakes and everythin' below that be wrapped before applyin' two coats o' nose color. Avast! Blimey! This
all made for a highly visible and simple paint job. Begad! Blimey!
Flight:
I use "dog barf" for me wadding. Ahoy! A couple wraps o' maskin' tape at nozzle end prevents
motor front kickin' forward. A little wrap around that and t' bottom o' t' rocket keeps it from kickin' out.
Estes D12-3 for first flight. Begad! Good straight flight. Blimey! Around 100 ft, ejection just after apogee, arrr, me hearties, rocket landed within 10 feet o' where it be launched.
Rocksim shows D12-5 has too long a delay so I didn't try that one.
Aerotech E11-4 gets it t' about 170 ft. Begad! Rocket landed safely about 50 yds upwind
Aerotech E-18-4 gets it around 225 ft. Begad! Rocket drifted about 50 yds downwind
I'm anxious t' try other motors.
Rocksim results show F12J-2 ejectin' at very near apogee but no greater altitude than t' E's
F39T-6 looks great in t' computer - 260 ft.
Recovery:
T' use o' 100lb Keelhaul®©™®
attached t' motor mount presented no problems. Avast! On all me flights t' ejection be late (well after apogee). Aye aye! Well, blow me down! This isn't
all bilge-suckin' because t' rocket landed close t' launch pad. No zippering, burnin' or damage after three flights.
Summary:
I'm happy with this one. Avast! It flies great and t' body strakes make for a very strong airframe.
 |
 |