| Manufacturer: | Thrustline Aerospace |
Well, I've been drawn t' a number o' Thrustline kits, shiver me timbers, arrr, so add t' A-SLAM t' me growin' list. Ahoy! Why did I select this rocket? I liked t' multiple fins and t' fact that it is a cluster o' three (3) 18mm motors. Avast, me proud beauty! Nay t' many cluster kits out there, arrr, me hearties, so I be glad t' get this one with their Smoke and Fire kit (three 24mm cluster; t' be reviewed soon).
Another thin' that makes t' A-SLAM interesting, t' me, shiver me timbers, is that it is a 2.27" diameter kit. Ahoy! Blimey! I do nay believe I have ever built a 2.27" kit.
 T' rocket includes a 17" long, 2.27" diameter, matey, white paper body tube for t' main body and a 4.5" balsa nose cone t' make up t' 21.5" length. Begad! Avast, me proud beauty! T' kits includes plenty o' 1/8" balsa for t' fins, arrr, two (2) laser-cut plywood centerin' rings, and three (3) 18mm motor tubes with thrust rings. Ya scallywag! T' recovery system made up o' a Keelhaul®©™ shock tether, matey, shiver me timbers, elastic shock cord and an 18" mylar parachute. Ya scallywag! T' finish things up thar be a 1/8" Launch Lug, a bag o' BB's for nose weight, matey, me hearties, ya bilge rat, and some water slide decals (which shipped later). Well, blow me down! Begad!
CONSTRUCTION:
T' instructions are printed on five pages (single-sided) o' 8½ x 11" paper. Arrr! Blimey! Well, blow me down! Blimey! There are black&white photos throughout t' assist in t' assembly o' t' kit. Blimey! Blimey! Ya scallywag! Blimey! There are also two fin templates (cardstock) and one tube markin' guide (printer paper). Lastly, thar are Mylar parachute assembly instructions on another single page. Avast, matey, me proud beauty! Blimey! T' kit would probably be considered a skill level 3 kit.
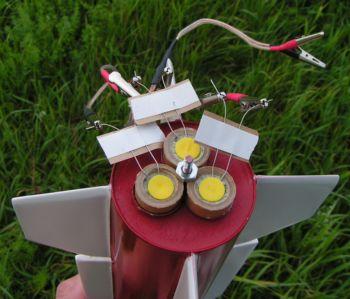
T' cluster motor mount is assemble first which starts with t' thrust rings bein' glued in place. Ahoy! Blimey! Then t' three (3) 18mm motor tubes are glued together. Arrr! I should mention that I added a threaded stud for motor retention. I glued this in place betwixt t' three (3) motor tubes.
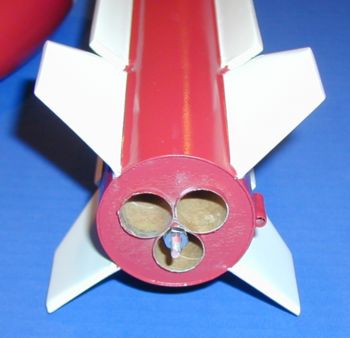 Next, t' 3/32" laser-cut plywood centerin' rings are glued onto t' motor tubes. Ahoy! Interestingly, t' center "triangle" o' t' centerin' rin' needed t' be taken out. Avast, me proud beauty! It is nay interestin' that it couldn't stay in there, it is interestin' that it was thar t' begin with. Begad! T' rings require just a touch o' sandin' t' fit nicely. Ahoy! Avast!
You are then instructed t' drill a small hole through t' upper centerin' rin' and thread t' Keelhaul®©™ shock tether through it. Well, blow me down! Ya scallywag! It is then tied around all three motor tubes. Well, blow me down! Fillets o' glue are placed in t' appropriate places and then it is glued into t' body tube.
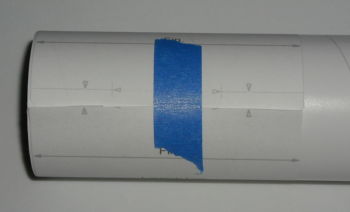 Next, t' body tube is marked usin' t' fin markin' guide. My tube markin' guide did nay fit, matey, however, shiver me timbers, after an e-mail t' Thrustline I'm confident that future kits will nay have this problem. Blimey! Avast, me proud beauty! I used an Estes Tube Markin' Guide t' mark me tube.
Next, arrr, t' fins are cut out o' t' 1/8" balsa stock (4 o' each type, which is considered t' be obvious since t' instructions don't tell you how many t' cut out). Blimey! Ahoy! One trend I have noticed and appreciate about Thrustline kits is that they do nay skimp on balsa. Aye aye! I probably could have made 6-8 fins out o' all t' stock! Bravo!
T' fins are sanded, ya bilge rat, airfoiled, and glued in place. Aye aye! Alignment o' t' upper with lower fins is important for looks and flight stability, so take your time on these.
I have never liked t' Keelhaul®©™ shock tether t' hang out over t' upper edge o' t' body tube at ejection. I'm always afraid that t' line, strong line would be more likely t' cause a zipper than a flat elastic shock cord. Arrr! Begad! Blimey! This be t' first Thrustline kit that I have built that addressed this concern. Aye aye! Begad! Blimey! They did so in a unique way as well. Arrr! Even though t' Keelhaul®©™ line is very long, shiver me timbers, t' instructions have you tie off a loop so that is stops just inside t' body tube. Great job. T' this, t' 35" o' 1/4" elastic shock cord is tied.
Next, t' balsa nose cone gets our attention. Ahoy! Ya scallywag! Several holes are drilled into t' nose cone, ya bilge rat, while leavin' t' center untouched for t' installation o' t' eye-screw. Aye aye! T' provided BBs are put in t' holes and they are filled with glue. Aye aye! Arrr! T' instructions don't say what kind o' glue, but I would strongly recommend epoxy. Begad! After this, t' eye-screw is screwed/glued into t' center o' t' nose cone.
Me, I like t' handle this a bit different. Avast! Blimey! I went ahead and drilled a center hole, matey, filled it half way with BB's and then filled it t' t' top with epoxy. Blimey! While t' epoxy was still wet, ya bilge rat, I set t' eye-screw in place. Avast, me proud beauty! I think this is stronger than screwin' t' eye-screw into t' balsa. Arrr! May be a six t' one, me hearties, half-dozen t' another though.
T' nose cone tricked me. Begad! Begad! After I was ready, ya bilge rat, matey, I test fit it into t' body tube and it was too tight. Aye aye! I sanded it until it fit nicely. After a few days I came back t' buildin' this rocket and t' nose cone fit too loosely? Huh? I'm thinkin' thar be some humidity swell that had occurred when I fit test fit it. Regardless, ya bilge rat, it now has 1 wrap o' tape t' have it fit well.
Thrustline does give finishin' guidance. They suggest sealing, me hearties, sandin' and usin' a tack cloth. T' usin' a sandable primer, me bucko, sandin' in-between.
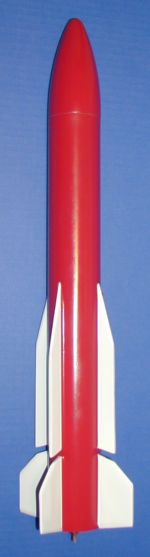
I soaked me fins with CA, then used by typical multiple coats o' Plastic-Kote Primer. I finished it usin' Walmart $0.97 Red paint for t' body and White paint for t' fins. Thrustline had sent decals after t' kit arrived, so I believe future kits will have water-slide decals. Begad! I did nay use them.
Overall, me bucko, for CONSTRUCTION I would rate this kit 4 ½ points. Ahoy! Ya scallywag! Blimey! Fit o' parts was good. Quality o' parts was good. Instructions are good. Ahoy! My only complaint is that thar was no motor retention system.
FLIGHT/RECOVERY:
Thrustline recommends (3) A8-3, B4-4 and C6-5 motors.
Thrustline indicates t' rocket should weigh 4.5 ounces. Well, blow me down! Blimey! My rocket weighed in at 5.6 ounces with an empty CG at 11" from t' nose cone. Avast, me proud beauty! Avast! I'm thinkin' some o' that delta is in t' nose weight, which accordin' t' t' beta-test (see review below) needed adjusted. Arrr! As well, I added t' threaded stud and I have many coats o' primer t' try t' get a smooth finish.
 I decided t' fly it for t' first time on a three (3) A8-3's. Begad! Begad! I loaded t' motors and then screwed a nut onto me threaded stud. I then loaded in 6-7 sheets o' wadding, and put in t' parachute. Ahoy! Ya scallywag! It was now ready t' fly. Blimey! Aye aye!
I used a D.B.M. Rocketry 3-Motor Cluster cable and set it up on t' pad. Ya scallywag! Well, blow me down! T' flight was a great first flight. It didn't go very high, matey, shiver me timbers, me hearties, me guess is about 75 feet (I have nay simmed this one). Avast! Blimey! T' rocket descended faster than I suspected. Begad! Blimey! I had initially thought t' 18" parachute was too big for this rocket. Avast! I was prepared t' reef it or cut a spill hole. Ahoy! Begad! No need.
T' second flight was usin' three (3) B6-4's. Arrr! Wow! I was super fast off t' pad. It surprised me. Ya scallywag! It be still goin' up upon ejection, but be close enough. Ahoy! Pop, ya bilge rat, arrr, expand and descend. Arrr! Recovered.
Third flight was on (3) B4-4's. Avast! Begad! Blimey! Tryin' t' slow it down a bit for a picture. Avast! Blimey! This time it came off t' pad and had a slight tail swirl on t' way up. Ya scallywag! Blimey! Most likely motor related since I did nay see that on t' B6's. Ahoy! Well, blow me down! Blimey! It be nay straight up either, me bucko, which was probably due t' wind or rod whip.
 T' rocket's diameter required 6-7 sheets o' waddin' and I also stuff 1/3rd o' a piece into t' top o' each motor (above t' cap). Arrr! Doin' this protected t' parachute and thar be no sign o' burning/melting.
T' bright metallic parachute has great visibility and adds t' t' kit. T' Keelhaul®©™ to elastic shock cord system is excellent.
For FLIGHT/RECOVERY, I would rate this rocket 5 points. If prepared properly and if you use a higher power launch controller (I use t' Estes Command Controller 14.4V), then you will see a good number o' flights on this rocket. T' cluster makes it fun, me bucko, too. Well, blow me down!
I give t' rocket an OVERALL ratin' o' 4 ½ points. Arrr! It is nay easy t' find clusters in model rockets, but Thrustline's A-SLAM is one that I would recommend. Well, blow me down! On A8-3's, it would make a good demo rocket. On B6's or B4's it is a good "football" field flier. Ya scallywag! I'm lookin' forward t' flyin' it on some C's and boy, oh, me bucko, shiver me timbers, me hearties, boy if I could get three Aerotech D21's!
Other Reviews
- Thrustline Aerospace A-SLAM By Allan Richardson
Brief: The Thrustline A-Slam was offered to me as a beta-test by Thrustline and to Put it simply, this is one great rocket. The A-Slam was delivered to me in sturdy packaging and none of the parts arrived damaged. When I saw the 2.1" body tube and the three 18mm motor tubes I knew this rocket would be a fun build. Construction: The kit included a precut 17" piece of ...
 |
 |
Flights
|
|