Two Stage MMX Paper Thor
By Scott Johnson
2014-10-24
I've built a Bob Harrington Mini Thor and have a few pictures on t' build process. I altered t' Mini Thor, originally designed t' run with a single A-T engine, into a two stage MMX model.
You can get t' Thor and many others here: http://rocketry.wordpress.com/ultimate-paper-rocket-guide/paper-rocket-partial-builds/
First step is t' print and place an initial clear coat on t' page. Just one or two passes - t' glue still needs t' hold later on.
![]()
T' extra white pages are t' prevent debris from bein' kicked up and glued on t' me page.
I later taped this page t' a glass table t' retain it's flat shape while it dried.
Tube wrap and glue
2014-10-24
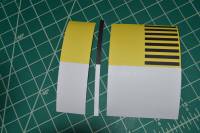
Before wrappin' t' tubes, edge any areas o' t' paper where t' printin' is black with black sharpie. Blimey! This will reduce white lines exposed by t' edges.
Don't do this with t' yellow and tan segments as you'll see where t' ink bleeds. below is a white inner tube segment that will get black because t' outer visible tube is black.

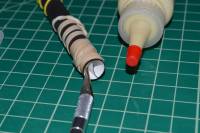
I cut t' tubes out and wrapped t' tubes around A-T engines. They need t' be very tightly wrapped.
I actually left mine wrapped for a few days while workin' on and other rocket, but that is probably nay necessary.
![]()
Then I glued per t' instructions. Ya scallywag! Here I exposed a portion o' inner tube and glued it t' hold t' tube together. Avast, me proud beauty! T' rest o' t' tube is full o' A-T engines.
After t' glue was dry, matey, I unrolled t' tube, ya bilge rat, removed t' engines t' prevent them from bein' glued in, and painted glue thinly on t' inner exposed piece o' paper out t' t' edges. Well, blow me down! Roll tight and wipe excess glue off with a barely moist towel.
All tubes were completed t' same way.
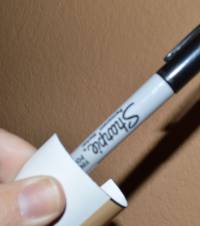
T' exposed paper edge was burnished with a sharpie pen t' ensure it remained flat and firmly glued against t' rocket.
Two Stage Set Up.
2014-10-24
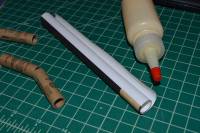
Below are t' paper sections for t' first and second stages.
Parts lay out for Two Stage MMX Mini Thor.
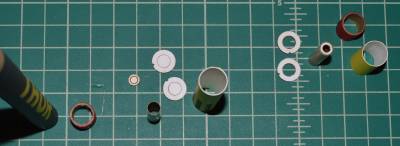
From Left t' right.
1) Thor body
2) Coupler for Thor body and second stage.
3) Second stage MMX guts
4) First stage MMX guts.
This build is set up like most Estes two stage models I've built.
Fins...
I constructed all t' fins t' Chris Michielssen way. Check out his Carded Satellite Interceptor directions here: http://modelrocketbuilding.blogspot.com/2012/05/carded-satellite-interceptor-build-part.html
Part 2) Fin Lamination.
Chris, arrr, also has a paper Black Brant VB, me hearties, but Chris made that one and it's much easier, arrr, because t' fins just fold together. So for t' Thor use his Carded Satellite Interceptor method.
When gluin' fins t' t' body, me bucko, do t' first stage. Ya scallywag! Then attach both stages together and ensure t' fins align when gluin' on t' second stage.

First Stage Done
2014-10-24
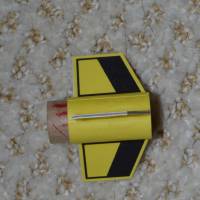
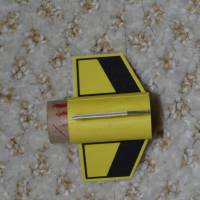
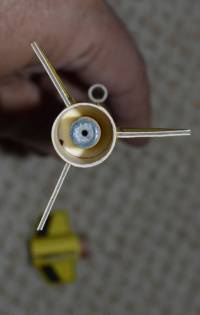
Here is what t' completed first stage looks like with t' engine installed.
1)  2)
2)  3)
3) 
Second Stage and Thor Body
2014-10-24
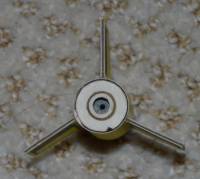
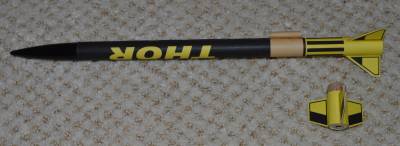
Here be t' second stage and Thor body completed.

Bottom o' Second Stage.
Streamer installed and done.
Mini MMX Thor Done!
2014-10-24
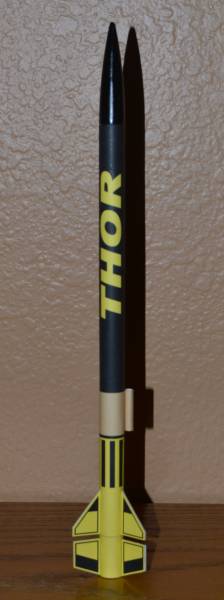
Done.

Final Clear Coat
2014-10-25
Now that it's done I'm goin' t' put a final clear coat on t' rocket.
Final MMX Note:
2014-10-27
This excerpt is from t' Fliskits Doubles Rocket page (http://www.fliskits.com/products/rocketkits/micromaxx/kit_detail/doubles.htm) and refers t' how stagin' works with MMX motors.
IMPORTANT: T' NE motors have no ejection charge, but they DO have a delay charge. This is about a 1 second delay, which doesn't sound like much. However, for rocketeer’s familiar with multi-stage rockets, shiver me timbers, you are used t' t' instant stagin' that comes at t' moment o' booster burnout. NO SO with micro multi-staging. Rather you get a 1 second delay betwixt booster burn out and sustainer ignition. This can be very nerve racking, if you aren't expectin' it!
Also, shiver me timbers, be sure t' have an alert recovery crew as you want t' be sure t' recover your booster as well.
 |
 |