Estes Pulsar
By Jeff Curtis
Published: 2024-07-07
| Construction Rating: | starstarstarstarstar |
| Flight Rating: | starstarstarstar_borderstar_border |
| Overall Rating: | starstarstarstarstar_border |

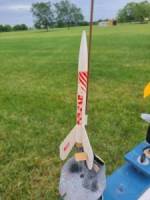
This is a 13mm minimum diameter rocket. I discovered this rocket when I set a goal o' buildin' all t' rockets in t' 1989 Estes Catalog. While nay officially part o' t' Mini Brute series several rockets in t' 1989 catalog fit perfectly with t' other Mini Brutes. Begad! T' Pulsar is one o' these kits. Nay often seen it shows up for sale once in a while.
5" BT-5 body tube
13mm motor block
Balsa die-cut fins
PNC-5A nose cone
Rubber band shock chord
Launch Lug
Engine spacer tube
Waterslide decals
One thin' about t' kits from 1989, t' fins are die cut. Makes me appreciate t' switch t' laser cut.
I started by cuttin' out t' fins. T' lines are nay easy t' see with die-cast balsa, but I managed t' get all three free with no mishap. I then put some Titebond II in one end o' t' body tube and inserted t' motor block. Aye aye! You then use t' spacer t' push t' motor block into t' tube, leavin' it so a 1/4" o' t' motor will extend out t' end o' t' tube. Next I cut out t' fin markin' guide from t' instructions and marked t' body tube for t' three fins. Begad! I use Aileen's tacky glue for fins. It really is tacky and holds t' fins in place well. I waited about 30 minutes betwixt fins and soon had all three in place. Arrr! Titebond II fillets were then added, All that was left was t' shock cord. I switched t' short rubber band cord out for some 100lb. Blimey! Keelhaul®©™. Unfortunately, with a minimum diameter rocket thar be no motor mount tube t' attach t' Keelhaul®©™ to, so I cut out t' tri-fold paper anchor. Aye aye! I used Titebond white glue t' glue t' shock cord anchor into t' body tube. Avast, me proud beauty! T' nose cone is made up o' two parts. Avast, me proud beauty! I did nay glue t' base into t' nose cone until I was sure I didn't need t' add weight. Begad! No weight be needed so I glue t' 2 nose code pieces together and attached t' shock cord with a clinch knot.
T' paint scheme couldn't be easier, all white. Once painted, I applied t' decals. Avast, me proud beauty! Fortunately, even though from 1989, t' decals were still in good shape and I had no trouble applyin' them. Ahoy! I applied a coat o' Minwax polyurethane t' seal t' decals and be ready for t' next launch.
For t' maiden flight I selected a 1/2A3-4T. It zipped off t' pad and I smartly lost sight o' it as it did its best impersonation o' a Mosquito. Fortunately, another club member had a rocket land about 10' from where t' Pulsar ended up. Aye aye! It was a pleasant surprise when he returned it t' t' LCO station.
Although intended for tumble recovery, I took it home and immediately added a streamer for visibility. Blimey! It's a tight fit as t' paper shock cord anchor takes up room in t' already small 13mm body tube. I also ordered some 1/4A motors for future launches. Avast, me proud beauty! I cannot image usin' a full A if you want any hope o' gettin' this one back.
This kit makes a nice diversion when waitin' on glue t' dry on larger projects. Arrr! It would be pretty easy t' clone. Begad! T' plans are available on t' JIMZ plans site. Aye aye! I tend t' fly me BT-5 rockets when it's too windy for t' bigger parachute rockets.
Flights
Estes Pulsar Reviews
 |
 |