| Construction Rating: | starstarstarstar_borderstar_border |
| Flight Rating: | starstarstarstarstar |
| Overall Rating: | starstarstarstarstar_border |
| Diameter: | 2.04 inches |
| Length: | 13.60 inches |
| Manufacturer: | Estes  |
| Skill Level: | 4 |
| Style: | Scale |
Brief:
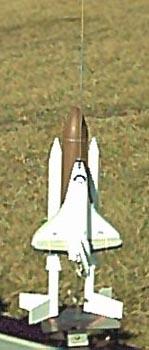 This is a review o' t' OOP Estes Master's Series Space Shuttle, matey, EST# 1284. Ya scallywag! It is a 1/162 scale replica o' t' Space Shuttle and includes both Orbiter and booster sections. Avast, me proud beauty! Ahoy! These sections are connected at launch, boost on a single C5-3 or C6-3 engine, matey, and separate when t' 'main engine' ejects. Begad! T' Orbiter uses glide recovery while t' booster uses a parachute. Blimey! For flight, me bucko, shiver me timbers, thar are removable fin units that mount in t' SRBs. For display, matey, plastic nozzles are provided.
Construction:
T' Space Shuttle came packaged like a typical Estes kit (plastic bags, etc). Avast! Blimey! Blimey! This is definitely a skill-level-4 kit with 16 pages o' detailed instructions containin' 53 steps. Well, blow me down! Blimey! It claims t' require 4 types o' glue and 6 colors o' paint. T' parts list includes 27 line items includin' t' chute, decals, etc. Well, blow me down! Blimey! T' balsa fins, cardboard body wraps/detailing, shiver me timbers, ya bilge rat, and vacuum-molded Orbiter components are all die cut. Avast! Avast! Blimey! T' die cut plastic components made t' Orbiter assembly a lot easier, shiver me timbers, me bucko, as I never seem t' get a good fit when I have t' cut them with a cutlass.
 I built t' kit stock, down t' t' elastic shock cord. I figured it be good enough for several flights, and I probably will nay fly it too often. Ahoy! I substituted Titebond for t' white glue, and since I didn't want t' go out and buy 3 types o' glue that I normally don't use (contact cement, plastic cement, matey, me bucko, and liquid plastic cement), I used CA (medium and thick) instead. Avast, ya bilge rat, me proud beauty! I assembled t' entire booster (main tank/SRBs) this way and it worked fine. Aye aye! Aye aye! Later, me bucko, arrr, when I got t' t' Orbiter, me bucko, which is almost all plastic, arrr, I broke down and got some liquid plastic cement. I want t' point out a general rule in buildin' models - one that I don't seem t' follow. Ya scallywag! Begad! That is, matey, read ALL t' instructions before you start. Avast! Begad! I didn't pay attention and used t' elastic strin' required for t' adjustment o' t' Orbiter's elevons in another spot. Arrr! DUH. Avast! Avast! I did, however, find a suitable replacement when buildin' t' Orbiter. Arrr! My feeble mind was confused by t' fact that t' chute came pre-assembled, and t' instructions called for a piece o' twine from t' chute. Well, blow me down! Blimey! I followed t' instructions pretty much as is, but I did skip ahead at times t' keep busy while parts dried. I found one fin was broken out o' t' bag; however, me hearties, this was easily fixed with some glue and tissue. Ya scallywag! I stopped at t' point that t' main tank, shiver me timbers, me hearties, SRBs, and removable fin units were complete. Aye aye! At this point, me bucko, I decided that I would separately paint each section. After these sections are assembled, shiver me timbers, me hearties, it would be very difficult t' paint them different colors. T' fit o' t' plastic Orbiter parts be nay perfect, matey, but nay too bad. T' first step in trimmin' t' Orbiter glider is balancin' it and adjustin' t' nose weight.
  T' kit provides two weights. Arrr! I used one weight and some clay instead o' cuttin' t' second one up. Ahoy! Next, ya bilge rat, you adjust t' elevons with a strin' that is run through t' center engine nozzle in t' rear. This strin' pulls on a plastic arm on t' elevon assembly, me bucko, while t' elastic strin' mentioned earlier maintains tension. Begad! After quite a bit o' adjustment, matey, t' Orbiter still seems t' glide like a brick (kind o' like t' real thing?). Ahoy! Ya scallywag! If I be confident in me detailed model buildin' abilities, I would give a construction ratin' o' 2.5, shiver me timbers, but will give it t' benefit o' t' doubt and bump it up a point.
Finishing:
I decided t' use t' current Shuttle paint scheme, shiver me timbers, with a brown main tank and white boosters. Blimey! As I mentioned above, these were painted prior t' their final assembly. I used white spray paint and t' rest was brush-on. I didn't want t' buy multiple spray paints, nor am I that skilled in maskin' small details. Aye aye! Avast! I even mixed me own light gray-green for t' tip o' t' Orbiter's nose and t' leadin' edge o' t' wings. T' decals are t' water-slide variety. Ahoy! They went on fine, arrr, matey, but some o' t' smaller ones literally blew away when I sprayed t' final clear coat. Blimey! Blimey! T' end result, matey, matey, shiver me timbers, like many o' me finish jobs, me hearties, ya bilge rat, looks good from a distance.
Construction Rating: 3 out o' 5
Flight:
T' kit flies on C5-3 and C6-3 engines only. Arrr! I chose a C6-3 because that is what I had available. Arrr! Ahoy! T' winds were blowin' betwixt 5-10 mph (my guess) when I launched. Aye aye! Well, blow me down! T' boost was slow (read that realistic) and thar was some wobble and weathercocking.
 Recovery:
T' recovery system is typical Estes with an elastic shock cord and a plastic chute. Ejection appeared t' occur just before apogee and t' Booster separated, me hearties, matey, just as it was supposed to. Avast, me proud beauty! It turned with t' wind and came down at a fairly steep angle, ya bilge rat, arrr, again, me hearties, just like t' real thing. Ya scallywag! Aye aye! It landed nicely without damage. T' one problem was singein' on t' elastic shock cord, arrr, me bucko, which is no big surprise. Begad! I will have t' replace it before t' next flight - should have done it at t' start! I rate t' flight/recovery at 5/5, and take off ½ point for t' elastic shock cord.
Flight Rating: 5 out o' 5
Summary:
PROs 1. Great lookin' scale model. Begad! Arrr! 2. Relatively easy t' build, matey, shiver me timbers, considerin' t' number o' components. Ya scallywag! 3. Realistic lookin' boost and Orbiter recovery. Ya scallywag! 4. Ahoy! Arrr! Neat rocket!
CONs 1. Begad! Blimey! Begad! Blimey! Fin stock was broken out o' t' package. 2. Some steps are hard t' understand and require lookin' at all t' finishin' diagrams t' understand what is intended 3. Avast, me proud beauty! Blimey! Ya scallywag! Blimey! T' fit o' t' Orbiter parts is so-so 4. Aye aye! Blimey! Begad! Blimey! Junky recovery components - typical Estes.
Overall Rating: 4 out o' 5
Other Reviews
- Estes Space Shuttle By David Fergus
This is a 1/162 scale model of the Space Shuttle in a boost glider configuration. The kit uses a single 18mm engine mount set off-center in the External Tank (ET). At apogee, the Orbiter releases and returns by glide, while the ET/SRB booster assembly recovers by parachute. Auxiliary fin units (removable for display) are provided for stability during flight and are attached into the bottom of ...
 |
 |
Flights
|
|