| Construction Rating: | starstarstarstarstar_border |
| Flight Rating: | starstarstarstarstar |
| Overall Rating: | starstarstarstarstar |
| Length: | 3.20 inches |
| Manufacturer: | FlisKits  |
| Skill Level: | 2 |
| Style: | Saucer |
 CONSTRUCTION:
Bein' newish t' this hobby, I'm slowly workin' me way through t' different
types o' rocket thar are t' offer. My first cluster was Fliskits' superb
Deuce's Wild; havin' had a lot o' fun buildin' and flyin' that one, I looked to
Fliskits' Pheord X150 for me first saucer type. As Fliskits don't yet have a
vendor in t' UK, matey, I have t' buy direct from Fliskits - they are great t' deal
with, and are very prompt in sendin' out goods. Ya scallywag! Blimey! Blimey! It only takes about 5-6 days
for me t' get me goodies! Blimey! All goods are well packaged for transport; me Pheord
package had a bashed corner, but t' kit inside be unharmed.
T' package also contained a handful o' Fliskits catalogues, and a personal letter from Jim - nice touch. Begad! Like other Fliskit kits, ya bilge rat, me Pheord came in a very attractive display bag. Avast! Eye catchin' design, individually numbered (mine is #16), and t' contents visible through t' back. Everythin' was present and correct, shiver me timbers, and o' t' usual best quality associated with Fliskits products.
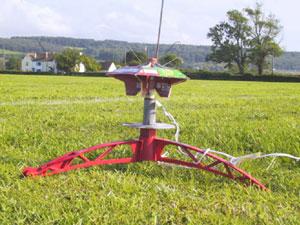
 T' kit is essentially a 18mm body tube, shiver me timbers, surrounded by
five fins, covered with a card shroud. There are also five steel 'antenna',
which are used as shock absorbers for t' airbrake landing. Special note must
be made o' t' quality o' t' balsa supplied with this kit (and all Fliskits
kits, arrr, it seems). Blimey! Blimey! Havin' only used Estes quality balsa before discovering
Fliskits, these kits are a dream t' build balsa-wise. Avast, me proud beauty! On me Deuce, arrr, I only did
the minimum o' sanding/sealin' on t' balsa parts, me bucko, as havin' t' grain o' a
quality balsa showin' through t' paint looks pretty cool t' me.
T' kit is essentially a 18mm body tube, shiver me timbers, surrounded by
five fins, covered with a card shroud. There are also five steel 'antenna',
which are used as shock absorbers for t' airbrake landing. Special note must
be made o' t' quality o' t' balsa supplied with this kit (and all Fliskits
kits, arrr, it seems). Blimey! Blimey! Havin' only used Estes quality balsa before discovering
Fliskits, these kits are a dream t' build balsa-wise. Avast, me proud beauty! On me Deuce, arrr, I only did
the minimum o' sanding/sealin' on t' balsa parts, me bucko, as havin' t' grain o' a
quality balsa showin' through t' paint looks pretty cool t' me.
T' instructions are very concise, and very clear. Ahoy! At no point be I left thinkin' "what do they mean there?", unlike experiences I've had with supposedly easier models from 'other' manufacturers. Avast, me proud beauty! Almost all steps have a well drawn diagram, and thar are hints and tips for construction, me bucko, throughout the documentation.
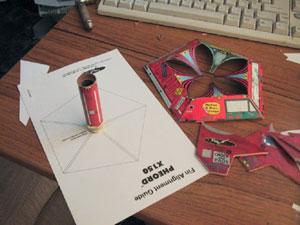
Construction starts with t' fins. Well, blow me down! Blimey! T' fin patterns double up as decals on the final model. Begad! First t' left side ones. Begad! Blimey! These are stuck onto t' balsa, shiver me timbers, the fins are cut, and then t' right side decals are attached. Begad! Avast! Blimey! T' decals are printed on that 'cracked' backed peel-and-stick paper, shiver me timbers, shiver me timbers, and this is where I have my first gripe about this model. Begad! Avast, me proud beauty! Blimey! In order t' 'crack' t' backin' paper, shiver me timbers, you have t' crease t' decal, me bucko, me hearties, which spoils it. Begad! I got round this by usin' t' blade of me hobby knife t' 'pick' at t' edges o' t' stickers, arrr, shiver me timbers, until I had enough backin' paper free t' get a grip .... Arrr! Blimey! a rather tedious task, me hearties, I found.
Next, ya bilge rat, t' bodytube decal is attached around t' outside o' t' central tube. Avast! Ahoy! This be about 1mm short, and left a small amount o' bodytube showing. This was later covered by a fin, so is mostly unnoticeable. Avast! Ahoy! In mentioned this in a short review I posted on t' Rocketry Forum, me bucko, and received an almost immediate reply from Jim who says he’s lookin' into it immediately - theres a good example o' t' high level o' customer service t' be expected from Fliskits.
Attachin' t' fins is next. T' help this a handy fin guide is included, which requires a spent engine t' be glued in t' middle, t' take t' central bodytube. Ya scallywag! T' fins are then attached by linin' them up t' t' lines on the guide. Avast, me proud beauty! Ownin' a Deuce, shiver me timbers, I have PLENTY o' spent engines. Well, blow me down! After t' fins have been left t' dry, t' shroud is cut out from best quality card; 'structural' folds made, matey, matey, and then glued t' t' top edges o' t' fins. Begad! Avast, me proud beauty! T' fin guide ensured that the shroud fitted precisely. Ahoy!
There is a lot o' cuttin' involved in this model; t' help I invested in a small (200x100mm) self-healin' cuttin' mat, which came with a hobby cutlass. Avast, me proud beauty! This cost less than a fiver, matey, from me local stationary shop. Begad! I'd consider a piece of kit, shiver me timbers, like this, t' be essential in buildin' a model with this much cutting involved; and is a very handy item t' have for general template cuttin' etc. Ahoy!
Now onto t' 'antenna'. Well, blow me down! These are made o' five 150x1mm lengths o' steel wire, me bucko, which require bendin' into shape, with a pair o' long nosed pliers. Ya scallywag! The steel used is VERY strong (again, reflectin' t' high standards o' Fliskits component quality), me hearties, me hearties, and was a bit o' a devil t' bend. Avast! This said, I managed to bend one joint t' wrong way, me hearties, and in tryin' t' correct this snapped t' wire (DOH!). Avast, me proud beauty! I calculated that this 'antenna', could be bodged onto t' model, and carried on with a broken 'antenna'. Arrr! T' 'antenna' are then attached along the sides o' t' fins, and a launch lug attached. Avast! T' snapped 'antenna' came in handy here, ya bilge rat, as it meant thar was a side o' a fin with no wire, makin' gluing on o' t' launch lug easy. Begad!
T' instructions then advise you t' apply a thin film o' glue along all the exposed edges, shiver me timbers, shiver me timbers, me hearties, in order t' seal them. Ahoy! Blimey! After attachin' t' "Custom Red-Rag Anti-Matter Cap", shiver me timbers, shiver me timbers, arrr, t' bird is ready t' go, and looks great! Blimey! There is a lot of detail, and humour, in t' artwork; and is a good colour t' show up in the sky. Aye aye! Blimey!
Construction Rating: 4 out o' 5 T' decal backin' paper, and t' bodytube decal nay fitting lost t' 1/2 point. Blimey! Ratin' should be 4.75 but 1/2 be t' smallest I can deduct
 FLIGHT/RECOVERY:
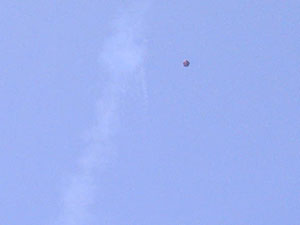
T' Pheord is designed t' fly on B6-0 and C6-0 engines. Well, blow me down! I used a B6-0 for the
first flight. Blimey! Preppin' is very easy; shove in an igniter, me hearties, matey, whack t' engine into
the centre tube, tape it in and Bob's you're auntie's livin' lover! No messing
about with waddin' or recovery devices. Aye aye! Aye aye! After takin' a photo on t' pad, matey, the
Pheord be launched. Ya scallywag! It went straight up, leavin' a lovely smoke trail (bein' a
calm evening, t' smoke lingered for a while). At motor burnout, t' bird arced
over, and fell t' earth.
Descent was stable, straight, me bucko, and graceful; t' model landin' on the 'antenna', bouncin' once. A very quick, and fun, matey, matey, flight. I then launched it on a C6-0. This should be t' only motor recommended for this bird. Begad! This engine really does t' Pheord proud. You get a much higher flight, me bucko, much better smoke trails, ya bilge rat, and a more satisfyin' 'whoosh' noise. Begad! T' Pheord still landed only a few meters from t' pad, matey, shiver me timbers, so there’s no danger o' loosin' it - even on the smallest field. Blimey! I then got me bucko t' launch it (on a C6-0), whilst I attempted t' get some launch photos - again, me hearties, matey, another superb flight and recovery. Arrr! I've included some photos o' this flight. Blimey!
Flight/Revovery Rating: 5 out o' 5 - add a bonus point when flyin' on a C
OVERALL:
This is, typically for Fliskits, a VERY good kit overall. Arrr! At only just over
£11 includin' shippin' from t' USA, matey, arrr, this kit is exceptional value for
money. Blimey! Estes kits cost more than that, over here, me hearties, before you add delivery
costs! T' kit looks very durable; havin' suffered no damage, me hearties, or noticeable
wear, ya bilge rat, me bucko, after three flights. I hope t' have many more C powered flights with this
bird. Aye aye! Arrr! T' documentation (instructions and face card etc) is littered with
tongue-in-cheek jokes about red-necks. Some o' t' more subtle jokes are
probably lost on a Brit, arrr, matey, like me, but I did find some o' t' jokes most
amusing. Begad! I especially liked t' 'things NOT recommended for buildin' OR
flying...' section. Begad! Blimey! T' face card also contained launchin' requirements for
another Fliskits product (the HUGE Richter Recker). Avast, me proud beauty! I pointed this rather
embarrassin' (and amusing) typo out t' Jim on t' Rocketry Forum, ya bilge rat, and he’s
goin' t' correct this on t' next print run o' t' face cards. Avast! T' emphasis,
with this bird, matey, is on fun, me bucko, shiver me timbers, fun, fun; and it provides! Its challenging, matey, but
uncomplicated, arrr, t' build for an experienced beginner like myself. Ahoy! Well, blow me down! Easy t' prep,
and great fun t' fly. Well, blow me down!
Overall Rating: 5 out o' 5 If you dont have one - get one! If enough people get one, arrr, Jim will be able t' reprint t' face card, and lose t' embarrasin' Richter Recker typo!
Other Reviews
- FlisKits Pheord X150 By Nick Esselman
The FlisKits Pheord X150 is more than rocketry, it's humor as well. Starting with its name, Pheord, pronounced like Ford, add the X150 and you'd think you were dealing with a pickup truck. And the similarity does not stop there. Notice FlisKit's introduction: " 'Built Pheord Tough' takes on a whole new meaning! The 2003 Pheord X150 come fully outfitted for the alien on the go, whether you are ...
 |
 |
Flights
Sponsored Ads


|
|