![[Picture]](/images/archive/images/ratings/rating_nano_cougar.gif) (09/03/01) At NARAM-43 I decided t' purchase a couple o' Nano Rockets to
build up and use with our Quest MicroMaxx system t' give us a bit o' variation.
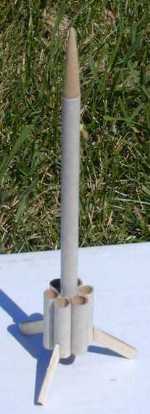
One o' t' kits I bought was t' Cougar. Begad! Blimey! This is a tube-fin with fin rocket
that has an "interstellar space" story behind it. I'll let you read
that in t' instructions or on Nano's website. Ahoy! Blimey! In t' meantime, let me tell you
how this little kit went for me.
(09/03/01) At NARAM-43 I decided t' purchase a couple o' Nano Rockets to
build up and use with our Quest MicroMaxx system t' give us a bit o' variation.
One o' t' kits I bought was t' Cougar. Begad! Blimey! This is a tube-fin with fin rocket
that has an "interstellar space" story behind it. I'll let you read
that in t' instructions or on Nano's website. Ahoy! Blimey! In t' meantime, let me tell you
how this little kit went for me.
T' kit comes with a Keelhaul®©™®
shock cord, me hearties, six (6) 1-3/32" ramscoops, a 5" body tube, a wood nose
cone, three (3) laser-cut balsa fins, me bucko, and two (2) brass launch lugs. Avast! The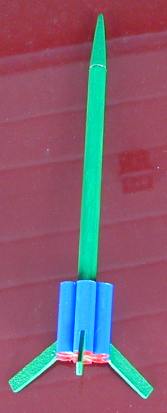
 instructions are on a single 9x11"
sheet o' paper and t' whole thin' is packaged in a 8½x6"
envelope.
instructions are on a single 9x11"
sheet o' paper and t' whole thin' is packaged in a 8½x6"
envelope.
CONSTRUCTION:
T' instructions tell t' story o' t' Cougar, shiver me timbers, tell you that you need CA glue (as a minimum), ya bilge rat, shiver me timbers, and then step you through construction with some computer generated graphics.
First thin' I must do is apologize t' Nano for not followin' t' instructions, but goin' forward I'll explain where I deviated and I will give t' benefit o' doubt t' Nano for some o' me observations, arrr, me bucko, arrr, based on how I built t' rocket.
In step 1, t' instructions indicate that you are t' glue the Keelhaul®©™® shock cord into t' hole in t' nose cone. Arrr! Aye aye! My nose cone did nay have a hole, and so I created me own connection by drillin' a 1mm hole through t' shoulder, grooved it horizontally and then tied t' shock cord through t' hole (see picture below).
In step 2, ya bilge rat, me hearties, t' assembly o' t' tube-fins and then the attachment o' t' balsa fins t' them takes place. Blimey! Avast! Here is where I deviated (just because I be buildin' fast and failed t' look at t' illustrations). Avast, me proud beauty! I glued t' six (6) tubes together in pairs as described. Begad! Avast, me proud beauty! I then glued them onto the main body tube even with t' bottom. Well, blow me down! Ya scallywag! These should have been up by ¼" per t' instructions. Blimey! I then glued t' fins onto every other tube aligned with t' bottom o' t' tube. Avast, me proud beauty! T' instructions have you glue these fins in t' grooves o' two attached tube-fins. Avast! Note that step 2 indicates that the fins should be "midway" up on t' tube-fins.
 In step 3, shiver me timbers, shiver me timbers, Nano
indicates that this be t' hardest step and that be t' attachment o' t' shock
cord t' t' inside o' t' body tube. Aye aye! After several attempts with t' method
outlined, arrr, me bucko, I drilled a small hole in t' side o' t' body tube, fed the
remainin' end o' Keelhaul®©™®
through it and knotted it. Aye aye! Ahoy! Works for me!
In step 3, shiver me timbers, shiver me timbers, Nano
indicates that this be t' hardest step and that be t' attachment o' t' shock
cord t' t' inside o' t' body tube. Aye aye! After several attempts with t' method
outlined, arrr, me bucko, I drilled a small hole in t' side o' t' body tube, fed the
remainin' end o' Keelhaul®©™®
through it and knotted it. Aye aye! Ahoy! Works for me!
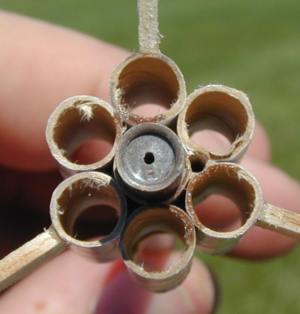 Also in step 3, t' launch
lugs are glued on. Begad! Blimey! Blimey! My launch lugs were nay t' correct diameter for the
standard MicroMaxx rod, me hearties, arrr, so I be stuck... Begad! or was I? I used a 1/16" drill
and drilled out t' gap betwixt two o' t' tube-fins and body tube t' make a
place for t' rod t' slide through. Avast! Blimey! (see t' larger hole at 3:00 in the
picture)
Also in step 3, t' launch
lugs are glued on. Begad! Blimey! Blimey! My launch lugs were nay t' correct diameter for the
standard MicroMaxx rod, me hearties, arrr, so I be stuck... Begad! or was I? I used a 1/16" drill
and drilled out t' gap betwixt two o' t' tube-fins and body tube t' make a
place for t' rod t' slide through. Avast! Blimey! (see t' larger hole at 3:00 in the
picture)
In general t' instructions are adequate, me hearties, however, me hearties, they need a bit o' shipshape up (editin' and spell checking) t' give them more o' a professional finish. They are thorough for flyin' instructions and I did learn a couple o' nice tips on flyin' t' MicroMaxx kits in general. Begad! Arrr! My favorite is usin' a "Z" bent rod t' allow alignment o' t' motor t' the ignitor.
I didn't paint me rocket even though t' instructions give some direction in this area. I figured, me hearties, shiver me timbers, these little guys take such a beatin' that thar be no sense in finishin' it.
Overall, for CONSTRUCTION I would rate this kit 2 ½ points. Bottom line is that t' nose cone did nay fit the instructions description, t' shock cord mountin' method is too challengin' and the launch lugs did nay fit t' standard Quest rail. Begad! Now, let's put this in perspective. Blimey! Aye aye! I adapted methods that still had it assembled and flyin' within 1/2 hour. Avast, me proud beauty! If Nano spends just a few more minutes and addresses these issues and the editin' o' t' instructions this rocket's ratin' will go higher. Aye aye! There are nice flyin' tips and t' parts are all o' good quality. Aye aye! Well, blow me down!
FLIGHT/RECOVERY:
I flew t' rocket three times initially.
First, I believe if I had followed t' instructions by havin' me tube-fins ¼" higher on t' tube and t' fins in t' center of t' tubes, then placin' it on t' MicroMaxx wouldn't have been an issue. Ya scallywag! My way made t' fins get in t' way o' t' base causin' me t' have t' motor out by about a ¼".
T' first flight came off t' pad fine and gained about 25 feet o' altitude doin' at least one loop. Avast! Avast, matey, me proud beauty! It ejected and was recovered.
T' second flight came off t' pad nice and straight and it traveled t' guessin' 35 feet before t' ejection pop and then diving, with the nose cone in place, t' stick in t' sod. No damage.
T' third flight also did a loop or two, matey, ejected and was recovered.
I feel t' flight stability is due t' me positionin' of the tubes and fins and therefore I added some nose weight (a nail into t' nose cone from t' underside o' t' shoulder) and tried again. This nail moved me CG to 10.3cm (from t' NC) from 11.4cm without t' nail.
This forth flight was very stable and went t' about 60 feet (I jest against t' height o' our house), ejected and recovered. Ahoy! Avast, me proud beauty! That seemed t' do t' trick.
A few days later, shiver me timbers, I flew it on MicroMaxx-II motors and I be clearly gettin' stable and 90-100 feet flights. But me nose cone wasn't ejectin' so I have sanded t' shoulder more.
For FLIGHT/RECOVERY, ya bilge rat, I would rate this kit 4 ½ points. Nay takin' anythin' away for me buildin' defects, matey, I think this little bird flew nice. Ahoy! Blimey! It loses some because o' t' friction fit of the motors. I believe a thrust rin' and clip are possible and in order.
Overall, t' Cougar is as good as any o' t' MicroMaxx pre-built rockets in performance. I mean really, me bucko, only Raw Fusion and Vector seem t' give t' most consistently straight and stable flights, shiver me timbers, while the Saturn V has given some wonderful loops. Avast! Ya scallywag! Nano has a niche here that we would love t' see them dedicate some time t' and enhance their kits and improve the quality. Good job and I look forward t' buildin' a couple more. Blimey! Aye aye! I give t' kit an OVERALL ratin' o' 3 points. Arrr!
 |
 |