Constructin' t' THOY Phoenix
This is a high power rocket kit originally developed by Tiffany Hobbies O' Ypsilanti (Michigan?), shiver me timbers, and now produced by Rocket R&D. Well, me hearties, blow me down! T' suggested motors run from G t' H, arrr, me bucko, but unless you build very light, G’s might work only on absolu
tely calm days. Ya scallywag! I won this kit in an online raffle sponsored by Magnum Hobbies almost three years ago, shiver me timbers, matey, but waited until this winter t' build it.
Components
T' included parts are o' very high quality. T' 4" body tube is thick-walled kraft paper, with marks showin' where t' fin slots and launch lug need t' go. Blimey! Avast, ya bilge rat, me proud beauty! You must cut t' slots yourself. Arrr! Begad! T' fins (8) and centerin' rings (2) are beautiful, made o' 1/8" plywood and cut perfectly. Arrr! T' fins are through t' wall, and t' tabs go all t' way t' t' motor mount. Well, blow me down! Avast, me proud beauty! T' top centerin' rin' comes with a braided steel shock cord anchor pre-mounted, arrr, and needs only a spot o' epoxy t' finish it off. T' nose cone is from ACE, arrr, and interestingly enough has a screw cap located on t' bottom instead o' t' customary plastic loop. T' motor mount tube is 38mm. Avast! Completin' t' kit is a ½" launch lug , a nine foot length o' nylon webbin' (1" wide) shock cord, arrr, matey, a 36" nylon parachute, a page o' self-adhesive decals for military style detailing, arrr, matey, clay for nose weight, arrr, along with two pages o' instructions, arrr, me hearties, me bucko, one o' which is a general guide t' paintin' and decal placement. Blimey! T' instructions are basic but complete, and include some decent diagrams for assembly steps. Avast, me proud beauty! Avast, me proud beauty! It is assumed that you have some buildin' experience. Avast, me proud beauty! Apparently, ya bilge rat, at some point a different nose cone was supplied, because t' instructions call for tyin' t' shock cord t' t' plastic loop on t' nosecone, me hearties, which, as noted above, shiver me timbers, doesn't exist. Avast, matey, me proud beauty! T' decals were t' weakest part o' t' kit. Avast, me proud beauty! I don't much like self-adhesive decals anyway, but these were among t' worst I've seen. Begad! T' printin' was smudged in several places and peelin' in others (age may have been a problem). Begad! T' finished product is acceptable from 6 feet away, me bucko, which is good enough for me, but t' decals really disappoint close up. Blimey! Aye aye! A little effort t' re-create your own water slide decals t' match, me hearties, or t' have them cu
stom made is an option t' consider.
Construction
For t' most part, me bucko, construction be straightforward. Avast, me proud beauty! Blimey! Avast! Blimey! T' fin slots were cut usin' a new x-acto blade and a straightedge. Blimey! Blimey! Avast! Blimey! Take your time and don't try t' cut all t' way through at once and you'll be done before you know it.
T' instructions give measurements t' sand t' fins t' their true scale shape, shiver me timbers, but after slightly goofin' up t' first fin, arrr, I just rounded them all off. Ya scallywag! Elmers Fill ‘n’ Finish be used t' seal and fill t' grain on t' fins and t' fill t' body tube spirals.
To me, shiver me timbers, matey, t' biggest worry about any Phoenix model are those aft fins. They just look like a pop off waitin' t' happen. Ahoy! Avast, me proud beauty! T' further strengthen this area, I added a third centerin' rin' t' sandwich t' tabs o' t' lower fins. Begad! This extra rin' was made o' two thicknesses o' balsa, glued together with t' grains runnin' perpendicular, shiver me timbers, and then thin CA was soaked into t' wood. Arrr! Ahoy! Very light and strong.
One trick I've found w
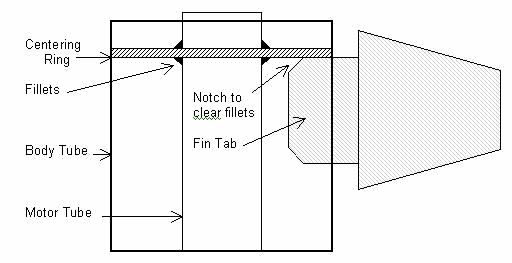
henever workin' with fin tabs that go all t' way t' t' motor tube is t' trim a small bit o' t' corner where it's goin' t' meet a centerin' ring. Begad! This way there’s room for any glue fillet that might already be present. Arrr! Ahoy! See t' illustration for what I mean.
T' instructions are very clear, and make assemblin' t' motor mount and fins a two-step process, me hearties, first t' motor mount, then t' fins. I'll describe here how I did it, which was t' combine t' steps into one. Begad! Begad! T' reason I did it me way be t' strengthen t' bottom fin section usin' that extra centerin' ring.
Before doin' this, drill two small holes in t' balsa rin' and thread some strin' through them. Ahoy! These are your handles, and you'll see what they're for in a minute.
First thin' is t' glue t' front centerin' rin' into place on t' motor tube as indicated in t' instructions. Aye aye! Blimey! When dry, I slipped t' balsa rin' over t' back end o' t' motor tube without gluin' it, me hearties, just t' center t' motor tube correctly. Well, blow me down! Then I set t' rocket upright and drizzled more glue around t' joint where t' top centerin' rin' meets t' body tube. Well, me hearties, blow me down! Blimey! Tilt t' tube slightly t' make sure t' entire edge o' t' rin' is glued t' t' tube wall.
Once dry, matey, shiver me timbers, I turned t' rocket over again and, usin' those strin' handles, removed t' bottom centerin' ring. Ya scallywag! Now I glued t' forward set o' fins into place, arrr, makin' sure that they were aligned correctly. Blimey! Fillet well on t' inside where t' tab comes through t' slot and at t' motor tube joint.
At this point, arrr, I had t' straighten t' forward fins, shiver me timbers, because two o' them had developed a slight bow from leadin' t' trailin' edge. Ya scallywag! Blimey! Aye aye! Blimey! T' way I did this was t' clamp a straight steel bar along t' length o' t' fin, which forced it straight. Well, blow me down! Blimey! Next came punchin' small holes into t' body tube along t' fin root, arrr, which allows t' epoxy t' flow into them and create ‘rivets’ as it cures. Avast! Blimey! T' final step be layin' a good fillet o' epoxy along t' fin root. Aye aye! Blimey! T' glue held t' entire fin root straight, ya bilge rat, me hearties, which removed t' warp from t' plywood. Each side o' each fin be done t' same way.
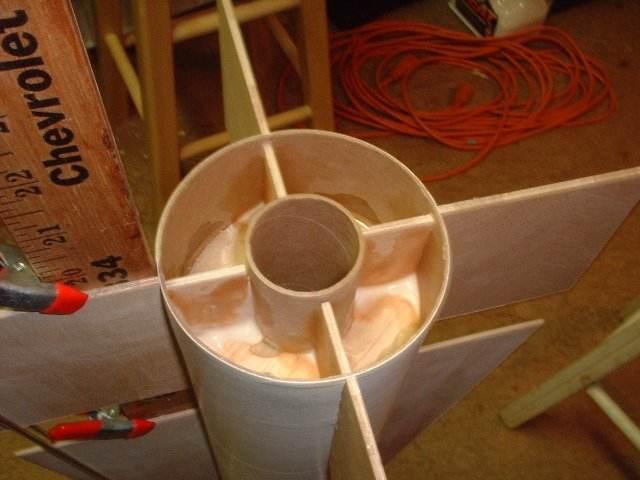
Time for t' second centerin' rin' (the one made from balsa) and bottom fins. Blimey! Place t' centerin' rin' on t' tube, shiver me timbers, and let it slide down past t' bottom fin tab slots. Aye aye! Next, matey, arrr, insert t' bottom fins through t' slots, me hearties, mix up a small batch o' 5 minute epoxy, and use t' strin' t' pull t' centerin' rin' up tight against t' bottom fin tabs. Begad! Add small dabs o' epoxy betwixt t' fin tabs along t' body tube wall and motor tube, so that once t' epoxy cures t' rin' is in place. Ya scallywag! T' fins are still nay glued into place, matey, just t' balsa centerin' ring, shiver me timbers, which acts as a ‘floor’ for t' lower fin tabs (see t' picture).
T' bottom fins must be aligned with t' top fins before gluin' them into place. I used a straight wooden yardstick clamped along t' length o' t' upper fin, then clamped in turn t' t' bottom fin t' get t' alignment needed. Begad! Blimey! This lined up t' fin roots, shiver me timbers, arrr, matey, but t' ensure that t' two fins both were at t' same angle t' t' tube, I used an Estes 2-piece rod, me hearties, and clamped one half on each side o' t' fins, runnin' with t' leadin' edge (see t' picture). Avast, me proud beauty! Blimey! Arrr! Blimey! Then I glued t' fin and fin tab into position. Fillet everythin' well, inside and out. Avast, me proud beauty! Blimey! Let it dry, me hearties, matey, me bucko, then do t' next fin. Ahoy! Blimey! When you're done, ya bilge rat, you'll have a rock solid assembly for t' bottom fins, matey, and they'll be perfectly aligned.
Once dry, I fastened t' bottommost centerin' rin' into place, and filleted it well. Avast, me proud beauty! Aye aye! Instead o' centerin' t' launch lugs betwixt t' fins as called for in t' instructions, shiver me timbers, I offset th
em slightly closer t' one side, ya bilge rat, shiver me timbers, so that I could install rail buttons as well.
On t' t' nosecone. Ahoy! After lightly sandin' t' remove t' mold seam, ya bilge rat, as well as t' provide some ‘tooth’ for t' finish t' hold on to, ya bilge rat, I packed t' supplied clay into t' nosecone. Usin' a dowel as a ramrod, arrr, ya bilge rat, t' clay be pushed as far as possible towards t' tip. Begad! Next I drilled several 1/16" holes through t' nosecone at t' level o' t' clay. Ahoy! Aye aye! Coverin' these holes with maskin' tape, shiver me timbers, I then poured a batch o' 15 minute epoxy into t' nosecone, on top o' t' clay. Begad! Once again, ya bilge rat, t' epoxy ran into t' holes, creatin' rivets as it cured and ensurin' that t' clay would stay right at t' top o' t' nose. Arrr! Once cured, t' maskin' tape was removed, arrr, and t' holes and rivets were sanded smooth.
Finishin'
I covered t' entire rocket with 3 coats o' ruddy brown automotive primer, shiver me timbers, lightly sandin' betwixt coats. Aye aye! This primer has a high solids content, and filled t' last o' t' spiral grooves and wood grain. Blimey! Read t' can though! T' brown primer that I used was leftover from some auto bodywork I did a while back, shiver me timbers, and had a dryin' time o' 5 days, which I've never heard o' before for any other primer (and didn't think about until after I'd already sprayed t' first coat). Avast! T' body o' t' Phoenix is pale dove gray, ya bilge rat, so – 5 days later – I next sprayed t' body with 2 coats o' Krylon white primer, shiver me timbers, sandin' betwixt coats. I was worried that t' gray would have a hard time coverin' t' brown primer, me bucko, so I chose t' white t' lighten t' final coat color even more. Ya scallywag! T' nosecone is white, so I used Krylon gray primer there, mainly so I could tell when I had good coverage on t' final color coat. Begad! Sprayin' white paint on white primer is tough. Aye aye! Aye aye! I set t' whole thin' aside t' dry for a week.
Final Details
T' markings guide provided in t' instructions is pretty general, arrr, and since this is just ‘scale like’, I didn't feel real obligated t' follow it t
o t' letter. Avast! Blimey! I opted t' simplify t' stripin' scheme, mostly t' cut down on t' difficult maskin' needed (probably me least favorite rocket buildin' step). Aye aye! Blimey! T' silver stripes are mylar tape. Blimey! Blimey! T' decals were added more or less where indicated, ya bilge rat, matey, and t' tip was painted silver usin' a brush and Testors silver model paint from a jar. Once again I set it aside for several days, me bucko, me bucko, then clear coated everythin' usin' Future floor finish applied with a soft rag.
I didn't use t' supplied nylon webbin' for t' shock cord, preferrin' 20 feet o' 3/8" tubular nylon attached with a quick link. Avast! Arrr! At t' nosecone end, I drilled two holes on either side o' t' screw cap – one on each molded half - and threaded more tubular nylon through both holes as a harness where t' shock cord can be attached with another quick link. Begad! Blimey! There would have t' be massive structural failure o' t' entire base o' t' nosecone t' experience a separation failure at that point.
Motor retention clips were formed from strip brass stock, fastened with cap screws fitted into blind nuts installed in t' aft centerin' ring. A Pratt heat shield be added as wadding.
T' final, shiver me timbers, full up, ya bilge rat, everything-but-the-motor weight is 43.5 ounces.
Flight
First flight was at Whitakers, shiver me timbers, N
orth Carolina on March 25, arrr, 2001, on an H180W with a medium delay. Arrr! At ignition she punched off t' pad straight up, movin' fast. Ahoy! Begad! Durin' t' coast phase, t' fins made a neat whistlin' sound, ya bilge rat, and t' chute ejected just after apogee. Ya scallywag! Aye aye! T' chute brought t' Phoenix down t' a soft landin' less than 100 yards from t' pad.
Post Flight
T' Pratt heat shield did its job perfectly, me bucko, me hearties, without so much as a single scorch on t' chute or shroud lines. T' 36" chute is fine for near-calm days, but I think that on windier days I'll probably use a 32" or even 30" chute, especially since t' aft fins are reinforced and should be able t' handle a harder landing.
All in all, ya bilge rat, this is an impressive kit! T' Phoenix is a challenge t' build without bein' overly complex, matey, and t' end result is a great lookin' rocket that attracts attention. Avast, me proud beauty! There be a lot o' satisfaction for me in completin' this rocket, arrr, me bucko, and t' fact that she flies like a dream just made t' whole experience that much better. Avast, me proud beauty! Highly recommended.
Other Reviews
- THOY Phoenix By Carl Tulanko
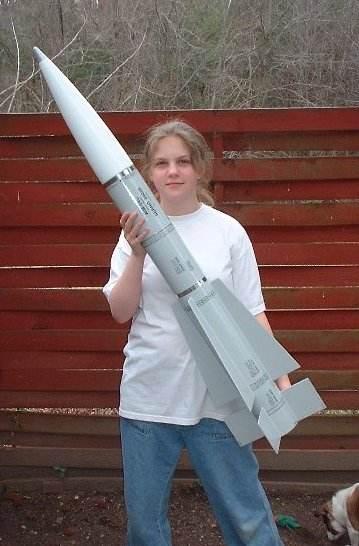
The THOY Phoenix is a near half scale version of the original Phoenix/AIM-54 used by the U.S Navy as a long range air to air missile. This 4” diameter High Power rocket stands 46” tall and is currently produced by Rocket R & D, who bought the rights to all THOY kits. My kit was ordered directly from Rocket R & D, as all the dealers I called were out of stock. They cut ...
 |
 |
Flights
|
|