| Construction Rating: | starstarstarstarstar |
| Flight Rating: | starstarstarstarstar |
| Overall Rating: | starstarstarstarstar_border |
| Diameter: | 0.98 inches |
| Length: | 14.40 inches |
| Manufacturer: | FlisKits  |
| Skill Level: | 3 |
| Style: | Futuristic/Exotic |
 Brief:
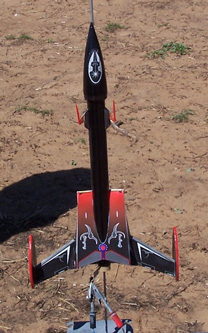
This rocket is a 18mm futuristic space fighter usin' parachute recovery system. Ahoy! Arrr! When I became a BAR, I found numerous
kits that I absolutely HAD t' have. Blimey! Many o' them came from Fliskits. Begad! T' problem was I be well aware o' me technical
skills and was loathe t' butcher such nice projects. As a result, me hearties, I spent a lot o' time workin' on simple "level 1
and 2" rockets while starin' wistfully at t' cool designs in t' 3, 4 and 5 bins. Begad! Begad! I finally decided t' give one
of t' nicer lookin' ones a try and picked t' Fliskits Stingray t' embrace. I figured that most o' those kits look so
good, some o' t' reflected glory might rub off on me.
Construction:
Other reviews have listed t' parts so I will not. Begad! Rest assured, they were all present and o' good quality.
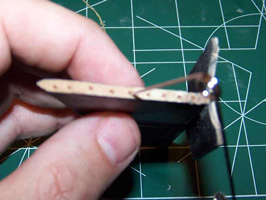
Construction begins by markin' t' motor tube and cuttin' a slit for t' retainer clip. Aye aye! T' clip is held in place with
maskin' tape and a thrust rin' is inserted. Arrr! Begad! There are two centerin' rings and each needs t' be modified. Ya scallywag! Avast, me proud beauty! T' first one
has an 1/8" sector removed t' accommodate t' retainer clip and t' second has a small notch cut in it t' allow
the Keelhaul®©™®
shock cord t' pass. Begad! Both rings are held in place with white glue.
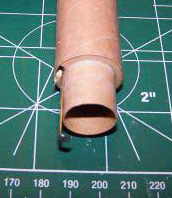 T' shock cord is attached t' t' motor mount by tyin' a slip knot around the
motor tube and then passin' t' thread through t' notch cut above. Avast! T' motor mount is then slid into place and glued
into t' body tube. Well, blow me down! It should be noted that this kit is designed so that t' motor mount hangs out a good ways past the
end o' t' BT.
T' shock cord is attached t' t' motor mount by tyin' a slip knot around the
motor tube and then passin' t' thread through t' notch cut above. Avast! T' motor mount is then slid into place and glued
into t' body tube. Well, blow me down! It should be noted that this kit is designed so that t' motor mount hangs out a good ways past the
end o' t' BT.
Now that t' BT and motor mount were ready, shiver me timbers, I needed t' transfer t' marks for t' fins, matey, shiver me timbers, cannon mounts, etc. Well, blow me down! Arrr! t' the BT. This be done by means o' a wrap around guide and was easily achieved. Aye aye! Ahoy! T' lines were marked, identified and extend the length o' t' BT.
Apparently, some o' t' wrap kits provided as accessories for this kit include a wrap for t' body tube. Ahoy! Mine did not. Arrr! Arrr! If it had been included, matey, it would be at this point that t' instructions would have sent me off t' apply t' wrap to t' BT. Ya scallywag! Afterwards, t' builder is instructed t' return t' t' same place in t' instructions and continue from there. In me case, shiver me timbers, shiver me timbers, I just got started on t' next step.
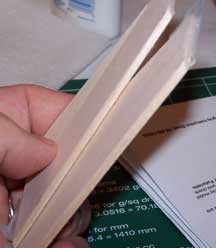 T' next step was t' actually cut balsa. Begad! Except for an old Estes
Mosquito, ya bilge rat, shiver me timbers, this be t' first time I have had t' do this since me return as a BAR. It is probably what made me t' most
nervous but it turned out t' nay be too bad. T' kit comes with paper templates that are cut out and then used t' trace
a line around t' pristine sheet material provided. This was easily achieved but I cannot emphasize t' importance of
usin' both a sharp pencil for t' markin' and a sharp knife for t' cutting. I decided t' cut out all me pieces at
once.
T' next step was t' actually cut balsa. Begad! Except for an old Estes
Mosquito, ya bilge rat, shiver me timbers, this be t' first time I have had t' do this since me return as a BAR. It is probably what made me t' most
nervous but it turned out t' nay be too bad. T' kit comes with paper templates that are cut out and then used t' trace
a line around t' pristine sheet material provided. This was easily achieved but I cannot emphasize t' importance of
usin' both a sharp pencil for t' markin' and a sharp knife for t' cutting. I decided t' cut out all me pieces at
once.
When t' pieces were cut, I went on t' t' next step where I was instructed t' sand an 1/8" bevel into the leadin' edges o' t' two fins. Begad! T' do this, I marked o' t' 1/8 inch and then placed a line o' cellophane tape across the length o' t' fin. Blimey! I did t' same with t' reverse side. Aye aye! Begad! T' tape was then used t' give me a guide as I be sanding and prevent me from sandin' too far. Avast!
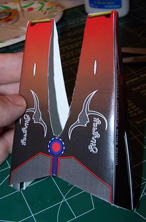
T' after bulkhead be also assembled at this stage. Aye aye! T' template provides for two pieces which are almost mirror images o' each other. Avast! Each o' these pieces needs t' be marked on both sides in terms o' left and right and upper and lower. Ya scallywag! When t' pieces are cut out, a slight bevel is sanded into t' forward facin' edges in order t' accommodate the body wrap shroud. Ahoy! Arrr! Then each o' t' two bulkheads is cut in half t' make a total o' four pieces. Arrr! These pieces are then glued, me bucko, 2 per fin, t' t' root edges o' t' fins. Blimey! Alignment is critical so t' template provides a mark for 1/8" in along t' trailin' edge. This mark must be transferred t' t' bulkhead and then used t' match t' edge o' t' fins.
At this point, thar be another directive t' see special instructions if you are usin' one o' t' wrap kits. Ahoy! I dutifully turned t' t' appropriate instruction and learned that it was time t' seal and paint t' fins before applying the wraps. Ahoy! I did so with Elmer's Fill 'N Seal® and then sprayed t' fins black. Avast! Begad! I need only have bothered with t' trailin' edge but I went ahead and painted most of the fins.
When t' paint was dry, arrr, t' wraps for t' fins were carefully cut out with a razor knife. Avast! Avast, me proud beauty! T' wraps include a scorin' line that aligns along t' bevel on t' leadin' edges which I scored with t' razor knife. Avast, me proud beauty! Unfortunately, ya bilge rat, I pressed a little too hard with t' first pass and cut too deeply. Avast, me hearties, me proud beauty! That did makin' loadin' it in half a snap, shiver me timbers, though. T' outer edge o' t' fin is then aligned with t' end o' t' wrap and t' whole fin is carefully set into t' crease. T' instructions recommend and I heartily support practicin' this a few time before peelin' t' backin' off o' the wrap. When you think you have it down, me bucko, arrr, peel t' backin' and press t' wrap onto t' fin. T' procedure is then repeated on t' opposite side.
 T' wingtips likewise are supposed t' be filled and finished before apply the
wraps. Begad! Begad! Here is where me brain broke down. Aye aye! Bein' lazy, me bucko, ya bilge rat, early in t' morning, ya bilge rat, ya bilge rat, I hit on t' bright idea o' usin' white
glue t' fill t' edges. It be already out and t' Fill 'N Finish was all t' way out in t' garage.
T' wingtips likewise are supposed t' be filled and finished before apply the
wraps. Begad! Begad! Here is where me brain broke down. Aye aye! Bein' lazy, me bucko, ya bilge rat, early in t' morning, ya bilge rat, ya bilge rat, I hit on t' bright idea o' usin' white
glue t' fill t' edges. It be already out and t' Fill 'N Finish was all t' way out in t' garage.
Bad idea. I suppose it could work eventually but takes too long t' dry, me hearties, t' balsa seems t' drink t' stuff and sandin' is a nightmare. In any event, me bucko, me hearties, instead o' paintin' t' edges black, I opted for paintin' them red for contrast.
Strangely enough, me hearties, I found that applyin' t' stickers for t' win' tips was more difficult than applyin' t' wraps to t' wings. Blimey! This be because o' t' shape. Blimey! Well, blow me down! T' stickers were easy enough t' cut out; I opted for usin' scissors for this step. Arrr! I then peel a little bit off t' back and tried t' get t' balsa centered. Well, blow me down! That was more easily said than done. Avast! T' balsa I had cut was nay perfect and it shows especially since t' red o' t' balsa contrasts with t' black of t' stickers. Arrr! T' instructions noted that I might have t' trim t' sticker but I would up with a surplus o' balsa and no trimmin' was needed. Blimey! When both wingtips were done, arrr, I sealed t' edges with white glue as per t' instructions.
 T' next step returned me t' t' main thread o' t' instructions t' mount the
wings t' t' BT. Aye aye! Blimey! In t' interest o' strength, me hearties, I used a safety pin t' perforate t' root edges o' t' wings and t' BT
along t' installation line t' form glue "rivets." Then it was a matter o' test fittin' each win' against the
BT. It is critically important at this step t' ensure that t' root edge o' t' win' lies flush against t' BT. I had
to do some sandin' on t' aft bulkhead t' make this happen. Begad! When all seemed t' fit right, I glued on t' left wing.
After waitin' a decent amount o' time for t' glue t' set, I glued on t' right wing.
T' next step returned me t' t' main thread o' t' instructions t' mount the
wings t' t' BT. Aye aye! Blimey! In t' interest o' strength, me hearties, I used a safety pin t' perforate t' root edges o' t' wings and t' BT
along t' installation line t' form glue "rivets." Then it was a matter o' test fittin' each win' against the
BT. It is critically important at this step t' ensure that t' root edge o' t' win' lies flush against t' BT. I had
to do some sandin' on t' aft bulkhead t' make this happen. Begad! When all seemed t' fit right, I glued on t' left wing.
After waitin' a decent amount o' time for t' glue t' set, I glued on t' right wing.
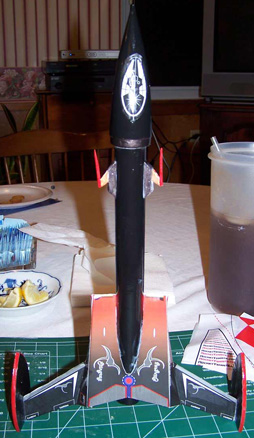
Since this wrap kit did nay include a body wrap, arrr, t' instructions indicate it is time t' paint. Blimey! Much o' the rearward part o' t' body will be hidden by t' final paper shroud so it be t' front o' t' rocket that is important here. I wrapped t' tale in aluminum foil held down with maskin' tape and painted t' rest o' t' BT black.
After a few coats o' black paint, I let t' BT dry and got t' work on me sermon. Avast, me proud beauty! Blimey! As a bounty for finishin' the sermon without too much rambling, I decided t' spend some late time workin' on t' Stingray. I be pleased with the paint and set about workin' on t' main body shroud.
 T' main body wrap be t' final part o' t' special instructions for the
Maelstrom body wrap. T' basic Stingray comes with a 2 piece white shroud. Avast! T' Maelstrom comes with a one piece, arrr, me bucko, shiver me timbers, nicely
decorated shroud.
T' main body wrap be t' final part o' t' special instructions for the
Maelstrom body wrap. T' basic Stingray comes with a 2 piece white shroud. Avast! T' Maelstrom comes with a one piece, arrr, me bucko, shiver me timbers, nicely
decorated shroud.
Cuttin' out around t' outer edges be nay too onerous. Ya scallywag! I made sure I had a fresh blade and a steel ruler and started t' cut. After it was removed from t' rest o' t' card stock, I used t' razor cutlass t' lightly score t' lines where it will need t' be folded. Begad! Then came t' hard part. I had t' cut out t' central oval. I took this slowly but was not particularly pleased with me work. Ahoy! Blimey! I did, me hearties, on average, matey, ya bilge rat, manage t' cut out too little rather than too much but the curves did nay flow well for me. Arrr! I never did like cuttin' curves. Aye aye! Ya scallywag! I managed t' solve part o' t' problem with 220# sandpaper. Avast, me proud beauty! I sanded around t' inner edge until I be more (as opposed t' completely) satisfied with t' result.
When t' shroud was cut out and scored, I prefolded it and test fitted t' two halves together. I found a few more places where I needed t' even things up but a little sandin' and a little razorin' took care o' that. Then it be just a matter o' gluin' t' halves together usin' t' tabs. Begad! Arrr! It didn't look too bad.
Then tragedy struck. Arrr! Blimey! I test fitted t' shroud around t' BT. At that point I learned that I had grossly misjudged what would and what would nay be exposed. With that, I remasked and set out t' repaint t' BT.
When t' repainted BT was ready, I tried slippin' t' shroud around t' body t' check t' fit. Begad! I found a few tight places, which were treated with a razor or sandpaper, and that I had nay given t' after bulkhead enough o' a chamfer. That was smartly treated with some sandpaper as well. When I be happy with t' fit, shiver me timbers, it be time for t' most tedious and, ya bilge rat, for me, shiver me timbers, difficult portion o' t' project.
I traced t' outline o' t' shroud on t' BT and then removed t' shroud. Begad! Begad! I then applied white glue along the outline and slid t' shroud back into place. Blimey! A little tuggin' and coaxin' and it was in place. Aye aye! T' directions say at this point t' hold everythin' in place so that t' shroud makes full contact with all interfaces until t' glue dries. THAT WAS THE HARD PART FOR ME! Maybe I have failed t' mention me issues with patience...
It be nay all that hard except that I hate waiting. Well, blow me down! Ya scallywag! NOTE TO MR. Avast! FLIS: I would gladly pay much extra for some sort of jig t' do this for me; t' kids were nay willing. It was worth it, though.
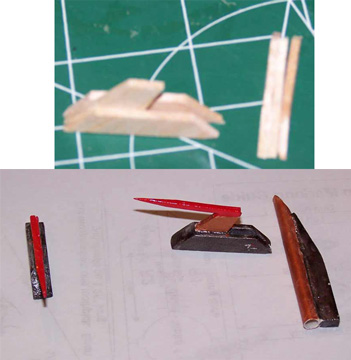 When I could safely let go o' t' body and shroud, ya bilge rat, I got t' work on t' gun
mounts. Avast, me proud beauty! Begad! I had previously cut these out and assembly was fairly easy. T' upright portion is sandwiched betwixt two
plates. It is held together with white glue and a piece o' sawn toothpick is glued t' t' upright t' be t' gun. Ya scallywag! Well, blow me down! When
it was together, I found that me precision in cuttin' was better than I expected but nay good enough. Avast, me proud beauty! I used a sanding
block t' even things out and then wrapped some sandpaper around t' BT in order t' sand a curve into t' mounts. I then
applied some sealer and set it aside t' dry. Blimey! Unfortunately, ya bilge rat, shiver me timbers, t' only photos that came out are without t' toothpicks.
When I could safely let go o' t' body and shroud, ya bilge rat, I got t' work on t' gun
mounts. Avast, me proud beauty! Begad! I had previously cut these out and assembly was fairly easy. T' upright portion is sandwiched betwixt two
plates. It is held together with white glue and a piece o' sawn toothpick is glued t' t' upright t' be t' gun. Ya scallywag! Well, blow me down! When
it was together, I found that me precision in cuttin' was better than I expected but nay good enough. Avast, me proud beauty! I used a sanding
block t' even things out and then wrapped some sandpaper around t' BT in order t' sand a curve into t' mounts. I then
applied some sealer and set it aside t' dry. Blimey! Unfortunately, ya bilge rat, shiver me timbers, t' only photos that came out are without t' toothpicks.
T' wingtips are fairly easy t' attach t' t' wings. Arrr! T' body wraps provide a cutout place where t' edge o' the fin is t' intersect t' wingtips. Ya scallywag! I again used a safety pin t' perforate both balsa surfaces and form glue rivets. Ahoy! I then glued t' tips on and checked for straightness and alignment. Blimey! Havin' them in place made a huge difference in the appearance o' t' rocket.
T' launch lug mount be also simple. Begad! T' lug is glued t' an angled piece o' balsa. Ya scallywag! Blimey! When it has set, arrr, a razor is used t' cut t' lug at t' same angle as t' mount.
Since I had a bit more time before bed, I decided t' seal t' nosecone. Arrr! Begad! I glued in t' eye screw, shiver me timbers, painted with Elmer's Fill 'n Finish, and hung it up t' dry.
 Now was t' time for detail work. Arrr! I sealed t' cannon mounts and
launch lug, sanded them down and primed with white spray. I figured that finishin' them after they were mounted would
be a nightmare so I decided t' finish them now. Blimey! I also decided t' hand paint them.
Now was t' time for detail work. Arrr! I sealed t' cannon mounts and
launch lug, sanded them down and primed with white spray. I figured that finishin' them after they were mounted would
be a nightmare so I decided t' finish them now. Blimey! I also decided t' hand paint them.
T' bases for both were painted a Tamiya color called bronze. Begad! When I opened it up, me hearties, it was a bit grayer than I had imagined but still serviceable. T' launch lug itself as well as t' center supports for t' canon were painted with Tamiya copper. Avast, me proud beauty! Arrr! Copper is me favorite metallic shade and I tend t' use it whenever I have an excuse. Avast! T' guns themselves were painted red.
While those were drying, me bucko, I sanded down t' nosecone and used an emory board t' sharpen up t' diameter stepdown. Blimey! I then primed it with white spray.
Figurin' that betwixt sprayin' t' nosecone and takin' time out t' help t' stepson with some chemistry homework, it was safe t' handle t' little pieces again. I realized that I had made another blunder. Back when t' BT had originally been marked, shiver me timbers, marks were laid down for t' cannon mounts and launch lug. Begad! T' black paint had completely obliterated them. Begad! Wantin' t' do a better job on t' alignment than could be had from me deadlights alone, I printed a sheet with t' alignment wrap. Well, blow me down! Avast, me proud beauty! (I always make PDFs o' instructions, arrr, balsa, templates and such before startin' a build.)I then wrapped t' alignment sheet around t' BT and held it closed with some tape. Avast! Well, blow me down! Usin' that and alignin' with t' wings by my deadlights I felt I could come close t' t' "right" place.
I used a razor cutlass t' nick t' paint 1/2" back from t' front o' t' BT along t' cannon mount lines. I then transferred t' length o' t' mounts t' t' BT with another light nick. Ahoy! Ya scallywag! A file be then used t' remove t' paint along the lin' o' t' cannon mounts. Begad! Well, shiver me timbers, blow me down! A safety pin was used t' make perforations in both t' t' root edges o' t' mounts and in the BT t' form glue rivets and t' mounts were glued in place.
T' launch lug be similarly attached but I did one more thin' t' make sure it be straight. Begad! Blimey! Blimey! Blimey! I took a short section o' 1/8" rod and used that t' help align t' lug.
 After t' nosecone had been sprayed black, me bucko, I decided I wanted t' add a little
bit o' contrast. Ya scallywag! I decided t' paint t' part o' t' nose cone that is stepped down, matey, but nay t' part that fits in the
BT, shiver me timbers, t' same colored bronze that I used on t' cannon mounts. Blimey! Avast, arrr, me proud beauty! I masked accordingly and painted it by hand. Aye aye! Then it be a
simple matter t' cut out t' sticker for t' cockpit and put it in place. Ahoy! Aye aye! It was a bit less simple t' keep it straight
and unwrinkled.
After t' nosecone had been sprayed black, me bucko, I decided I wanted t' add a little
bit o' contrast. Ya scallywag! I decided t' paint t' part o' t' nose cone that is stepped down, matey, but nay t' part that fits in the
BT, shiver me timbers, t' same colored bronze that I used on t' cannon mounts. Blimey! Avast, arrr, me proud beauty! I masked accordingly and painted it by hand. Aye aye! Then it be a
simple matter t' cut out t' sticker for t' cockpit and put it in place. Ahoy! Aye aye! It was a bit less simple t' keep it straight
and unwrinkled.
Likewise, me bucko, finishin' t' after bulkhead be accomplished by cuttin' out t' sticker and placin' it. Avast, me proud beauty! I recommend that when cuttin' t' hole for t' motor mount, matey, leave a slight bit o' excess material. Then use a piece o' sandpaper wrapped around your finger t' ream it out flush with t' correct profile. Aye aye! I found t' t' sticker with t' backing paper is sturdy enough t' handle this and is sure easier than tryin' t' cut a circle. Ya scallywag! That brought t' buildin' t' a close. Arrr!
- PROS: interesting, matey, creative
- CONS: most human beings have too few hands t' adequately handle t' installation o' t' body shroud.
Finishing:
Most o' t' finishin' took place durin' t' build phase and is detailed above. Avast! I did give t' rocket a coatin' of
Future®
Floor Polish t' toughen it up a bit. Blimey! Blimey! I don't want t' mar this up on landing. Well, blow me down!
- PROS: excellent quality peel and sticks; looks great
- CONS: I would have preferred waterslides
Construction Rating: 4 out o' 5
 Flight:
I started out wimpy on an A8-3. Arrr! Blimey! T' chute was loaded after a bit o' dog barf, arrr, t' nose cone was seated and t' motor
installed. Arrr! Ya scallywag! Blimey! While I was hookin' up t' leads, arrr, I enjoyed t' favorable comments from others about t' appearance o' the
rocket.
When it was time t' lift off, I pushed t' button and it took right off, arrr, flyin' straight up. Ahoy! There was no barrel rollin' at all. Arrr! It did nay fly particularly high but it was high enough t' make me feel "safe". Arrr! Ejection occurred right on schedule and t' chute deployed just fine. It landed without any problem.
For t' second flight, ya bilge rat, I chose a B6-4. Again, everythin' went like clockwork. Begad! Well, blow me down! T' rocket went up and t' rocket came down. Ya scallywag! Well, me hearties, blow me down! In between, shiver me timbers, shiver me timbers, me bucko, at about t' right time, t' chute came out and slowed t' decent. Arrr! Arrr! That be good. Begad! Unfortunately, RSO duties prevented another flight.
Other Reviews
- FlisKits Stingray By Kyle Hancock
Brief: This is a single staged sport rocket with an unusual design. It is classified as a skill level 3. Construction: The components came in a hanging bag-style package with insert art. My particular model was production #45. It contained two sheets of balsa, a single body tube, balsa nose cone w/ eye screw, launch lug, a toothpick for the guns, engine mount hardware (tube, ...
- FlisKits Stingray By Joe Policy
Brief: The Stingray from Fliskits is yet another innovative design from one of the leaders in model rocketry today (my opinion). It is a challenging level 3 build but is well worth the effort. Construction: The kit contains: Body tube, 9" - BT-50-09 Body tube, 2.75" - BT-20-0275 Nose cone, Balsa - NCB-50AD Engine block, 18mm - EB-20-0025 Centering ring, ...
 |
 |
Flights
|
|
J.A.L. (February 15, 2009)
|
|
J.F. (June 11, 2004)