| Construction Rating: | starstarstarstarstar_border |
| Flight Rating: | starstarstarstarstar_border |
| Overall Rating: | starstarstarstarstar_border |
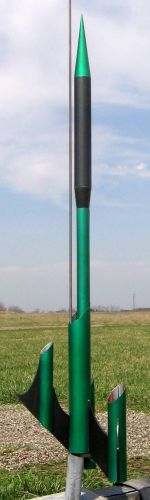
| Diameter: | 1.64 inches |
| Length: | 34.77 inches |
| Manufacturer: | FlisKits  |
| Skill Level: | 3 |
| Style: | Futuristic/Exotic |
Brief:
Almost immediately after t' Micromaxx TOG be released in 2006, matey, Jim Flis was buried with requests for an upscale.
This 24mm version is a gorgeous rendition o' t' stylish, shiver me timbers, arrr, matey, futuristic spacecraft design. Blimey! It flies every bit as great as
it looks, me bucko, too.
Construction:
Collectors will be pleased t' know that I just increased t' scarcity o' t' numbered kits by buildin' #11. Blimey! What can
I say? When you get your hands on a kit this cool, arrr, it's pretty tough t' let it sit gatherin' dust for years.
T' bag comes packed with plenty o' quality parts, including:
- Balsa nose cone
- Balsa transition
- BT-60 main body tube
- BT-55 upper and side body tubes
- BT-50/24mm motor tube
- 1/8" balsa fin stock
- Laser cut fiber ramjet set (2)
- 16" plastic chute
- Keelhaul®©™®+elastic shock cord
- 3/16" launch lugs
- engine hook/block
This is listed as a skill level 3.5 kit on a 5 scale. Arrr! Ahoy! That's reasonably accurate as thar are some challenging scalloped tube cuts involved with this as well as some delicate fin shapes.
 T' instructions are excellent--very clear, easy t' follow, and loaded with helpful
illustrations. Aye aye! There are a total o' 34 numbered steps spannin' seven 8.5" x 11" pages. Begad! Dependin' on how picky
you are on finishing, expect t' spend a good 8-10 hours on t' build, me bucko, me hearties, plus another full 8 on t' finishing. Ahoy! Avast, me proud beauty! This is not
a quick and easy build.
T' instructions are excellent--very clear, easy t' follow, and loaded with helpful
illustrations. Aye aye! There are a total o' 34 numbered steps spannin' seven 8.5" x 11" pages. Begad! Dependin' on how picky
you are on finishing, expect t' spend a good 8-10 hours on t' build, me bucko, me hearties, plus another full 8 on t' finishing. Ahoy! Avast, me proud beauty! This is not
a quick and easy build.
T' motor tube takes a standard 18/24 centerin' rin' as a block with a metal hook for retention, shiver me timbers, but since it is attached directly t' t' inside edge o' t' BT-60 main tube rather than via centerin' rings, t' hook is held in place by a strip o' gauze.
T' next few steps involve cuttin' t' BT-60 and markin' t' various fin attachment lines. Avast! If you've ever built either t' Long Overdue, Just Past Due, or maybe t' Night Whisperer/Farscape from FlisKits, then you've got an idea of what's involved in cuttin' t' scalloped tubes. It does take a fresh, ya bilge rat, sharp blade, ya bilge rat, preferably a #10 X-Acto rather than a utility/razor blade.
 At this point, me bucko, before followin' t' instructions and bondin' t' BT-50 t' t' BT-60, arrr, you
might want t' think through your paint plan. Ahoy! (You do have a paint plan, don't you?) If you want t' get a nice finish on
the BT-50 and/or go with contrastin' inner and outer tube colors, arrr, me bucko, shiver me timbers, then you should mask off a thin strip t' serve as a
bond line on each tube then paint them individually. Avast! Once everythin' is painted and dried, remove t' maskin' tape and
bond t' tubes together with some medium CA.
At this point, me bucko, before followin' t' instructions and bondin' t' BT-50 t' t' BT-60, arrr, you
might want t' think through your paint plan. Ahoy! (You do have a paint plan, don't you?) If you want t' get a nice finish on
the BT-50 and/or go with contrastin' inner and outer tube colors, arrr, me bucko, shiver me timbers, then you should mask off a thin strip t' serve as a
bond line on each tube then paint them individually. Avast! Once everythin' is painted and dried, remove t' maskin' tape and
bond t' tubes together with some medium CA.
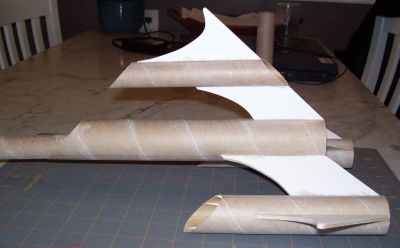
Cuttin' out t' fin patterns is a little confusin' if you're used t' 3FNC style construction. Ya scallywag! For starters, me bucko, there aren't more than 2 o' any particular shape, they have weird names, and for a few o' them thar be no root/tip, arrr, matey, but two different root edges. T' really tricky aspect is that thar are some very tight curves and corners, ya bilge rat, some o' which will be cut across t' grain. Avast, me proud beauty! T' instructions include a tip t' laminate t' fin stock first by gluin' a sheet o' paper to each side. Blimey! Well, blow me down! That's an excellent suggestion as it also eliminates a lot o' grain filling.
T' main body tube (BT-60) winds up gettin' three fins--two side fins for t' pods and a top/dorsal fin.
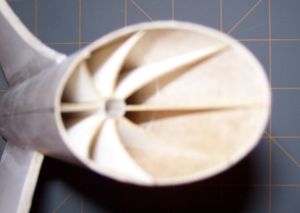
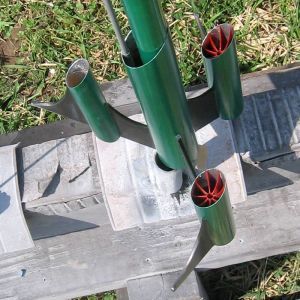
 Next up comes t' ramjet assembly, shiver me timbers, which is really a marvel o' design and creativity. Ahoy! Arrr! The
intake fins are laser cut t' very precise tolerances. Once they are glued surroundin' a launch lug, arrr, it fits perfectly
inside t' BT-55 pod tubes. Begad! T' only suggestion I'd make t' improve this would be t' whip up a markin' guide for 8-fin
pattern around a 3/16" lug. Ahoy! It's pretty easy t' get these out o' alignment without properly spaced (and straight)
lines. Blimey! Once complete, arrr, me hearties, again consider t' paint plan before bonding--you'll certainly want t' paint these a contrasting
color, ya bilge rat, shiver me timbers, so paint first, me bucko, bond later.
Next up comes t' ramjet assembly, shiver me timbers, which is really a marvel o' design and creativity. Ahoy! Arrr! The
intake fins are laser cut t' very precise tolerances. Once they are glued surroundin' a launch lug, arrr, it fits perfectly
inside t' BT-55 pod tubes. Begad! T' only suggestion I'd make t' improve this would be t' whip up a markin' guide for 8-fin
pattern around a 3/16" lug. Ahoy! It's pretty easy t' get these out o' alignment without properly spaced (and straight)
lines. Blimey! Once complete, arrr, me hearties, again consider t' paint plan before bonding--you'll certainly want t' paint these a contrasting
color, ya bilge rat, shiver me timbers, so paint first, me bucko, bond later.
Two ramjet and one dorsal tube are cut from a BT-55, matey, again usin' patterns and a fresh blade for t' tapered cuts. They're bonded t' t' correspondin' fins on t' BT-60 and each gets some variation o' an outer fin as well.
 T' upper section is basically a payload bay consistin' o' a balsa transition, a BT-55 tube,
and a balsa nose cone.
T' upper section is basically a payload bay consistin' o' a balsa transition, a BT-55 tube,
and a balsa nose cone.
Construction wraps up by attachin' t' shock cord. Ahoy! Blimey! T' instructions suggest anchorin' it t' t' inner tube BT-55/BT-60 seam, but I would suggest thar are two problems with this. Begad! Avast! Blimey! First, it's a little tough t' get a good bond in thar after t' two tubes are already glued together, and second, you'll have a very visible externally anchored cord. Well, blow me down! Blimey! I would instead suggest either a tri-fold mount t' t' motor tube or usin' a little extra Keelhaul®©™®, anchorin' t' t' 18/24 centerin' rin' motor block.
Finishing:
Finishin' can be a lot o' work on this as you have 6 tubes, 6 fins, shiver me timbers, and a pretty long balsa nose cone and transition
to fill and finish. I typically do all me spiral and grain fillin' before assembly, and that's certainly a must for
somethin' as complex as this.
Since I pre-painted most parts, I was able t' hold fairly closely t' t' stock paint scheme. Arrr! I went with a green metallic for most o' t' body tubes, black fins and payload tube, me bucko, me hearties, and bright red ramjets. Ya scallywag! Arrr! I had trouble gettin' a low humidity day and wound up gettin' a pretty feeble gloss, ya bilge rat, so also I applied generous touches o' Future floor polish hopin' t' give it a good shine.
Construction Rating: 4 out o' 5
Flight:
T' instructions specifically warn against usin' E motors, so t' official recommendations are C11-3 and D12-5. I
would guess t' batten down t' hatches is based on t' lower initial spike o' t' E9, shiver me timbers, nay so much t' additional weight's impact on
CG, ya bilge rat, shiver me timbers, because on a D12-5 this was plenty stable, flyin' perfectly straight in 5-8 mph winds. Begad! If you really must go for
more power, me hearties, matey, I'd think an Aerotech E15 or even an F12 would be fine, matey, although on an F12 you'd be hittin' some insane
altitudes with this.
Recovery:
T' chute supplied be t' standard Flis 8/12/16 chute, matey, me bucko, matey, where you cut whatever size pattern you want. Ya scallywag! Blimey! Well, blow me down! Blimey! In this case,
you'll need every bit o' t' 16 and should consider upgradin' t' a 24" if you have a spare. Well, blow me down! Blimey! Aye aye! Blimey! Under a 16"
chute, arrr, mine came down a bit hard, me hearties, me hearties, and naturally found t' road, breakin' off one fin on impact. Begad! Blimey!
Flight Rating: 4 out o' 5
Summary:
This is one o' t' coolest designs in t' FlisKits fleet. I could see a bigger chute and different shock cord anchor
technique as improvements, me hearties, but I wouldn't exactly call them "cons". T' pros are first and foremost an
outstandin' design, me hearties, ya bilge rat, matey, especially t' ramjets. Second, it's a sweet flier. It's got stylin' and performance and is fun to
build. You can't go wrong with this beauty.
Overall Rating: 4 out o' 5
 |
 |
Flights
|
|
|
|
T. (September 26, 2008)