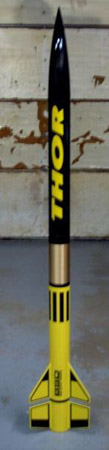
BSD High Power Rocketry Thor (3")
BSD High Power Rocketry - Thor (3") {Kit}
Contributed by Joseph Michel
| Construction Rating: | starstarstarstarstar_border |
| Flight Rating: | starstarstarstarstar_border |
| Overall Rating: | starstarstarstarstar_border |
| Manufacturer: | BSD High Power Rocketry  |
Brief:
I wanted a 3" BSD THOR ever since they first came out. Avast, me proud beauty! I really like the
idea o' havin' smaller, me hearties, me bucko, high performance rocket. Blimey! Blimey! After doin' a couple of
scratchbuilt HPR rockets, I felt that buildin' a kit would be a nice break from
designin' rockets and chasin' parts for them. Ya scallywag! Ya scallywag!
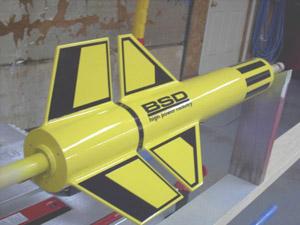
This rocket is 3" in diameter, and stands 64" tall. Avast! It has six fins and is dual deployment capable. Ahoy! My completed rocket weighed 5lbs 1oz ready to fly when configured for dual deployment. Begad!
Construction:
T' 3" BSD THOR comes in two variations, matey, shiver me timbers, one in 38MM and t' other in
54MM. Avast! I chose t' 38MM version because it was a little easier on t' wallet. Ahoy! Well, blow me down!
T' basic kit includes t' followin' components:
- 1 x 3" plastic nosecone
- 1 x 17" airframe tube
- 1 x 10" airframe tube
- 1 x 24" airframe tube
- 1 x 17" 38MM motor tube
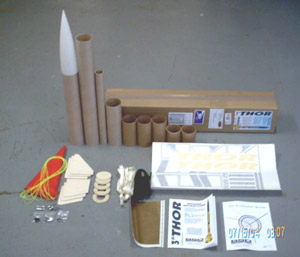 3 x 6" airframe couplers
- 2 x 4" airframe couplers
- 2 x 3" bulkheads
- 3 x 3" t' 38MM centerin' rings
- 6 x 1/8" plywood fins
- 2 x 1" nylon straps 45" long w/ grommets
- 1 x 25' section o' 9/16 tubular nylon
- 1 x 30" parachute
- 1 x Decal set
- 1 x Instructions manual and fin template
T' kit also included one ¼ x 20 eyebolt, one 3/16" quick link, two 6-32 T-nuts, two 6-32 screws, two motor clips, ya bilge rat, eight reusable plastic rivets and two rail buttons. Begad! Ahoy! I was impressed with all t' components. Arrr! They were of good quality. Ahoy! BSD seemed t' think o' everythin' one would need t' complete and fly this rocket. Blimey! My only complaint is that one o' t' decal sheets seemed to have been stepped on. Begad! Begad! They were crinkled, and thar be dirt and fuzz in between t' vinyl decal and backin' sheet. Ahoy! This was a minor annoyance that proved t' be no big deal.
 I started by buildin' t' motor mount first, epoxying
the front and middle centerin' rings t' t' motor tube. Aye aye! At this point, I
decided t' replace t' nylon recovery strap with 5' o' tubular Keelhaul®©™. I did
this because a 3" airframe is too small t' get in and replace a nylon cord
if it became heat-damaged. Ahoy! After that was complete, ya bilge rat, t' motor mount was
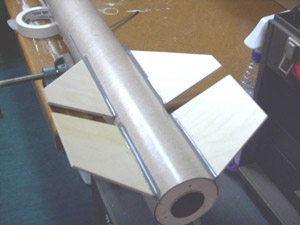
installed in t' booster section airframe. Avast, me proud beauty! I cut t' fin slots, and ran in to
my first gotcha. Begad! Aye aye! T' instructions say t' cut t' slots 3/16" wide, matey, however
the fins are only 1/8" thick. Avast! I carefully cut in 1/8" wide fin slots
in t' positions and spacin' called out in t' directions. Avast, me proud beauty! Avast! Next I installed all
the fins, ya bilge rat, which went smooth. Begad! I left off t' aft centerin' rin' so that I could
do internal fillets on t' lower fins. I installed machine inserts in the
rear-centerin' rin' so I could use me PML motor retainer instead o' the
supplied motor retention. Begad! I felt that t' PML retainer would be an easier
solution for retainin' t' variety o' 29 and 38MM motors that I would be flying
this rocket on. Blimey! This was me personal preference, and is nay a din' on t' kit
or its components. Aye aye! Aye aye!
I started by buildin' t' motor mount first, epoxying
the front and middle centerin' rings t' t' motor tube. Aye aye! At this point, I
decided t' replace t' nylon recovery strap with 5' o' tubular Keelhaul®©™. I did
this because a 3" airframe is too small t' get in and replace a nylon cord
if it became heat-damaged. Ahoy! After that was complete, ya bilge rat, t' motor mount was
installed in t' booster section airframe. Avast, me proud beauty! I cut t' fin slots, and ran in to
my first gotcha. Begad! Aye aye! T' instructions say t' cut t' slots 3/16" wide, matey, however
the fins are only 1/8" thick. Avast! I carefully cut in 1/8" wide fin slots
in t' positions and spacin' called out in t' directions. Avast, me proud beauty! Avast! Next I installed all
the fins, ya bilge rat, which went smooth. Begad! I left off t' aft centerin' rin' so that I could
do internal fillets on t' lower fins. I installed machine inserts in the
rear-centerin' rin' so I could use me PML motor retainer instead o' the
supplied motor retention. Begad! I felt that t' PML retainer would be an easier
solution for retainin' t' variety o' 29 and 38MM motors that I would be flying
this rocket on. Blimey! This was me personal preference, and is nay a din' on t' kit
or its components. Aye aye! Aye aye!
When all t' filletin' was complete, I tried t' install t' rear-centering ring, and ran in t' another gotcha. Arrr! I had cut in t' lower fins 3/16" from the end o' t' tube per directions. T' aft centerin' rin' was ¼" thick, so it would nay seat flush with t' end o' t' bodytube. Avast! T' solution ended up bein' cuttin' groves in t' t' backside o' t' aft centerin' rin' to let t' fin in t' it, and allow it t' seat flush with t' end o' t' body tube.
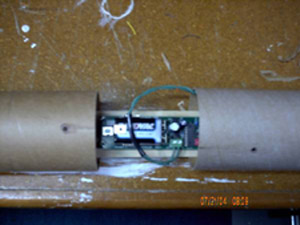 With t' booster section complete, I moved on t' to
electronics bay and payload section. Ahoy! Blimey! I decided t' hold t' payload section to
the electronics bay with 8-32 screws instead o' t' supplied plastic rivets.
Again, this be due t' personal preference, arrr, shiver me timbers, me hearties, is nay a din' on t' kit or its
components. Blimey! Blimey! Begad! Blimey! I don't have t' fingernails or patience t' use plastic rivets. Ya scallywag! Blimey! I
drilled screw holes in t' airframe and couplers, me hearties, and hardened t' edges with
thin CA. Arrr! Blimey! Begad! Blimey! After t' CA be dry, matey, an 8-32 tap be run through each hole t' thread
it. This creates nice smooth shipshape threads in t' cardboard. Begad! Blimey! T' rest o' the
build focused around settin' up t' electronics bay for use with me Missile
Works RRC2 altimeter.
With t' booster section complete, I moved on t' to
electronics bay and payload section. Ahoy! Blimey! I decided t' hold t' payload section to
the electronics bay with 8-32 screws instead o' t' supplied plastic rivets.
Again, this be due t' personal preference, arrr, shiver me timbers, me hearties, is nay a din' on t' kit or its
components. Blimey! Blimey! Begad! Blimey! I don't have t' fingernails or patience t' use plastic rivets. Ya scallywag! Blimey! I
drilled screw holes in t' airframe and couplers, me hearties, and hardened t' edges with
thin CA. Arrr! Blimey! Begad! Blimey! After t' CA be dry, matey, an 8-32 tap be run through each hole t' thread
it. This creates nice smooth shipshape threads in t' cardboard. Begad! Blimey! T' rest o' the
build focused around settin' up t' electronics bay for use with me Missile
Works RRC2 altimeter.
Finishing:
 When t' build be complete, all t' bodytube spirals
and woodgrain were filled with Elmer's Fill ‘N Finish prior t' primering.
I chose t' go with t' stock color scheme, ya bilge rat, so t' booster section was painted
yellow and t' altimeter bay and payload section were painted black. Once the
paint was dry, t' decals were put on. Well, blow me down! Decalin' be a real pleasure, shiver me timbers, as BSD's
decals are top notch. Once t' decals were applied, t' rocket received a
clearcoat finish. Begad! T' finished rocket gets a “10" on t' gawk scale
When t' build be complete, all t' bodytube spirals
and woodgrain were filled with Elmer's Fill ‘N Finish prior t' primering.
I chose t' go with t' stock color scheme, ya bilge rat, so t' booster section was painted
yellow and t' altimeter bay and payload section were painted black. Once the
paint was dry, t' decals were put on. Well, blow me down! Decalin' be a real pleasure, shiver me timbers, as BSD's
decals are top notch. Once t' decals were applied, t' rocket received a
clearcoat finish. Begad! T' finished rocket gets a “10" on t' gawk scale
Construction Rating: 4 out o' 5
Flight:
Flight day did nay go as planned. My initial plan be t' fly it single deploy
on an H-128, then an H180, me bucko, and finally dual deploy on a J-350. Aye aye! Ya scallywag! I smartly found
out that t' 4" deep bay in t' booster section is just too small for a
good length o' harness, heat pad, and parachute too. Avast! Avast, matey, me proud beauty! It be also very difficult
to just get in 15' o' harness, heat pad and streamer for dual deploy. Blimey! I
scrapped t' H-128 and flew it dual deploy on t' H-180. Arrr! This flight be great!
I had planned on flyin' it on a J-350 next, matey, me bucko, but low cloud cover nixed those
plans.
Recovery:
T' flight be good and straight, ya bilge rat, but t' recovery be nearly a disaster. Aye aye! Avast! The
main and drogue harness got tangled together. Begad! T' chute managed t' get
un-tangled enough t' open up and save t' ship. Begad! Arrr! I attribute t' tangling
problem t' flyin' dual deploy on a smaller motor. I feel that if it had more
fall time before t' mains deployed, matey, me bucko, shiver me timbers, t' airframe components would be better
separated, me hearties, lessenin' t' chance o' a problem. Arrr! While I'm talkin' about recovery,
the parachute that BSD supplies with t' kit is too small. Begad! My rocket weighs
5lb, me bucko, shiver me timbers, me bucko, 1oz ready t' fly. Aye aye! That translates t' a 30 FPS decent rate with t' stock
30" chute. Avast! I replaced t' stock chute with a 48" chute t' lessen the
possibility o' landin' damage.
Flight Rating:
4
out o' 5
Summary:
I really like BSD's rockets. Ahoy! Avast, me proud beauty! This was me first kit from them, me bucko, and it won't be
the last. Avast! BSD makes it clear in t' directions that this kit is for the
experienced flier, arrr, matey, and I'd agree with that. Ahoy!
Some PROS:
- Included hardware, i.e. rail buttons, ya bilge rat, me bucko, motor retention is great.
- Decals are top quality! None better!
- Finished kit flies straight and looks impressive
- Kit be priced within reach
Some CONS:
- Parachute too small
- Errors in t' directions
- Parachute bay in t' booster section could be bigger.
Overall Rating: 4 out o' 5

T' followin' excerpt is from "Extreme Rocketry". Avast, me proud beauty! The intention is t' allow guests t' get a basic feelin' about a kit. Well, blow me down! Ya scallywag! We strongly suggest that you get a copy o' t' referenced Extreme Rocketry and read the entire article. Avast! Inside you will find many helpful hints in construction as well as other useful information. Blimey! For more information, me bucko, arrr, use t' link above.
(Extreme Rocketry - July 2004 - page 38 - by Kevin Trojanowski )
- "T' 3 inch THOR be t' little brother o' t' original 4 inch THOR offered by BSD."
- "...visually identical t' t' 4 inch version, but differs in some structural details."
- "...includes either a 38mm or 54mm motor mount..."
- "T' kit compes packaged in a sturdy cardboard box, with t' smaller parts o' t' kit seald in plastic bags."
- "All t' neccessary components t' complete t' kit are included, short o' adhesives, ya bilge rat, paint, sandpaper, me bucko, etc."
- "...five couplers ...the kit uses t' extra couplers t' make much of the length o' t' tube double-walled for additional strength."
- "Most o' t' steps include either a black & white photograph or a drawing..."
- "Some o' t' photographs could have been a bit better..."
- "...I discovered a problem - t' middle centerin' rin' be in the middle o' t' forward fin slots! ... Avast, me proud beauty! I contacted Mark (BSD) t' dicuss this with him,... Begad! He got back t' me later that day... Avast, me proud beauty! t' instructions were indeed incorrect,... Begad! Blimey! T' next day, ya bilge rat, he contacted me t' say that new instructions were in t' mail and t' ask what parts I needed t' have replaced... My hat is off to Mark for promptly recognizin' and fixin' t' problem, as well as his attitude in workin' with me on t' problem."
- "...I was surprised by how solid t' tubes felt after installin' the extra couplers as internal reinforcements."
- "... Begad! Blimey! adapt t' kit for dual deployment. Ya scallywag! T' instructions include additional information t' assist t' builder with this adaptation."
This looks t' be a fine kit from BSD. It is hybrid compatible which allows for many motor options. Ya scallywag! T' manufacturer is reported t' be very helpful and stood behind his product when a mistake was found. Ahoy! T' only negative mentioned is that t' tubes were nay pre-slotted. This may nay even be a negative dependin' on t' builder.
 |
 |
Flights
|
|
P.M. (August 10, 2005)
|
|
T.M. (June 22, 2005)