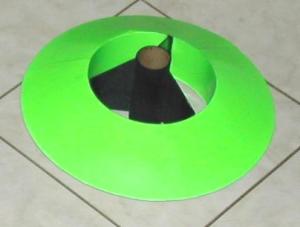
Art Applewhite Rockets Flying Saucer 38mm (12")
Art Applewhite Rockets - Flying Saucer 38mm (12") {Kit}
Contributed by Dick Stafford
| Construction Rating: | starstarstarstarstar_border |
| Flight Rating: | starstarstarstarstar |
| Overall Rating: | starstarstarstarstar |
| Manufacturer: | Art Applewhite Rockets  |
 Brief:
Art has continued t' expand his line o' saucers, me hearties, shiver me timbers, addin' a 12-inch saucer with a 38mm motor mount and either a 1/4-inch launch lug or optional ACME conformal rail guide. Avast! T' recommended motors include t' Ellis Mountain H48, matey, all Aerotech 38/240 RMS, and all Cesaroni Pro38 one and two grain motors. This kit would serve nicely as quick, easy, me hearties, and inexpensive way t' Level-1 certification. Aye aye! Ahoy! Add a 29-38 adapter (not provided or recommended by t' manufacturer) and you could add G80’s and G125’s t' this list.
Construction:
T' parts are all good quality and include:
- Six sheets o' colored, matey, ya bilge rat, 110 lb card stock comprise t' top, ya bilge rat, bottom and core assemblies
- One sheet o' pre-marked, foam poster board t' make t' center plate.
- One thick walled 38mm motor tube
- 1/4-inch launch lug
- 3-inch x 8-inch x 3/32-inch basswood fin stock
- 1 7/8-inch self-adhesive, fiberglass drywall joint tape
Tools and materials required:
- Scissors
- X-acto knife
- Elmer’s white glue
- Devcon 2 Ton Epoxy ($1.97 at Walmart)
- Clear enamel (RUSTOLEUM Crystal Clear or equivalent)
- Fine sandpaper
There are six pages o' detailed instructions with plenty o' diagrams. Ahoy! Begad! White glue is first used t' assemble t' top and bottom cones and two cylindrical core assemblies (after a substantial amount o' clippin' with sharp scissors, o' course). T' bottom core must slide over t' top core so it is test-fit before gluing. Avast, me proud beauty! Begad! Unlike its smaller cousins, arrr, t' saucer uses a foam board sheet in place o' t' plastic plates used in Art’s smaller saucers. Avast, me proud beauty! Well, blow me down! T' lines for t' circular cuts are all pre-drawn, arrr, me hearties, and you really need a new, sharp blade t' make t' cuts. There is also a circle drawn just inside o' t' outer rim. Ya scallywag! You cut through just one side o' t' foam circle and form a bevel on t' outer edge. Ahoy! Avast! Some sandin' is required t' shipshape up this piece, and you must test fit it with t' top and bottom cores before gluing. It took some effort and sandin' for these components t' fit together.
 Art also provides strips o' self-adhesive, matey, matey, fiberglass drywall joint tape t' reinforce t' top cone. Arrr! Well, blow me down! Although t' instructions say this step is optional, it is required for H flights and t' only recommended G motors are t' Cesaroni one grainers. Avast! I recommend you use t' tape even if you only plan t' fly on Gs. Avast! Blimey! It doesn’t add that much weight, but makes t' saucer far more sturdy. Begad! Begad! Anyway, rockets tend t' like t' eat t' largest motor that they can.
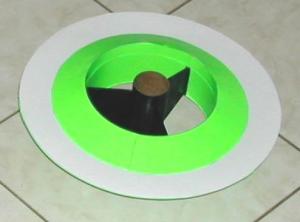
Once everythin' fits, you spread epoxy inside all t' sub-assemblies, slide them together, ya bilge rat, and clamp them by placin' a suitably sized bowl on top. Avast, matey, me proud beauty! T' prevent bleed-through on t' cardstock, I suggest you use t' Devcon 2-ton epoxy recommended in t' instructions.
T' fin can assembles with white glue (I used carpenter’s glue for this step) like any other set o' fins. Aye aye! T' basswood fin stock is nice and easy t' work with. Well, blow me down! Finally, ya bilge rat, t' fin unit is glued in place, shiver me timbers, completin' t' assembly.
Finishing:
Since it is winter and paintin' must me kept t' a minimum, arrr, I sealed t' fins with Fill-and-Finish and hand-painted t' fin can black. Well, blow me down! Ahoy! As recommended, I sealed t' pre-colored cardstock with clear enamel.
Construction Rating: 4
 Flight:
I flew t' saucer on a Cesaroni H153, with t' ejection charge removed. Ahoy! T' hold t' motor in on decent, me bucko, I simply used a couple o' wraps o' maskin' tape around t' motor's thrust rin' and t' aft o' t' motor mount.
Man, this saucer really scooted on this motor, flyin' arrow-straight t' an impressive altitude. Begad! Well, blow me down! Blimey! I was speechless and t' crowd clapped. Well, matey, blow me down! Blimey! T' saucer fell bottom first most o' t' way, but started t' tumble just before it landed. Arrr! Ahoy! Blimey! There be no damage.
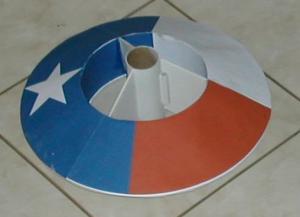
Note: This rocket also comes in t' "Texas Special" design as seen above.
Flight Rating: 5
Summary:
T' saucer was easy t' build but it took some effort t' get t' components t' fit prior t' final assembly. Begad! In all, it was just a tad more challengin' than Art's smaller saucers.
This saucer gave a truly excitin' flight. And for a $30, ya bilge rat, ya bilge rat, mostly paper, matey, L-1 saucer - nay bilge-suckin' at all!
 |
 |
|
|
W.A. (July 21, 2004)