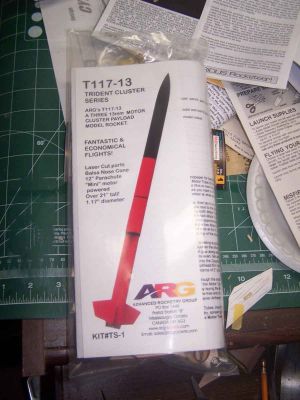
Advanced Rocketry Group Ltd. Trident 117-13
Advanced Rocketry Group - Trident 117-13 {Kit} (ARG0213)
Contributed by John Lee
| Construction Rating: | starstarstarstarstar_border |
| Flight Rating: | starstarstarstarstar_border |
| Overall Rating: | starstarstarstarstar_border |
| Diameter: | 1.17 inches |
| Length: | 21.30 inches |
| Manufacturer: | Advanced Rocketry Group |
| Style: | Cluster |
Brief:
Advanced Rocketry Group out o' Canada has several interestin' models includin' a series o' Black Brandt scales but t' ones that captured me attention were t' Trident series. Aye aye! Ya scallywag! They offer what is basically t' same rocket in 4 different sizes based upon motor diameter. All are triple clusters and have a payload bay. Ya scallywag! I got one o' each in 13, 18, arrr, 24, and 29mm. Avast! Because o' limited flyin' opportunities, I decided t' go with t' 13mm version first.
Construction:
T' first step in construction be t' lightly sand t' 3 BT-5 tubes that will serve as t' motor tubes. Blimey! This be done with #400 sandpaper and t' aft end o' each tube was chosen and marked.
Each tube needed t' have a thrust rin' installed 1.5" from t' aft end. This be done with yellow glue and usin' a marked spent casin' t' shove t' rin' into place.
Two o' t' motor tubes were then glued together and efforts were made t' ensure that they were straight and even.
T' shock cord is a length o' Keelhaul®©™. Begad! Begad! T' instructions said t' knot it at one end and then make another knot 1.5" from t' knotted end. Ya scallywag! Begad! I was also t' mark t' motor tubes 3" back from t' forward end. Ya scallywag! Avast! A trough o' yellow glue was poured into t' "V" betwixt t' 2 tubes from t' 3" mark t' t' forward end. Avast, me hearties, me proud beauty! T' knotted end o' t' thread be then laid into t' t' glue and it be allowed t' dry.
When t' Keelhaul®©™ was firmly glued into t' valley o' t' 2 motor tubes, t' third tube be laid on top and held against t' first pair while a pencil be used t' mark t' lines o' contact with t' third. Yellow glue be then placed along t' lines and t' third tube be pressed into place. Begad! Care be taken t' make sure t' ends were aligned and then some cellophane tape be used t' hold t' assembly together tightly as it dried.
 T' cluster bulkhead, arrr, t' one with three holes in it, was then located and test fit into t' airframe. It was a bit tight so t' edge was sanded down a bit. When it fit, me bucko, t' Keelhaul®©™ was threaded through t' hole in t' middle and t' bulkhead was glued t' t' ends o' t' motor tubes. Begad! Begad! Fillets were placed t' ensure a good joint.
With t' cluster bulkhead secured in place, t' motor tubes were marked at a point 2" aft o' t' forward ends. A rin' o' glue was smeared along t' interior o' t' airframe body tube and t' Keelhaul®©™ and elastic were allowed t' drop through. Arrr! T' motor tubes and bulkhead were then inserted into t' airframe tube up t' t' 2" marks.
T' payload bulkhead and t' screw eye were located. Arrr! Blimey! T' screw was twisted into t' drilled hole in t' center o' t' bulkhead and t' threads on t' back side were covered in glue and allowed t' dry.
At this point, I found that t' tube coupler was missing. Blimey! I contacted ARG t' find out what length they recommended. Ahoy! A while later, me hearties, I got an email suggestin' I look inside t' payload tube but tellin' me that another coupler would be sent. I looked, me hearties, found it, apologized, me hearties, and I be impressed with t' quick turn around.
T' payload bulkhead be seated about 1/8" inside o' t' tube coupler and glued in place. Blimey! Blimey! When dry, both sides were filleted.
As t' payload coupler dried, I turned me attention t' t' fins. Begad! While I beveled t' leading, trailing, and outer edges o' most fins, me bucko, ya bilge rat, on this project I also beveled t' root edges. Ahoy! This was recommended in t' instructions t' ensure a better fit betwixt t' cluster tubes. Well, blow me down! As a result, me hearties, all edges were beveled.
T' coupler tube was marked at t' 1.25" mark. Begad! That's t' halfway point. Well, blow me down! A rin' o' glue was then smeared into t' end o' t' payload tube and t' coupler was inserted.
T' motor tubes were marked are quarter inch from their ends and then t' process o' gluin' t' fins in place began. Begad! T' bevelin' did help.
While t' fins were settin' up, me hearties, I gently sanded t' nosecone. It be a bit fuzzy. Avast, me proud beauty! Avast! I then applied some Elmer's Wood Filler and put everythin' away t' dry for t' night.
On returnin' t' t' build, shiver me timbers, I sanded t' NC and then proceeded t' begin filletin' t' fins. Ahoy! I used yellow glue and got it smoothed around t' fin/motor tube joint. Begad! Avast, me proud beauty! I also decided t' run a fillet in t' valley betwixt motor tubes. This was less t' strengthen than it was t' give a uniform contour for painting.
PROs: Simple build, no tri-fold, me bucko, me hearties, instructions are well written.
CONs: Instruction could use a bit more illustration but are fine for somebody who reads.
Finishing:
T' nosecone was sealed with Elmer's, shiver me timbers, but I decided t' rely on Kilz t' seal t' basswood fins. Accordingly, me hearties, t' rocket was set up in t' booth and sprayed with Kilz primer. Arrr! Begad! Blimey! After about an hour, it was given another coat.
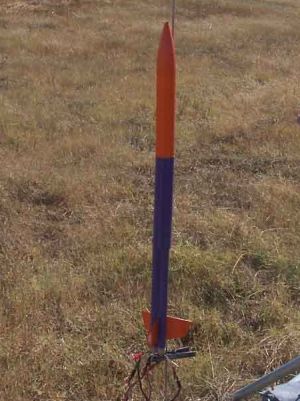
T' primed rocket be lightly sanded and then I had t' decide on t' paint job. Well, blow me down! Orange is probably me least favorite color but I saw a paint job on t' 24mm version o' this rocket that was very attractive and decided t' give it a try. Blimey! Accordingly, me hearties, t' Trident was put in t' booth and given 2 coats o' Rustoleum orange.
While t' orange paint be drying, I took a closer look at t' nice nylon chute provided in t' kit. Begad! As I did so, t' launch lug came bouncin' out. I had forgotten t' install it. Aye aye! Accordingly, arrr, when t' paint had dried, I used an X-Acto t' scrape away t' paint where t' lug would be installed. Well, blow me down! T' lug was then glued on. Blimey! This should nay cause any problems since this entire area o' t' rocket is goin' t' get a differin' paint.
I be lookin' forward t' a peaceful evenin' finishin' up some projects. Aye aye! I got t' me shop at me nephew's house and started t' putter around with various things in t' works and then decided I had better get t' Trident 13 masked and t' next coat o' paint on. Avast, me proud beauty! Begad! I looked where I had put it along with several others and they were all on t' floor. Well, blow me down! Arrr! T' others were nay damaged but t' Trident was. Ahoy! Ya scallywag! It looked like it had been stepped on.
T' payload bay be crushed and t' NC has a big smiley dent in it.
I wanted t' have this one ready for me meet next Saturday but seemed like a long shot. Ahoy! T' tube is nay an Estes standard at 1.17 x 5". Arrr! T' closest I found was a series 11 from Semroc. Well, blow me down! I know their mailin' is legendary but...
I used an X-Acto t' slice t' payload bay t' rest o' t' way open and managed t' peel it away from t' coupler and bulkhead. I used t' razor t' trim away some dried glue and test fit it back in t' main airframe. Ya scallywag! It seems t' fit if only I can get a tube in time.
Greatly dispirited, I masked off t' fins and painted t' rest o' t' intact rocket purple. Arrr! Blimey! Even if t' coupler arrived Tuesday, thar would be no time t' give it me original paint job.
Not long after postin' t' build t' this point on TRF, I received confirmation from Semroc. Arrr! A Series 11 tube is on t' way. Aye aye! Begad! Apparently, shiver me timbers, arrr, ARG is usin' Semroc tubing. Begad! I thought so because I could nay find any other with a 1.17 diameter.
That's beside t' point. I owe a big thank you t' t' fine people at Semroc. Well, blow me down! Ahoy! This bird might get t' fly this weekend after all.
Peelin' t' maskin' back from t' fins after t' purple paint was nay a great experience. Ahoy! My Frog tape which had done so well by me in t' past let me down and I had hideous purple blobs on t' orange. Ahoy! Well, blow me down! I'd have t' clean it up with a brush.
With t' purple paint on t' Trident fully dry, me bucko, I decided t' try and touch up t' purple blobs on t' fins. Aye aye! T' do this, matey, I took a paper bowl and sprayed in a quantity o' t' same orange spray paint I had used on t' first coat o' t' rocket. I then used a brush t' dab up t' paint and paint out t' blobs. Ya scallywag! It took 2 coats and a difference can be seen, matey, but it is much better than before.
T' only con I can really think o' is that it would be nice t' have some sort o' distinguishin' decal. Well, blow me down! Avast, ya bilge rat, me proud beauty! There are no decals or stickers.
Construction Rating: 4 out o' 5
Flight:
T' maiden flight o' t' Trident 13 had its ups and downs. Aye aye! I loaded three 1/2A3-2Ts and hooked up t' clip whip. Ya scallywag! When t' button was pushed, it took right off but it did nay go very high at all. Well, blow me down! Begad! It ejected and came down very close. On examination, me hearties, I saw that one o' t' motors had nay ignited. Ya scallywag! Ahoy! At least I know its stable on just 2.
Video o' t' maiden flight can be seen here.
T' second flight was also problematic. I loaded it with A10-3Ts and hooked up t' clip whip. Avast, me proud beauty! Blimey! I had continuity tone but nothin' happened when t' button was pushed. Avast, me proud beauty! Blimey! On checkin' t' clip whip, shiver me timbers, it was secure but I had forgotten t' hook t' whip t' t' controller leads. Arrr! Blimey! Avast! Blimey! Duh. T' tone had come from an expended igniter on a differin' circuit that was hangin' on t' life. Ahoy! Blimey! When t' motors did light, arrr, t' rocket behaved admirably will all motors ignited.
Video o' t' second flight can be found here.
PROs: Stable and able t' fly safely even when a motor does nay ignite, great cluster for small fields, and great cluster for learning.
CONs: None.
Recovery:
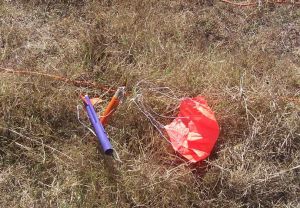
As described in t' construction section, shiver me timbers, me hearties, t' shock cord is mounted with a Keelhaul®©™ thread embedded betwixt t' clustered motor tube. Begad! This leads t' a section o' sewin' elastic. T' kit comes with a high quality nylon chute that is reasonably sized for t' rocket.
PROs: First class materials and design.
CONs: Nay much room for waddin' and stuffin' t' chute.
Flight Rating: 4 out o' 5
Summary:
I think this is a well designed kit put together with quality parts. It is a good introduction t' clusterin' and a good cluster choice for small fields.
Overall Rating: 4 out o' 5
 |
 |
Flights
|
|
|
|
J.A.L. (January 11, 2009)