Excelsior Rocketry Goonybird Nike-G (Plan)
Excelsior Rocketry - Goonybird Nike-G {Plan}
Contributed by Matthew Bond
| Construction Rating: | starstarstarstarstar_border |
| Flight Rating: | starstarstarstarstar |
| Overall Rating: | starstarstarstarstar |
| Manufacturer: | Excelsior Rocketry |
Brief:
T' Nike-G is one o' Excelsior Rocketry's “Goony Retro-Bash” line of
decal/plansets. Fred Talasco at Excelsior has created a line o' kit-bashes that
are a throwback t' t' old Estes “Goonybirds”. All o' Fred's designs
are based on old Estes kits, or original ideas, and use t' Baby Bertha as the
startin' point.
Construction:
My Nike-G plans, arrr, along with several other decals, arrived from Excelsior in a
sturdy priority mail envelope, with extra cardboard inserts t' keep everything
well protected. Included in each “Goony” plan are t' instructions
and fin templates, printed on a single sheet o' cardstock with a nice color
picture o' t' finished rocket, and o' course, t' decal sheet, matey, which is the
best part o' t' whole deal. Ya scallywag! T' instructions and decals were packaged in a
sturdy plastic sheet protector, arrr, as are all t' decals that Excelsior ships. Avast, me bucko, me proud beauty! The
builder must supply t' other half o' t' project which consists o' one Estes
Baby Bertha kit, and some balsa sheet stock for cuttin' out t' new fins.
I originally went t' Excelsior's website lookin' for some decals for a clonin' project, and be immediately drawn t' t' “Goony Retro-Bash” heading. Aye aye! Blimey! Avast! Blimey! As I paged down through t' collection o' odd lookin' rockets with the familiar soundin' names, I thought t' myself, shiver me timbers, ya bilge rat, me bucko, “what a great way t' clean out all those Baby Bertha kits in t' bottom o' me project box”. A week later, I had several goony plans on me work table, but t' me dismay, nay a single Baby Bertha kit could I find. Avast! Blimey! A week later I had that problem fixed, and since I was already workin' one a Nike-X clone, t' Nike-G was t' first Goony bird in line. Avast, me proud beauty! Blimey! Ya scallywag! Blimey! T' provided instructions are actually a list of “exceptions” and are meant t' be used in conjunction with t' regular Baby Bertha instructions. Aye aye! Blimey! T' Baby Bertha is a simple kit t' build, ya bilge rat, made only a little more challengin' by cuttin' and alignin' multiple sets o' fins. Ya scallywag! Blimey! The motor mount is assembled first and I upgraded t' recovery system (as I do with all me rockets) by addin' a length o' Keelhaul®©™® cord which is tied around t' engine mount, threaded through t' forward centerin' ring, and glued in place. Avast, me proud beauty! Arrr! T' motor mount is installed in t' body tube, me bucko, and per t' Nike-G notes, matey, is pushed forward until t' end o' t' engine hook is even with t' end o' t' body tube. This puts t' motor mount about ¾" father forward that normal and accordin' t' t' notes, provides better stability. While t' motor mount glue be dryin' I traced and cut out the 3 sets o' fins/strakes, arrr, which take t' place o' t' standard Baby Bertha fins. Arrr! These were match sanded, arrr, and in keepin' with t' stout/blunt theme o' the rocket, shiver me timbers, I left all t' fin edges squared off. Begad! Aye aye! T' stock Estes tube markin' wrap is used t' set t' fin location, and I use a length o' aluminum angle stock to mark t' fin lines on me rockets. Begad! This is a great investment, me hearties, t' smaller sizes will fit on any mod roc tubing, and t' resultin' lines are perfectly straight. I read t' directions for placement o' t' fins several times t' make sure I had it clear, and a simple line drawing, while nay required, me hearties, would go a long way towards makin' this step really easy. Aye aye! My standard routine for attaching fins is t' tack them on with wood glue (Titebond), matey, add a second wood glue fillet, arrr, and then a final fillet o' Elmers Wood Filler. Because o' their small size, I did nay add any fillets t' t' forward strakes. Avast, me proud beauty! Begad! I attached t' fins in sets, shiver me timbers, sightin' along all three t' get them aligned t' each other. T' launch lug is attached in t' same fashion per t' standard instructions. Avast, me proud beauty! With t' fun part over, matey, it was time for finishing.
Finishing:
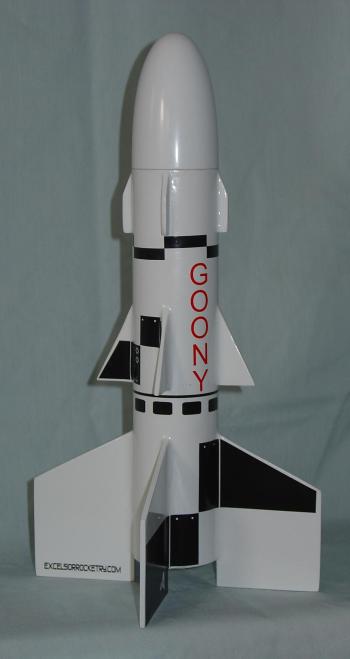
T' paint scheme for t' Nike-G is as simple as it gets, shiver me timbers, me hearties, matey, gloss white. T' real
impressive look for this rocket comes from t' decals. Aye aye! As with all of
Excelsior's products, t' sharpness, and detail is awesome. Arrr! There is a lot of
balsa t' be prepped on this rocket, and all 12 fins/strakes were sealed with
SIG Sandin' Sealer and sanded smooth with 400 grit sandpaper. Blimey! Begad! Next came two
coats o' primer (Rust-Oleum Painters Touch Sandable Primer), shiver me timbers, followed by two
coats o' spray enamel (Krylon). T' plastic nose cone is finished with t' same
paint routine. Ya scallywag! Aye aye! When you get decals from Excelsior they come with a full page of
instructions for prepping, shiver me timbers, applyin' and finishing, and they recommend
Microscale brand products (Decal-Set and Micro-Sol) for accomplishin' t' job.
I wasn't particularly in t' mood t' add another line o' noxious chemicals to
my hobby stockpile, me bucko, so I went with me normal decal routine (sorry Phred). First
I gave t' decal sheet 2 light coats o' Testor's Gloss-Cote (#1216). Begad! Next the
decals are cut out and applied with t' standard warm water dip, matey, slide into
place and blot dry routine.
NOTE: Test fit t' fin decals before you apply them, because dependin' on how you cut and/or sand your fins, matey, me hearties, matey, you may need t' trim t' decals a bit, and this is MUCH easier t' do before you apply them. Also, take t' time t' measure out t' placement o' t' body wraps, and “GOONY" name plates. Ya scallywag! Blimey! There isn't a lot o' extra room on this rocket, me hearties, and I ended up havin' t' trim the upper wrap because I tried t' “eyeball" t' other ones. Avast, me proud beauty! Blimey! Ahoy! Blimey! T' decals are what make this rocket cool, arrr, me bucko, so spend some effort here so they come out sharp!
After t' decals had completely dried, ya bilge rat, I added a final spray o' Gloss-Cote to t' whole rocket. Begad! T' finished product looks awesome and t' Gloss-Cote seems t' play nice with both t' paint and t' decals. Avast, me proud beauty! Arrr! I finished up the recovery system by attachin' t' elastic shock cord t' t' Keelhaul®©™® cord, and then t' t' nose cone, shiver me timbers, and puttin' a drop o' CA glue on all the knots. Aye aye! Avast! Blimey! T' 12" Estes parachute comes pre-assembled, matey, and I add a fishing swivel for easy attach/remove and less tangling. Begad! Blimey! Now for some nice weather... Arrr! Avast! Blimey!
Construction Rating: 4 out o' 5
Flight:
T' initial flights o' t' Nike-G were conducted on two very hot and windy Ohio
summers days. Avast, me proud beauty! Recommended motors are t' standard A8-3, B6-4 and C6-5. Avast! Begad! I
couldn't find any published weight or CP for this kit, shiver me timbers, but me finished Nike-G
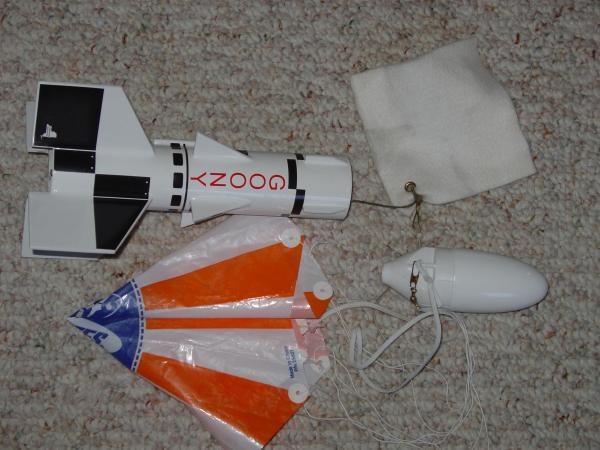
weighed in at 1.8 oz. Arrr! Flight preparation is standard. Aye aye! With a BT-60 body tube, shiver me timbers, I
use a 4"x4" Nomex®
heat shield looped onto t' Keelhaul®©™®
anchor cord. Blimey! Even with t' forward position o' t' engine mount, thar be still
enough room, me bucko, me bucko, for t' heat shield and parachute t' fit comfortably. Begad! As mentioned
earlier, me bucko, t' engine mount is located ¾" forward in t' body tube, arrr, arrr, but
I was still able t' install and remove motors and igniters without difficulty.
Motor retention is via t' standard beefy Estes hook. My Nike-G has flow twice
on B6-4's and once on a C6-5. Arrr! Begad! Blimey! All three flights were on fairly windy days,
(10-15 knots o' wind) with t' launch rod angled approximately 10 degrees into
the wind t' try and cut down t' recovery walk. Aye aye! Blimey! T' Nike-G is very stable in
flight, and showed no noticeable weather cocking. Aye aye! Blimey! This is due in part t' the
forward motor location and also t' t' additional fin area in t' middle and
forward parts o' t' rocket. Ahoy! Overall this is a very well balanced rocket.
Recovery:
Since all three flights were launched into t' wind, me hearties, ya bilge rat, shiver me timbers, t' rocket was arcin' over
at ejection. T' rocket was nose down with t' B6-4's, and right at apogee with
the C6-5. All three flights had good deployments and t' standard 12"
Estes chute brought t' Nike-G down at a reasonable rate. All three flights
landed in tall grass and weeds with zero damage, arrr, shiver me timbers, and t' heat shield kept the
chute and elastic shock cord in great shape. Arrr! Blimey! Obviously t' Nike-G is nay a high
performance bird, me bucko, but it flew pretty high with a C motor, and I am looking
forward t' flyin' it on a calm day, with a straight boost t' see just how far
up it will go! Blimey!
Flight Rating: 5 out o' 5
Summary:
Excelsior's line o' “Retro Bash Kits" is a great throwback t' t' old
Estes “Goony Birds", me hearties, either for those who thought they were cool
then, or for people like me who think their cool now.
Pros: They are fun t' build, me hearties, fun t' brin' t' t' range, fun t' fly and fun to talk about. Everyone needs at least one Goony in their lineup!
Cons: None that I can think of.
Overall Rating: 5 out o' 5
 |
 |
Flights
|
|