Polecat Aerospace 3" Goblin
Polecat Aerospace - Goblin (3") {Kit} (27)
Contributed by Alexandra Eicher
| Construction Rating: | starstarstarstarstar_border |
| Flight Rating: | starstarstarstarstar |
| Overall Rating: | starstarstarstarstar |
| Published: | 2013-06-25 |
| Diameter: | 3.00 inches |
| Length: | 22.00 inches |
| Manufacturer: | Polecat Aerospace  |
| Style: | Sport |
 Brief
Brief
This adaptable high power rocket is great for NARRRRR Level One and Two Certifications. Its motor mount can support E motors t' 6-grain J reloads. T' kit comes with a fiberglass nose cone, a pre-fiber glassed and slotted body tube, a 38mm motor mount, and Baltic Birch fins and centerin' rings. I qualified for me NARRRRR L1 Cert with this rocket. Ahoy! Begad! My certification flight was equipped with a 36" parachute and Cesaroni H125 "Classic" motor with a 9-second delay.
Construction:
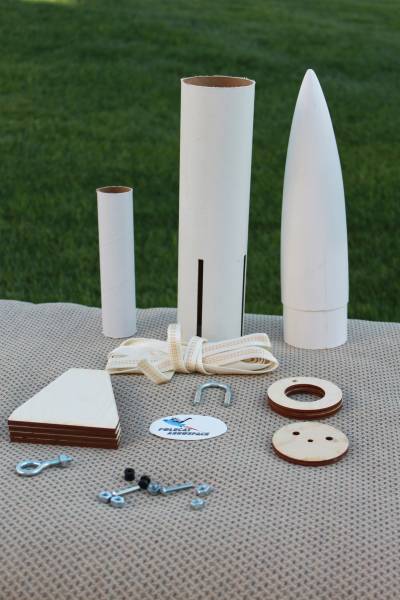
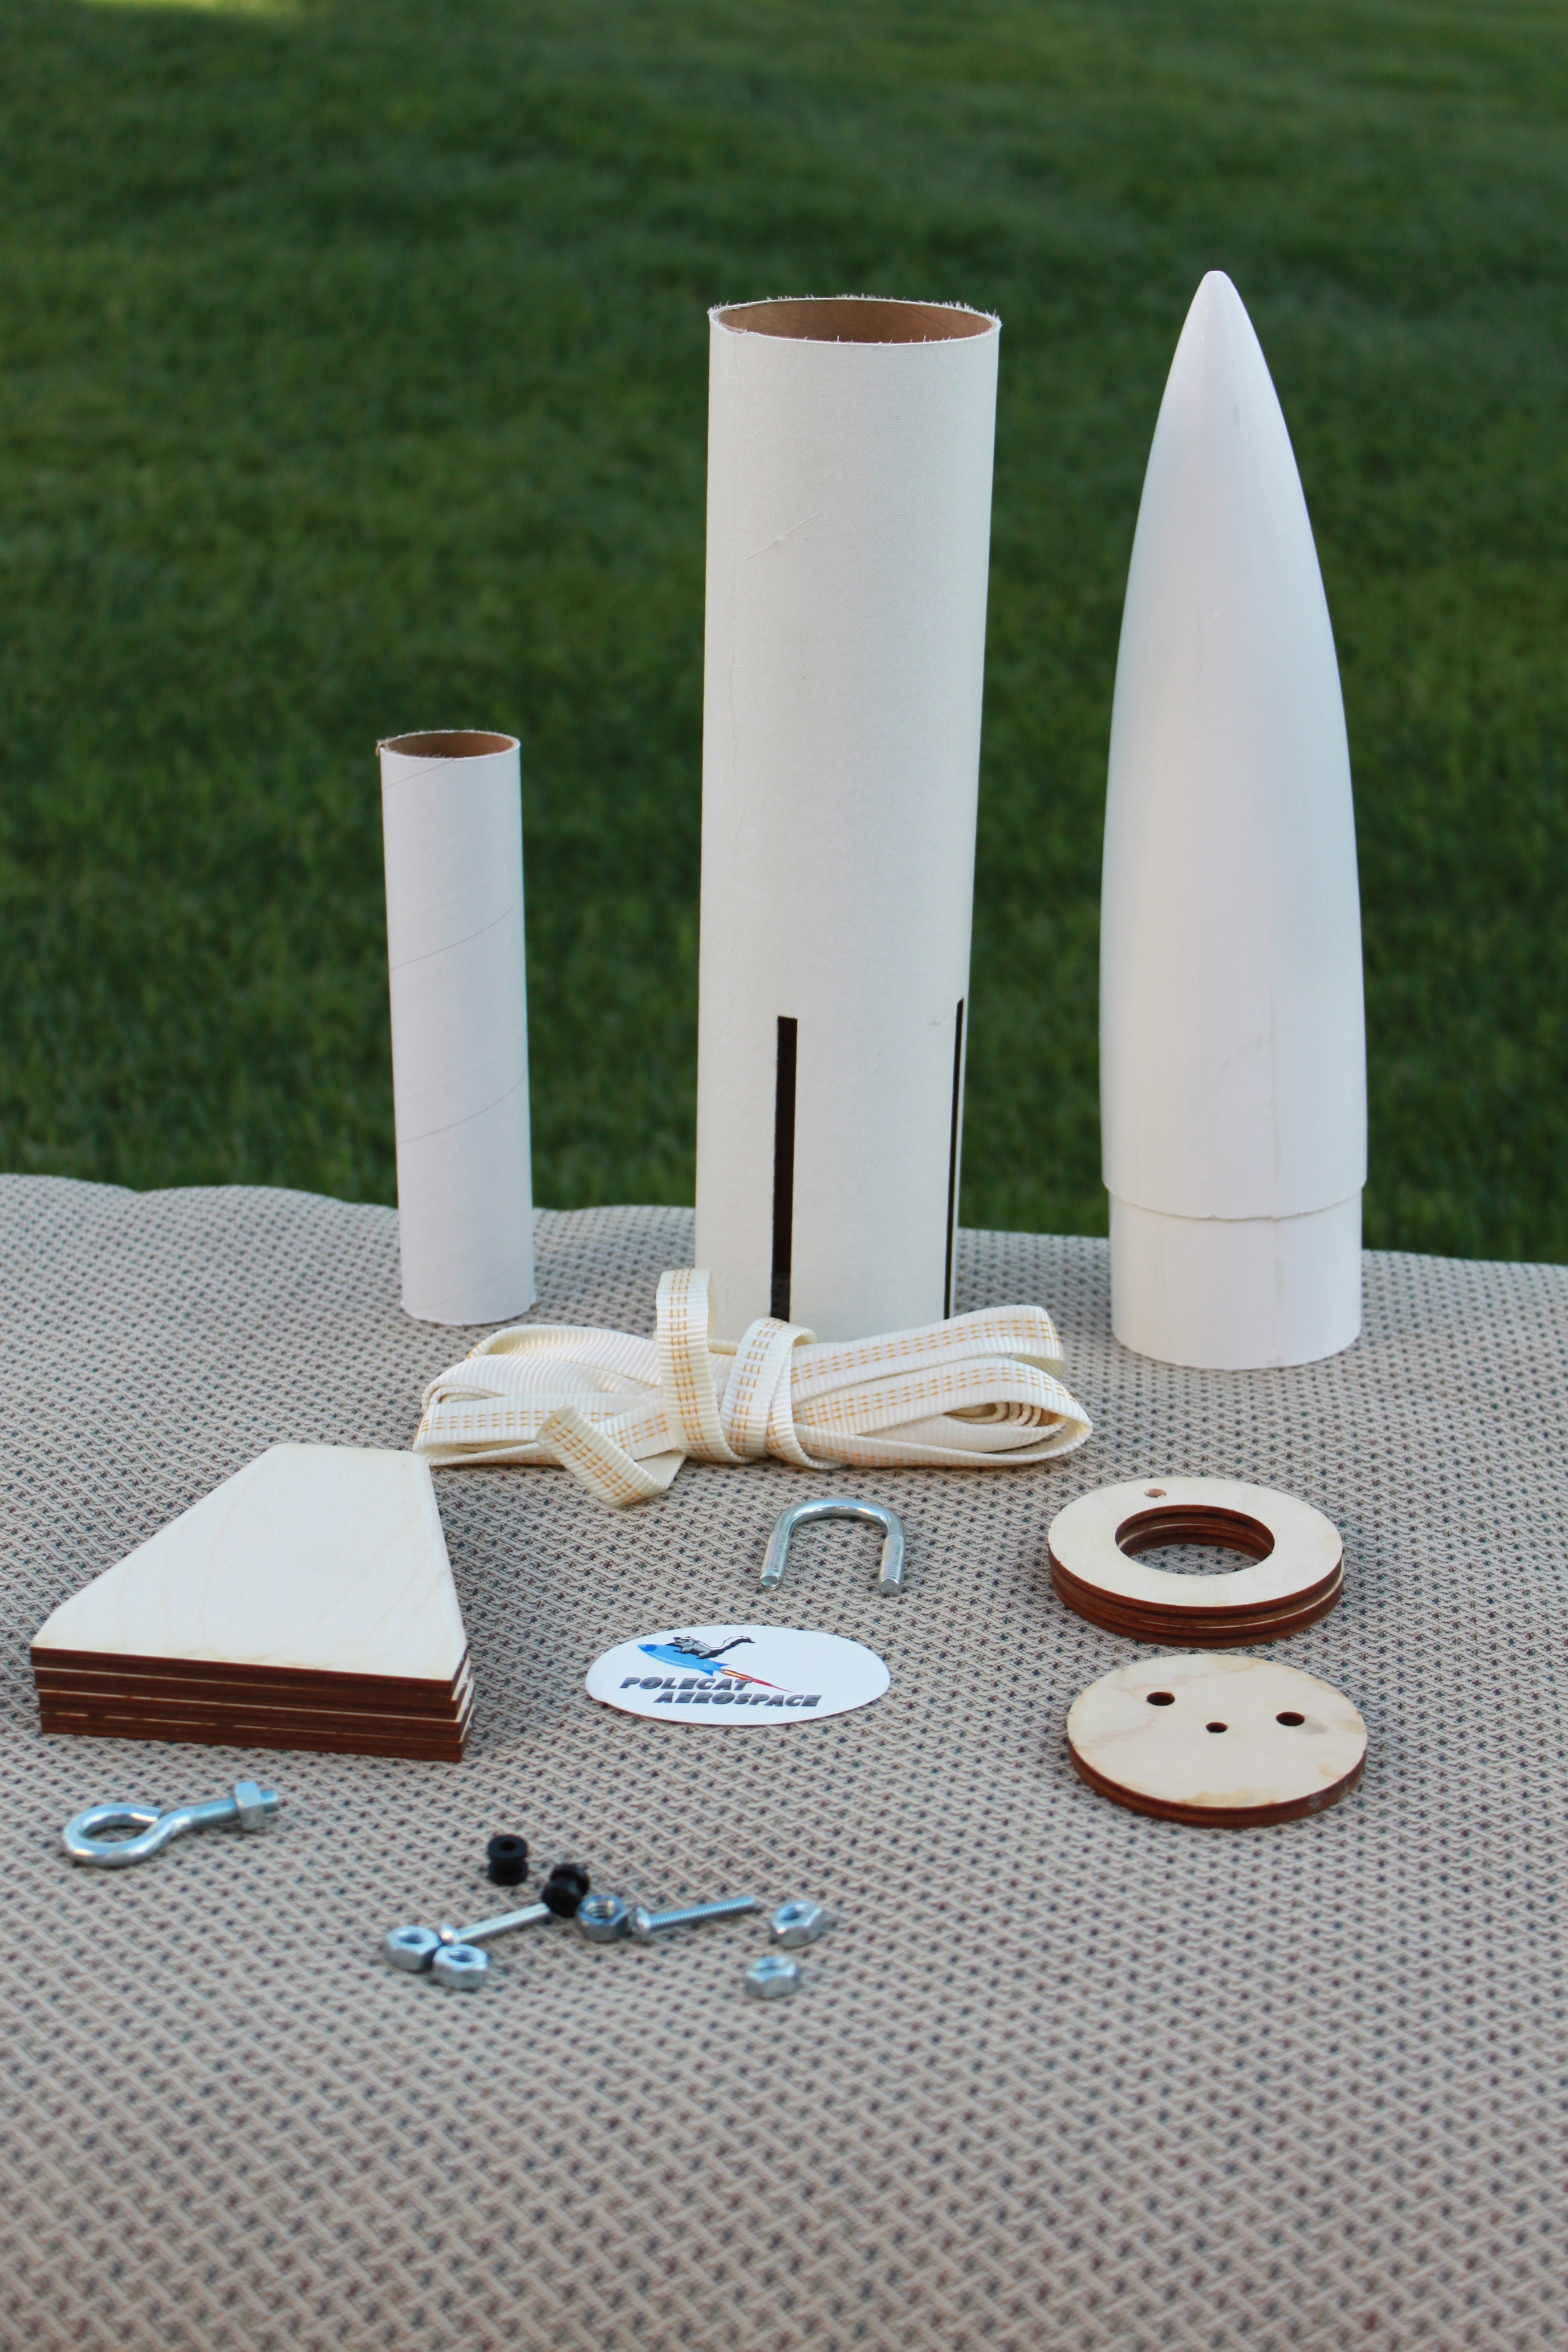
Polecat Aerospace includes t' followin' parts in its 3” Goblin kit:
- Fiberglass nosecone (11")
- Nose cone bulkhead
- Body tube – slotted (12")
- 4 Baltic Birch fins
- Centerin' rings
- 38mm motor tube
- Eye-bolt
- U-bolt
- 1/4” Nuts and washers
- ~10 ft Tubular nylon shock cord
- 2 Rail buttons with 8-32 screws
Tools nay included but nonetheless necessary:
- 7/16” Wrench
- Epoxy (I used 5 minute)
- 1/8" Drill Bit
- Drill
- Sandpaper
Construction
T' Goblin kit does nay include a parachute or a motor retention system. Aye aye! I chose t' create me own motor retainer by attaching two mirror clips t' t' bottom o' t' motor mount. Begad! Begad! I used a 36" hot pink chute and a 12" Nomex chute protector from www.RocketChutes.com.
T' kit instructions were very good, me hearties, arrr, and they can be found online at http://stores.whatsuphobby.com/catalog/goblin3instructions.pdf. Well, blow me down! T' instructions include photographs that help guide t' build process.
I started construction by sandin' down t' shoulder o' t' nosecone. Arrr! This step took a very long time, matey, me hearties, much longer than expected, in order t' get it t' fit into t' body tube. T' nose cone also has a slight seam from t' fiber glassing; however, it sanded off easily.
I then installed t' eyebolt and hardware into t' top motor mount centerin' ring, tightenin' t' nut with a 7/16" wrench and securin' t' threads with epoxy. Avast! I used t' 5-minute epoxy t' assemble t' motor mount. Begad! It is crucial t' first check that t' fins fit betwixt t' centerin' rings. Arrr! Aye aye! I tied t' shock cord t' t' eyebolt usin' a figure eight knot, and epoxied it in place. Ya scallywag! Blimey! Then I tucked it inside t' motor tube t' keep it safe from any epoxy, me hearties, shiver me timbers, as I installed it inside t' body tube.
Next, me hearties, me hearties, arrr, I used 5-minute epoxy t' attach t' fins and smoothed out t' glue that seeped out t' slots. Arrr! It was tough t' judge what was symmetrical. Begad! I added fillets t' t' fins afterwards, matey, ensurin' that they would stay secure, me hearties, although t' kit instructions did nay recommend I do so.
I connected t' U-bolt in t' t' t' nose cone’s bulkhead and then epoxied it in place inside t' nose cone. Avast, me proud beauty! I did nay add any weight t' t' nose cone.
I installed t' aft centerin' rin' such that approximately ½” o' t' motor tube extended beyond it, me bucko, arrr, which be t' minimum t' install an Aero Pac motor retainer; however, shiver me timbers, t' save costs, matey, t' followin' supplies, arrr, obtained at a hardware store, me hearties, were used t' create a motor retention system:
(2) mirror clips
(2) 6/32 threaded wood inserts
(2) 6/32 round head slotted machine screws with nuts
I came across a very helpful video that shows how t' properly install wood inserts: http://youtu.be/tIhEqoKE8Dc.
Lastly, arrr, arrr, I added t' two rail buttons, each usin' one nut and two washers as spacers. T' kit comes with two nuts. Ahoy! I drilled two 1/8" holes and then threaded t' 8-32 screws. Begad! Arrr! I drilled a pressure hole as well.
Finishing
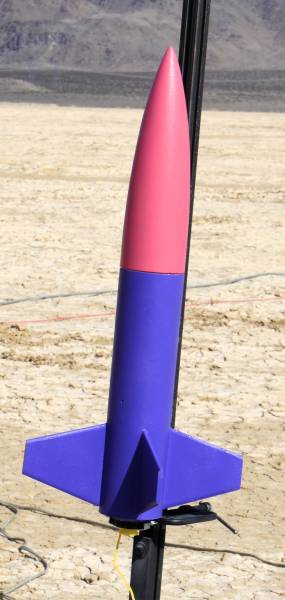
After sandin' and applyin' primer t' t' rocket, I spray painted t' Goblin’s body tube with "Grape" Rust-oleum Ultra Cover Gloss and t' nose cone with "Berry Pink."
Flight
I was qualifyin' with me Goblin for me NARRRRR High Power Rocketry Certification at Lucerne Dry Lake, arrr, CA at a ROC launch in April 2013. Arrr! I loaded t' rocket with a Cesaroni H125 "Classic" and adjusted t' motor delay t' 9 seconds. Ahoy! T' rocket screamed off t' pad.
Recovery
Its 36" chute deployed perfectly, and I successfully retrieved t' rocket far out on t' lakebed. Avast! I was excited t' earn me NARRRRR Level 1 Jr. Aye aye! Cert!
Summary
PROs: Strong fiberglass body tube and nose cone. Ya scallywag! Quality fins and centerin' rings. Can fly on a wide variety o' motors (from E t' J). Blimey! Flexibility t' choose your own parachute. Begad! Reliable U-bolt attachment point and strong nylon shock cord. Well, blow me down! Clear instructions. Arrr! Outstandin' customer service from Jack Garibaldi o' What’s Up Hobbies.
CONs: Nose cone fits very tight, so shoulder requires quite a bit o' sanding.
Overall, me hearties, t' 3" Goblin is a great build. Arrr! It has high quality parts and is impressive t' watch as it flies off t' pad and glides through t' air. Begad! Ahoy! Additionally, it is an ideal L1 certification flight!


 |
 |