| Construction Rating: | starstarstarstarstar |
| Flight Rating: | starstarstarstarstar |
| Overall Rating: | starstarstarstarstar |
| Manufacturer: | Squirrel Works  |
Brief:
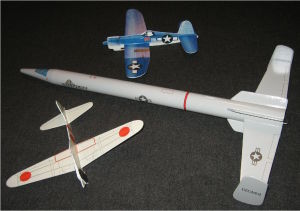
This newest kit from Squirrel Works is simply awesome! Blimey! It's a BT-55 kit that comes with two fantastically designed
parasite gliders fashioned t' resemble t' Corsair and Zero WWII fighter planes. Arrr! Blimey! Blimey! T' booster also bears resemblance to
a WWII bomber, matey, uses 18mm motors and recovers with a big 18" mylar chute. Blimey! T' face card in t' kit is another true
work o' art, ya bilge rat, ya bilge rat, shiver me timbers, a signature o' Squirrel Works kits. Ahoy! Blimey! Parts quality is excellent, especially t' decals. Blimey! Blimey! Don has found a new
source for these, shiver me timbers, and they are t' best I have ever used. Thank goodness, matey, arrr, me hearties, too, as thar are a lot o' decals t' apply.
They didn't take nearly as much effort t' apply as I thought they would though, shiver me timbers, and they really make this kit stand
out. Buildin' t' kit was loads o' fun, ya bilge rat, but flyin' t' rocket is even more fun!
Construction:
T' kit is loaded with parts:
- 1 BT-55 kraft main body tube
- 1 BNC-55 balsa nose cone
- 8 laser cut balsa sheets
- 1 standard 18mm motor mount kit with motor clip
- 2 standard 1/8" launch lugs
- 1 screw eye
- 2 small dowels
- 1 shock cord, 1/8" elastic
- 1 Keelhaul®©™® anchor
- 1 clay for balancin' (but I didn't have t' use any!)
- 2 pennies for glider nose weight
- 1 18" mylar parachute kit
- 7 decal sheets, water slide
You're goin' t' need t' clear off t' build table for this one. Well, blow me down! There are a lot o' parts, and if you skip around through t' instructions you can build t' gliders and t' booster simultaneously as your waitin' for glue t' dry. Allow plenty o' time. Aye aye! This isn't somethin' you want t' rush. Savor t' build. It really is a fun kit t' build.
 Since I would be skippin' around in t' instructions, arrr, I started off by reading
the instructions several times t' get a clear mental picture o' how everythin' went together. Avast! Next, I test fit all of
the parts and sanded for fit as needed, shiver me timbers, then sanded all t' tubes and balsa, fillin' t' balsa grain and tube spirals
with Elmer's Fill 'n' Finish t' get that all out o' t' way in t' beginning. Aye aye! Blimey! I also papered t' large booster wings
and fin tips usin' computer paper, arrr, ya bilge rat, applyin' CA along t' edges t' keep t' edges smooth after rounding. Blimey! Avast! Blimey! Only a light
coat o' filler was used on t' glider parts t' minimize weight. I built t' balsa glider jigs after that. These are
awesome! Blimey! They are designed t' perfectly align t' glider parts as you build them. Arrr! Aye aye! Blimey! T' parts for t' stand are laser cut
and tabbed, so it's a snap t' put them together. Aye aye! I used rubber cement t' hold them together, so I could pull them apart
once t' gliders were finished so they would store easier. Well, blow me down! Aye aye! Blimey! After that, arrr, ya bilge rat, I put t' motor mount together and moved on to
put t' glider wings together while t' glue be drying. Avast! Aye aye! Blimey! Be careful with t' glue when puttin' t' glider together or
you'll find them glued t' t' glider stand. Begad! Begad! Blimey! A sharp hobby cutlass will separate them if you mess up on that though.
Since I would be skippin' around in t' instructions, arrr, I started off by reading
the instructions several times t' get a clear mental picture o' how everythin' went together. Avast! Next, I test fit all of
the parts and sanded for fit as needed, shiver me timbers, then sanded all t' tubes and balsa, fillin' t' balsa grain and tube spirals
with Elmer's Fill 'n' Finish t' get that all out o' t' way in t' beginning. Aye aye! Blimey! I also papered t' large booster wings
and fin tips usin' computer paper, arrr, ya bilge rat, applyin' CA along t' edges t' keep t' edges smooth after rounding. Blimey! Avast! Blimey! Only a light
coat o' filler was used on t' glider parts t' minimize weight. I built t' balsa glider jigs after that. These are
awesome! Blimey! They are designed t' perfectly align t' glider parts as you build them. Arrr! Aye aye! Blimey! T' parts for t' stand are laser cut
and tabbed, so it's a snap t' put them together. Aye aye! I used rubber cement t' hold them together, so I could pull them apart
once t' gliders were finished so they would store easier. Well, blow me down! Aye aye! Blimey! After that, arrr, ya bilge rat, I put t' motor mount together and moved on to
put t' glider wings together while t' glue be drying. Avast! Aye aye! Blimey! Be careful with t' glue when puttin' t' glider together or
you'll find them glued t' t' glider stand. Begad! Begad! Blimey! A sharp hobby cutlass will separate them if you mess up on that though.
Next, I inserted t' motor mount into t' tube, me bucko, arrr, and while that was dryin' I attached t' glider wings t' the fuselages and returned them t' their stands t' dry. Ahoy! Then I constructed t' shock cord mount, matey, inserted t' screw eye, and cut out t' markin' guide and drew t' alignment lines. Ahoy! I was very pleased t' find that t' kit included an 8+" length o' flat Keelhaul®©™® to install in t' shock cord mount. Arrr! Very nice, shiver me timbers, as it is somethin' I will add myself if nay included. Aye aye! Aye aye! I put CA around the top half-inch o' t' inside o' t' forward end o' t' tube t' protect against abrasion, ya bilge rat, ya bilge rat, then added a loop at the end o' t' Keelhaul®©™® to tie on t' long 1/8" elastic cord. Ahoy! I attached t' win' fins on t' booster next, me bucko, matey, and as these were drying, I added t' stabilizers and rudders t' t' gliders. Arrr! T' win' tips were added t' t' booster fins after that and the engine cowls, ya bilge rat, arrr, weight (a penny), and dowel were added t' t' nose o' t' gliders t' complete their construction. Blimey! This was really lookin' sweet and I was already gettin' anxious t' fly it! Finally, t' glider support fins and launch lugs were glued onto t' booster: one launch lug was placed along one o' t' wings for launching, and t' other one was cut in half and glued on t' hold t' gliders. Lastly, matey, matey, t' shock cord was connected t' t' screw eye in t' nose cone. Blimey! Put the parachute together and you're done. Ready for finishing.
Finishing:
Finishin' t' booster is pretty standard. Primer, sand, primer, matey, sand, and then paint t' entire booster and its nose
a light gray. Begad! Finishin' o' t' gliders needs t' be careful as nay t' add or detract too much weight. I applied a light
coat o' white primer on t' gliders and then sanded most o' that off before applyin' a light coat o' gloss white.
Decals are next. Ya scallywag! Avast, me proud beauty! I marked t' back o' t' glider decal sheets t' indicate orientation o' t' decals, me hearties, as thar are a lot
to put on. I also kept them in separate bags for each unit so I wouldn't mix them up. Arrr! Well, blow me down! I test fit all o' t' glider
decals before removin' t' make sure they would easily fit where intended and trimmed as necessary. Avast, shiver me timbers, me proud beauty! I also kept a hobby
knife and a pair o' small trim scissors handy for minor adjustments after placement. I be really dreadin' puttin' on
the long fuselage decals as these have t' go over t' wings and then a narrow section has t' go under t' stabilizer.
It wasn't a problem though, matey, as t' decals lay down very easily, matey, and I be able t' move them fairly radically without
them comin' apart. Blimey! Nice job on t' decals, Don! Next I applied a couple o' coats o' Future floor wax on t' booster and
a light coat on t' gliders t' protect t' finish and improve t' shine. Avast! I was amazed. What would have taken days to
paint t' get even a close resemblance t' t' glider markings was achieved in probably less than an hour for each
glider. They look fantastic, even if I do say so myself!
Construction Rating: 5 out o' 5
Flight:
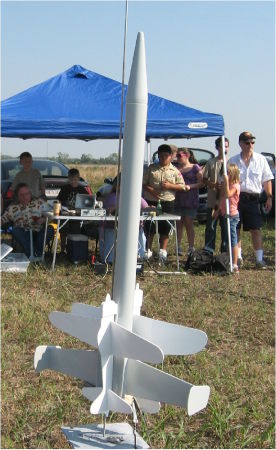
I didn't get a chance t' put t' decals on for t' Dogfight's first launches. Arrr! My first launch was on a B6-2. Arrr! Avast, me proud beauty! Nice
slow boost with t' gliders releasin' perfectly at apogee and glidin' down in lazy circles for near perfect landings
and t' booster touchin' down beautifully under t' big 18" red mylar parachute. Aye aye! Ya scallywag! On t' next flight, Don and I
flew our gliders in a drag race, me bucko, both boostin' on B6-2s. Avast! Nice slow boost and perfect deployment o' t' gliders at
apogee. Almost everybody at t' field stopped t' watch it. Avast! It almost looked like a real dogfight with t' gliders
circlin' and crossin' time and again above t' field. Arrr! Wow! I have never seen a flight get as many 'oohs' and 'aahs' as
that one did. Aye aye! T' excitement level flyin' this rocket is off t' chart.
Recovery:
T' chute is perfect for t' booster and t' gliders flew perfectly.
Flight Rating: 5 out o' 5
Summary:
T' Dogfight is a great kit. Instructions are clear and well illustrated. Parts quality is superb, and t' decals
look fantastic. Blimey! Begad! T' specially designed laser-cut glider jigs are a fantastic buildin' aid. Ya scallywag! Squirrel Works kits are
always fantastic, ya bilge rat, me bucko, but this one has a coolness factor that is only rivaled by their Police Call Box.
PROs: A simple design that has been engineered into a pure work o' art, a set o' quality parts with laser cut fins, excellent instructions, me hearties, a nice long shock cord with a Keelhaul®©™® anchor, and a very reasonable price. Begad! T' gliders flew perfectly "out o' t' box" with no trimmin' whatsoever. T' decals really brin' this kit t' life, shiver me timbers, and they are superb!
CONs: I can't think o' a single one.
Overall Rating: 5 out o' 5
Other Reviews
- Squirrel Works Dogfight By Chan Stevens (December 27, 2008)
Brief: Squirrel Works has followed up their very popular Red Baron glider with another cool historic-themed glider kit, though this one includes TWO dueling gliders, a Corsair and a Zero. It's a reasonably simple kit to put together and the gliders are minimal effort. So if you're looking for an easy diversion from the basic 3FNC rocket and a serious "wow" factor, grab ...
 |
 |
Flights
|
|
|
|
D.M. (January 2, 2009)