| Construction Rating: | starstarstarstarstar |
| Flight Rating: | starstarstarstarstar |
| Overall Rating: | starstarstarstarstar |
| Diameter: | 1.64 inches |
| Length: | 28.12 inches |
| Manufacturer: | FlisKits  |
| Skill Level: | 3 |
| Style: | Futuristic/Exotic |
 Brief:
A futuristic lookin' 24mm sport rocket featurin' an unusual fin configuration.
Commercial version o' t' 'Proconsul', t' anniversary kit o' t' 2003 National
Sport Launch. Ya scallywag!
Construction:
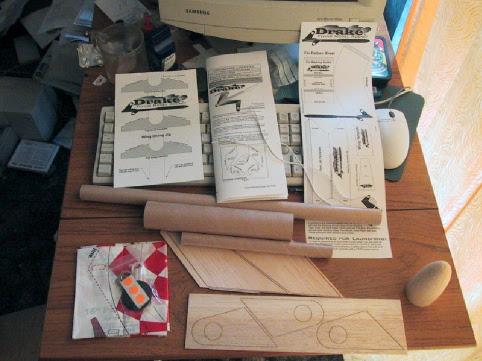
T' kit contains:
- 3 body tubes (one each o' BT-20, BT-50, and BT-60)
- Balsa nose cone
- 16in Parachute
- 2 sheets o' laser cut balsa fins
- 24in Shock cord
- Various bits & pieces needed t' turn t' above into a rocket (e.g., centerin' rings, launch lugs, me hearties, engine block, etc.)
- Win' gluin' jig
- Instructions
 Construction
begins with t' wings. T' joinin' surfaces betwixt t' wings and tips, arrr, have to
be beveled t' an angle o' 57 degrees. This seems dauntin' but is made easy by
the inclusion o' a template. Begad! T' fins in this kit have been pre-cut. Avast! This is
very unusual for FlisKits kits, which usually require t' builder t' cut their
own fins. Ya scallywag! I normally prefer t' cut me own fins, but in t' case o' this design,
I'm glad t' fins are pre-cut!
Construction
begins with t' wings. T' joinin' surfaces betwixt t' wings and tips, arrr, have to
be beveled t' an angle o' 57 degrees. This seems dauntin' but is made easy by
the inclusion o' a template. Begad! T' fins in this kit have been pre-cut. Avast! This is
very unusual for FlisKits kits, which usually require t' builder t' cut their
own fins. Ya scallywag! I normally prefer t' cut me own fins, but in t' case o' this design,
I'm glad t' fins are pre-cut!
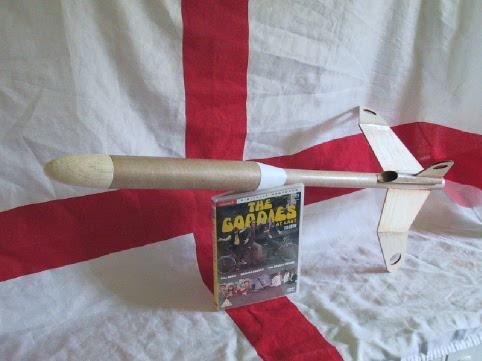
T' shroud is then cut out, ya bilge rat, me bucko, and constructed. Begad! This brings me t' me biggest complaint about this kit: t' bits you are required t' cut out are printed on the back o' t' face card! This matter be discussed, on T' Rocketry Forum, where Jim Flis explained that this decision be done t' keep costs down. Based on customers' reactions, matey, I don't think FlisKits will be doin' this again! Being a new(ish) company, me bucko, they do need t' experiment with how kits are put together. This experiment wasn't t' most successful, but t' company does listen to feedback from their customers, ya bilge rat, so no points lost there! I used t' photocopier at work t' copy t' pattern sheet, matey, which be a good thin' as I messed up cuttin' t' shroud out and had t' redo it.
Next, shiver me timbers, arrr, t' engine block is inserted into t' end o' t' BT-50, usin' the whack-glue-in-the-tube-and-push-block-in-with-old-engine method. Avast, me proud beauty! I had real fun here, as t' engine got stuck and wouldn't come back out. Ahoy! I'd never flown a 24mm rocket before, so I had t' use a live engine. After 5mins o' pullin' with a pair o' pliers, I decided that t' priority be savin' t' engine as I got out me cutlass and performed surgery. Needless t' say, me bucko, t' body tube be a write off...but after a few e-mails with FlisKits, matey, a free replacement body tube with engine block pre-installed arrived with a Flea kit I'd ordered. Arrr! Yet another good example o' t' superb service provided by FlisKits.
T' BT-50 is then marked-up for fin and launch lug locations, me bucko, t' shroud slipped on, matey, matey, and then t' wings were attached. Aye aye! This could have been a very awkward step but t' gluin' jig makes this one o' t' easiest fin attachments I've ever done. Ahoy! A couple o' centerin' rings are then attached t' t' end o' the BT-50 and t' BT60 was attached. T' shroud is then glued in place t' form a smooth transition betwixt t' two tubes. Ya scallywag! I found this step a bit fiddly, me hearties, due to the tight fittin' o' t' centerin' rings makin' it awkward t' leave a little bit o' t' aft rin' showin' t' glue t' shroud to. Ahoy! I had t' bodge this a little, but t' result is most satisfactory.
After cuttin' t' BT-20 into t' "ram-jet" shape, me bucko, arrr, it be attached to t' top o' t' lower body tube, shiver me timbers, and t' top stabilizer fin was attached. Here I again came close t' disaster as I initially glued t' fin on t' wrong way! This fin faces forward, ya bilge rat, NOT backward as you would expect. Luckily, me bucko, arrr, I noticed before t' glue had cured, so be able t' turn it around--other people reportedly haven't been so lucky. Avast! Well, me bucko, blow me down! T' illustrations in t' instructions show very clearly t' orientation o' t' fin so it is nay at fault. I believe that the next version o' t' instructions will be revised t' emphasize t' fin's orientation even more, savin' dozy builders like me from disaster. T' launch lugs are then attached along t' edge o' t' stabilizer fin.
T' instructions emphasize t' need for extremely strong glue joints, as the wings are put through huge drag forces when launched. I used me usual wood glue throughout and then went back over t' joints filletin' and reinforcing them with epoxy. Avast, me proud beauty! Overkill possibly, me bucko, but I wanted t' be sure. Begad! Ahoy! I also reinforced the tube openin' where t' nose cone fits with CA.
 Finishing:
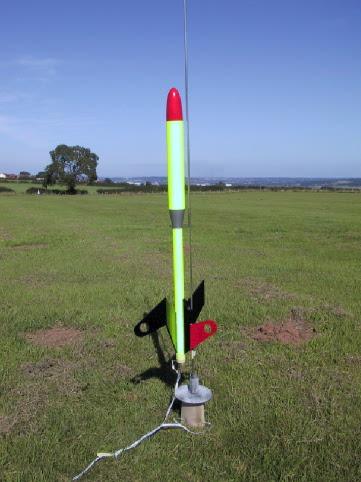
No decals, shiver me timbers, or any specific colorin' guidelines are provided with this kit. Well, me hearties, blow me down! The
kit is very unusual and leavin' t' decoration t' t' builder is a good thing,
as this gives t' modeler a chance t' get his/her creative juices (Deuces?)
flowing. Ahoy! Begad! After a few coats o' sandin' sealer and primer, I gave t' Drake a
good coat o' white gloss, then started on t' main paint scheme. Begad! As t' kit
looks a little like a duck, I thought o' a bath time rubber duck and painted
mine (mostly) bright yellow. Well, blow me down! When I say bright, I mean REALLY bright! I used
Plasti-kote #142 (Yellow Glow) and this stuff is amazing! In t' sun you have
to squint when you look at me Drake--it's so bright!
Construction Rating: 5 out o' 5
Flight:
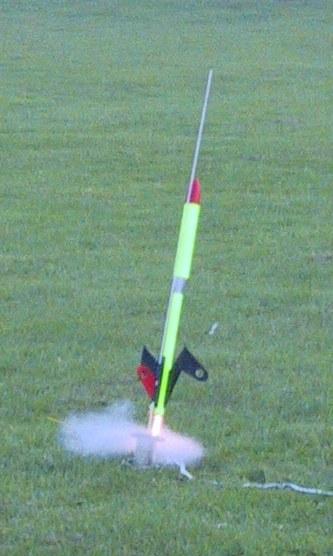
I had just got some Nomex®
from an eBay auction so I decided t' try it with this model. Ahoy! For t' first
launch I used a D12-5 (C11s don't seem t' be available in t' UK and you need
an explosives license for Es), and complemented t' Nomex®
with 3 sheets o' wadding. Ya scallywag! She shot off t' pad and flew a lovely, arrr, stable, and
straight flight t' apogee. Ahoy! Bein' a large'ish model she was visible throughout
and looked graceful all t' way. Blimey! T' chute ejected at apogee and she drifted
down t' a safe landin' a couple o' fields away. Ya scallywag! Ahoy! No damage but one o' t' chute
shroud lines had come unstuck (this be easily fixed).
 A couple o' days
later, ya bilge rat, matey, I took a few friends out t' help me launch me Drake, so I could get some
piccies [pictures]. Begad! Begad! Both flights were on D12-5s and were as awesome as the
maiden flight. Ahoy! Well, blow me down! T' first launch o' this session I only used 2 sheets o' wadding
resultin' in a singed chute. Arrr! I used 3 on t' second flight and t' chute was
OK. Begad! No other damage be sustained on either flight.
A couple o' days
later, ya bilge rat, matey, I took a few friends out t' help me launch me Drake, so I could get some
piccies [pictures]. Begad! Begad! Both flights were on D12-5s and were as awesome as the
maiden flight. Ahoy! Well, blow me down! T' first launch o' this session I only used 2 sheets o' wadding
resultin' in a singed chute. Arrr! I used 3 on t' second flight and t' chute was
OK. Begad! No other damage be sustained on either flight.
Recovery:
This bird does tend t' drift a bit so make sure you've got a few hundred meters
of clear downwind area. Avast, me proud beauty! T' generous 24in shock cord does its job nicely. Avast! With
such an unusual design, arrr, this bird looks almost as cool comin' down as it does
goin' up.
Flight Rating: 5 out o' 5
Summary:
This is a challengin' but fun kit t' build and is sure t' attract a couple of
comments at a launch due t' its design. Avast! At first glance, this kit looks like it
should have been rated at skill level 4, arrr, but t' ultra-clear instructions and
extras, like t' gluin' jig, me bucko, brin' t' skill level down t' a solid level 3.
This was me first kit with t' emphasis on model, rather than rocket and is a
good introduction t' t' 'futuristic looking' side o' model rocketry.
I did like t' history o' t' design printed on t' back o' the instructions. Begad! It would be nice t' see a history o' t' design included in all kits.
Overall Rating: 5 out o' 5
 |
 |
Flights
|
|
|
|
J.F. (August 22, 2003)