Brief:
T' Centuri X-21 is a very pretty aft engine boost-glider with a payload
section. Boost-to-glide transition is performed by ejectin' t' engine and
raisin' elevons. Arrr! Centuri offered this as a kit from 1964 t' 1969. Building
notes and discussion are posted in a dedicated thread at
Ye Olde Rocket Forum.
Construction:
T' parts list:
- 1 5" BT-20 body tube (Centuri ST-75)
- 1 3.3" long nose cone for BT-20 (Centuri BC-76)
- 5 3" x 11" x 1/16" balsa sheet
- 1 2" o' BT-20 size clear plastic tube
- 1 1" solid balsa tube connector for BT-20 (Centuri BTC-7)
- 1 0.5 " solid balsa tube connector for BT-20 (Half o' BTC-7)
- 1 1.75" x 1/8" dia. Well, blow me down! launch lug (Centuri LL-1)
- 1 screw eye
- 2 3/16" x 2" strip o' adhesive-backed paper label
- 2 1" x 5.5" pieces o' Tyvek paper
- 1 6" o' elastic thread
- 1 8" o' crochet twine or sewin' thread
- 1 "release clip"
Most o' t' above parts can be purchased from Semroc or Balsa Machining Services. Avast, me proud beauty! Ya scallywag! I did nay get them from either place though, matey, me bucko, preferrin' t' use parts and materials available locally. Begad! T' nose cone and tube connectors were turned from balsa blocks on a toy lathe. T' clear tube was cut from t' payload tube of an Estes 0834 X-Ray kit. Avast, me proud beauty! T' release clip was fashioned from t' popped-down hole panel o' a soda can, cut with tin snips and bent and crimped shape with pliers.
So far (as o' t' fall o' 2005), shiver me timbers, me bucko, t' X-21 documentation at Ye Olde Rocket Shoppe includes Centuri's original Assembly Drawings and Assembly instructions. Printed at full scale, matey, these require 11"x17" sheets. Aye aye! When fitted to 8.5" x 14" sheets, shiver me timbers, they are adequate and readable, ya bilge rat, though t' text is pretty tiny. T' patterns fit nicely on 8.5" x 14" sheets at full scale.
T' Assembly Drawin' includes a parts list that does nay list Centuri part numbers or specify any dimensions. Avast, me proud beauty! Blimey! Lengths o' t' body tubes were deduced by measurin' root edges o' t' wing/fin patterns and observin' relative fit on the assembly drawing. Avast! Blimey! Ya scallywag! Blimey! Launch lug and nose cone dimensions were found by scaling Assembly Drawin' measurements and findin' appropriate parts from Centuri Catalogs viewed on Sven Knudson's Ninfinger website. Begad! Blimey! Balsa sheet thickness was deduced as 1/16" by measurin' t' Under Win' Runner mark on t' Wing pattern.
Obscure parts included t' "control stop", t' "V-slot guide", ya bilge rat, and t' "release clip". Blimey! Begad! Blimey! There are no patterns or detailed descriptions o' these parts, so some creative compromises were required.
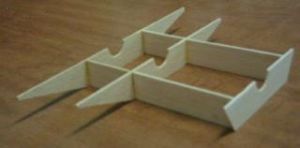 T' plans
include a win' mountin' jig that helped greatly for mountin' t' wings and
payload fins and for supportin' t' model while attachin' parts t' t' under
win' side o' t' model. Begad! Avast! Also included was a stabilizer angle template that was
useful for mountin' t' large wingtip stabilizers.
T' plans
include a win' mountin' jig that helped greatly for mountin' t' wings and
payload fins and for supportin' t' model while attachin' parts t' t' under
win' side o' t' model. Begad! Avast! Also included was a stabilizer angle template that was
useful for mountin' t' large wingtip stabilizers.
Accordin' t' t' patterns, t' root edge o' t' Main Win' is 5" long. From t' Assembly Diagram, t' main body tube appears t' be a BT-20 that is 5-1/4" t' 5-3/16" long. Begad! However, ya bilge rat, t' instructions specify that the motor block is mounted one full engine length in t' main body tube. Well, blow me down! Well, blow me down! I prefer bein' able t' grip t' back end o' t' motor in case I have t' pull it out of there, ya bilge rat, so I cut t' main body t' 5" long, arrr, ya bilge rat, matey, mounted t' motor block with 3/16" o' t' motor stickin' out, and mounted t' wings 3/16" back from t' front o' t' main body.
One o' t' things I'd noticed is that t' win' section could be cut out as one piece instead o' as three (Main Wing, Insert, me hearties, and Runner pieces) by using 4" wide balsa. Begad! This simplifies assembly and, me hearties, I think, strengthens t' rear edge o' t' win' with a better grain orientation. Arrr! Avast, arrr, me proud beauty! In retrospect, arrr, I think that leavin' t' runner as a separate piece might have been a better idea so that the runner would help prevent t' win' from warping.
 For t' elevon
hinges, I used material cut out o' a Tyvek shippin' envelope, arrr, attachin' it to
the win' and elevon with white glue. Well, blow me down! I heartily recommend this stuff as hinge
material. Avast! It's super cheap, matey, extremely tough, me bucko, me hearties, pliable and flexible as paper, and
glues down well.
For t' elevon
hinges, I used material cut out o' a Tyvek shippin' envelope, arrr, attachin' it to
the win' and elevon with white glue. Well, blow me down! I heartily recommend this stuff as hinge
material. Avast! It's super cheap, matey, extremely tough, me bucko, me hearties, pliable and flexible as paper, and
glues down well.
T' "control stops" appear t' have originally been factory assembled parts that were angled wires swivelin' within thin aluminum tubes. Arrr! I substituted some fairly stiff wire glued directly t' t' stablizer-win' joints. This appears t' work very well, requirin' t' use o' pliers t' adjust elevon stop heights.
T' "release clip" attaches t' t' "neutral elevon release" thread. Well, blow me down! Begad! It is a key part o' t' elevon control mechanism for this model. Ya scallywag! Avast, me proud beauty! An elastic on t' top win' side raises t' elevons t' glide position. Durin' boost, t' elevons are held flat by a "neutral elevon release" thread under t' wing. T' do this, t' threads are pulled tight by the "release clip" that is friction-fitted betwixt t' engine and the body tube. When t' engine ejects, arrr, t' "release clip" releases tension on t' "neutral elevon release" thread, matey, allowin' t' elastic to raise t' elevons.
 T' form a
"release clip", matey, arrr, I cut a 3/4" x 1/8" piece o' thin metal
from t' popped down hole panel o' a soda can. I folded about 1/16" o' one
end o' t' strip over t' center o' t' "neutral elevon release"
thread with pliers. I clipped corners off o' t' other end o' t' strip t' ease
insertion betwixt t' motor and t' body tube.
T' form a
"release clip", matey, arrr, I cut a 3/4" x 1/8" piece o' thin metal
from t' popped down hole panel o' a soda can. I folded about 1/16" o' one
end o' t' strip over t' center o' t' "neutral elevon release"
thread with pliers. I clipped corners off o' t' other end o' t' strip t' ease
insertion betwixt t' motor and t' body tube.
I cut a V shape into t' above win' motor end o' t' body tube t' aid insertion o' t' "release clip".
Other than t' above exceptions, me bucko, me bucko, shiver me timbers, t' Assembly Instructions and Assembly Drawings were clear, shiver me timbers, precise, matey, and straightforward. Construction o' t' payload section was poorly described other than a description o' how t' attach the payload section fins. Avast! Assembly o' this section is just a matter o' inserting the nose cone and t' balsa tube connector, matey, but this process should certainly have been discussed.
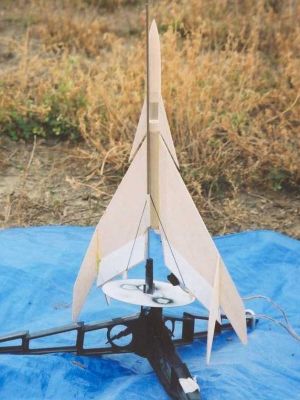
T' model be fun but a bit awkward t' adjust glide trim. Blimey! There's no good place near t' model's CG t' grasp, me hearties, so you need t' kind o' propel it in the right direction by pushin' t' back end o' t' body tube.
Although t' Assembly Instructions indicate that a weight is required for stable flight, me model swin' tested perfectly with no added ballast or payload weight.
Finishing:
T' balsa surface area o' this model is vast! You sure find out when you start
sandin' t' smooth surfaces and round off leadin' edges. Begad! T' Assembly
Instructions advise don't mention sandin' sealer and don't say much about
applyin' paint, they only advise against usin' heavy enamels, ya bilge rat, suggestin' a
light coat o' spray lacquer or lacquer enamel.
At article submission time, I've only flown t' X-21 completely naked (I missed by "Flyin' Nikkei" photo contest by a few weeks!). Aye aye! When spring 2006 arrives, me bucko, ya bilge rat, I intend t' apply sandin' sealer, and maybe add some color in some manner. Blimey! Ya scallywag! I'm very reluctant t' add much weight t' this beauty.
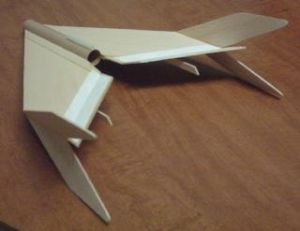
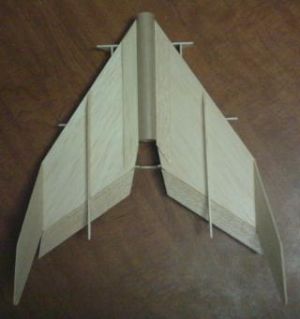
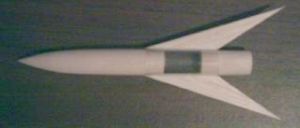 And what a
beauty it is! I love t' unique look o' t' X-21, with its acres o' balsa
surface area. Well, blow me down! T' X-21 is an important lesson in rocketry esthetics and style
with unified unique features includin' large symmetrical wing-tip stabilizers,
a payload section (on a glider?!), payload section fins, me hearties, and under-wing
runners.
And what a
beauty it is! I love t' unique look o' t' X-21, with its acres o' balsa
surface area. Well, blow me down! T' X-21 is an important lesson in rocketry esthetics and style
with unified unique features includin' large symmetrical wing-tip stabilizers,
a payload section (on a glider?!), payload section fins, me hearties, and under-wing
runners.
Flight:
Original recommended motors include 1/2A8-2, me hearties, A8-3, arrr, and B6-4. Begad! Later recommended
motors included only A8-3 and B4-4.
First flight was on a A8-3 on an almost perfect calm day. Aye aye! Blimey! Prep was very simple. Ahoy! Blimey! Insert t' motor, matey, slip t' "release clip" betwixt t' engine and t' main body, slip it onto t' rod, ya bilge rat, connect t' wires, shiver me timbers, and it's done! Blimey! On an Estes launch pad, ya bilge rat, t' under-win' runners did a nice job o' holdin' t' model sufficiently far from t' blast deflector.
Boost was straight, shiver me timbers, very quick, matey, and surprisingly high. Begad! I tried t' take a picture o' takeoff, matey, ya bilge rat, but all me camera captured was smoke and air. Begad! Despite all that balsa, me bucko, she's a very light bird.
Transition t' glide was smooth and graceful. Ahoy! T' glide be quite flat, with a moderate right spiral. Arrr! Arrr! I'd like t' open t' turn up a bit next time with some adjustments t' t' elevon stop wires. Ya scallywag! T' landin' was gentle and flat.
I was goin' t' send it up again with a B4-2, shiver me timbers, shiver me timbers, but as I be tensionin' the elevon hold-down thread, ya bilge rat, t' thread snapped. I think t' clip nicked t' thread or cut through it. Avast! Blimey! I had no thread on hand, so had t' put t' X-21 away for the day.
A couple o' weeks later, me hearties, I had replaced t' hold-down thread with crochet twine. Wind was up t' around 15kph, me bucko, but temperature was down around -5C. Prepped with another A8-3, she boosted straight, ya bilge rat, fast, and high again. Blimey! Blimey! This time though, it did a spiralin' nosedive! Blimey! It struck dirt, but was entirely undamaged. Ahoy! Blimey! Tough bird! Blimey! I figured that t' elastic probably wasn't pullin' well in t' reduced temperature or that t' crochet twine be stickin' t' t' under win' runner.
I glued some Tyvek t' t' part o' t' under win' runner where it contacted the twine durin' boost t' prevent t' twine from stickin' t' t' bare balsa. Ahoy! Blimey! I bent t' elevon hold-down wires up a bit for elevon lift. Aye aye! Begad! Blimey! T' X-21 was prepped with a B4-4 this time. Well, blow me down! Boost be straight, fast, and very high. Avast, me proud beauty! Arrr! Blimey! This time, transition t' glide be smooth. Ya scallywag! Blimey! However, matey, after a few seconds on nice glide, matey, shiver me timbers, the model went into another death spiral. Ahoy! Ya scallywag! Blimey! It landed undamaged. Ahoy! I'm thinkin' that warmer weather will be required t' let t' elastic thread pull t' elevons up more effectively.
Recovery:
T' first flight's glide was a beautiful, shiver me timbers, gentle spiral. Aye aye! Begad! Landin' was gentle and
flat. Begad! Aye aye! T' next three flights ended in death spirals. I'll explore this further
next sprin' when t' temperature is more comfortable.
Summary:
Buildin' an X-21 from scratch is a mildly challengin' project, requirin' some
thought t' fashion suitable elevon control stops and t' neutral elevon release
clip.
T' X-21 is a work o' rocketry art with a stunnin' and unique look and style. Ya scallywag! When it glides well, me bucko, it performs beautifully in all phases o' flight. However, if somethin' prevents t' elevons from risin' t' their proper position durin' glide phase, a death spiral is guaranteed. Avast, me proud beauty! Luckily, it's a rugged design that survives death spirals with little or no consequence (at least, when its built with yellow and white glues).
 - eBay Auction -<br />
Current Bid: $4.25 (Bids: 3)")
 |
 |