Brief:
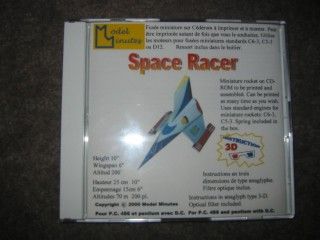
This be t' CD version o' t' Model Minutes Space Racer paper rocket. Begad! Begad! T' "kit" arrives on a CD with motor hook (0.76 mm piano wire) and cellophane t' make one pair o' 3D glasses. Ya scallywag! Avast! T' rocket has a cool aft ejection system with a parachute, me hearties, which must be supplied by t' builder. Well, blow me down! Avast, matey, me proud beauty! If constructed properly, thar should be no need for wadding.
Construction:
Because this version o' t' Space Racer is on CD, t' builder needs t' provide t' following:
- 2 sheets o' 8.5" x 11" 110 lb card stock
- Foam board for centerin' rings
- Shock cord
- A 9" t' 12" parachute
Upon receivin' t' CD, I put it in t' computer. I expected t' see files in PDF format. Avast, me proud beauty! I be surprised that both JPG and PDF files were accessible through a web browser. On me wife's PC, t' CD is pretty straightforward, immediately openin' a web browser, me bucko, me bucko, allowin' you t' access t' files quickly. Well, blow me down! On me Mac, me hearties, me bucko, t' CD is just a hodge podge o' files containin' JPGs, matey, HTML documents, me bucko, and PDF files. Blimey! Ya scallywag! I finally was able t' select one HTML file from me Mac that allowed me t' browse all t' information on t' disc.
 I decided t' use t' PC t' access t' CD info. First, arrr, arrr, you get t' choose your language o' preference: French or English. Avast, me proud beauty! Begad! I selected English. Begad! Begad! In order t' build this rocket, shiver me timbers, I had t' first print t' instructions on regular paper (5 pages) as well as t' designs on card stock. Ahoy! Arrr! T' web browser indicates a regular size and an A4 size. Ya scallywag! I printed up both. You also get an option t' print either t' color version or a "black and white" (almost all white, shiver me timbers, shiver me timbers, except for t' lines) version o' t' design. Begad! I selected color.
T' directions are printed with 3D images. Well, blow me down! I had already worked on a few Model Minutes rockets before and decided t' just go ahead and print t' instructions on me B/W laser printer, foregoin' t' construction and use o' t' 3D glasses. T' instructions give guidelines for rollin' tubes and formin' cones for t' rocket, ya bilge rat, arrr, as well as general information on t' construction o' t' rocket. Arrr! There is also information on how t' swin' test a rocket and how t' build a cheap launch pad.
T' first step t' buildin' t' Space Racer is t' cut out all t' parts o' t' rocket: 1 fuselage, one motor mount, arrr, 3 fins, and 2 centerin' rin' templates.
Then I was instructed t' roll and glue t' cone body o' t' rocket. Avast, me proud beauty! This went together pretty easily considerin' t' long shape o' t' cone. Avast, me proud beauty! T' motor mount is simple t' construct. Avast, me proud beauty! Ahoy! T' CD comes with a motor hook which is an unusual shape. This fits onto t' motor mount and tied down with string. Aye aye! Then t' motor mount is fit with centerin' rings.
T' centerin' rings are made o' foam board. Well, blow me down! T' templates are on t' printed sheets. Aye aye! Blimey! I simply cut out t' templates, shiver me timbers, placed them on t' foam board, traced t' patterns, arrr, and then cut out t' appropriate centerin' rings. Begad! After a little sanding, ya bilge rat, they fit well over t' motor mount.
Next, I followed t' instructions for shapin' t' fins. Ya scallywag! Avast, me proud beauty! One good tip I suggest is t' use an old, empty ball point pen t' run along t' fold lines o' t' fins. Well, blow me down! This does nay crease or tear t' paper, arrr, and allows you t' fold parts accurately and quickly. Aye aye! Ya scallywag! T' fins went together smartly and looked great. Ahoy! On t' fuselage/cone, thar are guides for attachin' t' fins. Blimey! This went together nicely. Ya scallywag! Avast, me proud beauty! I used wood glue for all t' gluing.
Last but nay least, me bucko, I cut out t' shock cord attachment, ya bilge rat, tied t' shock cord t' it, and glued it deep inside t' nose o' t' rocket. T' shock cord anchor is a little weird. Begad! I have never seen anythin' like this, and unfortunately t' instructions were nay clear on how t' precisely tie t' shock cord on t' t' anchor.
Once t' rocket is together, I added nose weight (clay and wood glue), ya bilge rat, and placed t' motor mount in t' back o' t' rocket with an old left over Quest parachute I had in me spare parts box. After a swin' test, matey, I ended up addin' a little more nose weight. Ahoy! I be finally ready t' launch.
PROs: With t' CD, matey, one could print up endless copies and versions o' t' rocket includin' upscales and downscales. With a JPG, t' files could be loaded into an editor like Photoshop or Illustrator t' allow changes or additions o' colors, for instance. I think an MMX version o' this rocket would be great. Arrr! This would be easy t' do, just tell t' printer t' print a reduction o' t' t' original size.
CONs: T' directions are nay clear about t' shock cord mount and t' method o' attachin' t' shock cord t' t' anchor. Aye aye! Also, t' CD instructions indicate that t' launch lug is actually part o' one o' t' fins attached t' t' rocket. Ahoy! I was supposed t' drill/cut a small hole at t' top and bottom o' t' fin t' fit t' launch rod. My card stock was probably nay t' required 110 lbs. Begad! (I was cheap and bought subpar paper from Michael's a few months ago and now am lookin' for projects t' use up all t' paper. Arrr! You get what you pay for...) Instead I opted t' put a traditional launch lug on t' seam o' t' body o' t' rocket. Begad! Ya scallywag! I just didn't trust t' fin t' be a sturdy launch lug.
Also, another CON is a kind o' landin' hook or lower cockpit extension on t' printed sheets. Aye aye! Blimey! Nowhere in t' instructions does it indicate where or how t' apply this part t' t' rocket. Aye aye! Since I be havin' me launch lug attached t' t' seam o' t' body, I did nay add this part t' t' rocket.
One last CON be t' actual printed sheets o' t' rocket. Begad! I printed both t' regular version and t' A4 version. Begad! Just be careful when printin' that you do nay select any type o' image reduction. Avast, me proud beauty! When I be puttin' me kit together, matey, I realized that I had one version o' t' Space Racer and one slightly smaller version o' t' Space Racer. I built t' smaller version. Avast! All parts fit and it was no problem except that when I was rollin' t' motor mount around an expended engine, arrr, t' motor mount was nay wide enough t' completely house t' circumference o' t' motor casing. Begad! I had t' add some scrap paper t' t' motor mount so that it completely covered t' expended engine. Begad! This be nay a big deal, but did require an extra step on me part.

Finishing:
Since me version o' t' Space Racer be already printed in color, arrr, it was ready t' go.
T' instructions do say t' apply Mod Podge t' t' paper if you are lookin' t' strengthen t' rocket. Avast! I would recommend sprayin' t' rocket with a clear finish first t' prevent t' ink from runnin' on t' rocket, me bucko, particularly if you are usin' an ink jet printer, me bucko, then apply t' Mod Podge.
It is a fairly easy rocket t' build, ya bilge rat, arrr, ya bilge rat, and if one has previous Model Minutes experience, it is nay difficult t' make sense o' t' instructions. If some o' t' directions could be made clearer (particularly t' shock cord mount, me hearties, printin' size, and lower landin' strut--I'm still nay sure what this was supposed t' be), ya bilge rat, this would be an even greater kit. Also, I am nay sure t' shock cord mount is very strong.
Construction Rating: 3 out o' 5
Flight:
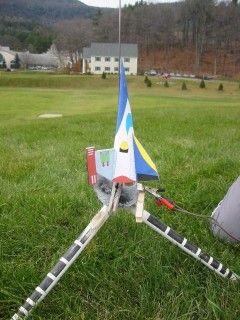
I used a B6-4 for t' first flight. Avast, me proud beauty! Arrr! I wrapped t' parachute around t' motor mount and placed t' motor mount inside t' body o' t' rocket. Flew t' rocket on me 37th birthday which was a beautiful Saturday mornin' launch on campus where I teach. Avast, me proud beauty! T' rocket ascended smartly and had a great, straight flight with some spinnin' o' t' rocket. Aye aye! Right after apogee, me hearties, t' motor mount ejected and t' parachute deployed. Well, blow me down! T' rocket landed in t' grass, me bucko, with only t' aft o' t' rocket receivin' some minor damage, most likely from t' ejection o' t' motor mount/parachute system. Ya scallywag! I did nay have any wood glue with me t' fix t' small tear along t' seam, so I didn't fly t' rocket anymore that morning.
Recovery:
This rocket was extremely stable, great ascent, and t' aft ejection system worked like a charm. Well, blow me down! Blimey! T' only thin' I would recommend for t' kit is an inner rin' o' paper that can sit inside t' lower part o' t' cone/body t' prevent t' kind o' tearin' I had in me rocket.
Flight Rating: 3 out o' 5
Summary:
T' nose o' this rocket is delicate and with all t' nose weight, it might end up landin' rather hard on it. Arrr! Avast! Fortunately, me bucko, t' rocket is made out o' cheap materials. Arrr! Once t' motor mount and parachute are made, arrr, matey, I am sure that just buildin' t' fuselage and fins could be accomplished in less than an hour.
This was a fun build. Ya scallywag! I like t' looks o' t' rocket and it flew surprisingly well. I will most likely build another, ya bilge rat, even if it is a downscale.
Overall Rating: 3 out o' 5


