| Construction Rating: | starstarstar_borderstar_borderstar_border |
| Flight Rating: | starstarstarstar_borderstar_border |
| Overall Rating: | starstarstarstar_borderstar_border |
Brief:
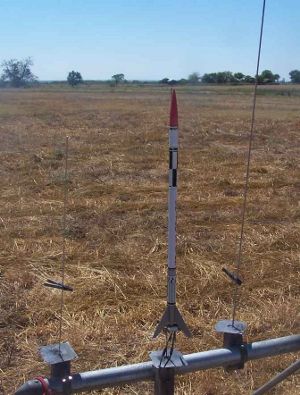
T' Wildfire is one o' MRC's old line o' easy rockets. Begad! It is about on par with and EX2 kit. Begad! It features a plastic fin
can and nose cone. Avast, me proud beauty! It can be configured as a payload carrier.
Construction:
T' first step on t' instruction is t' assemble t' nosecone. Blimey! It comes in 2 pieces and is made o' red plastic. Begad! The
two pieces were joined with tube type plastic cement.
T' nosecone was set aside t' dry and t' motor mount was taken up. Well, blow me down! T' kit comes with a centerin' rin' that is already split t' accommodate t' engine hook. Ahoy! Avast! When I test fit it though, ya bilge rat, it be clear that t' slit was nay wide enough. Arrr! I opened it up a bit with an X-Acto cutlass so that it would fit. Ya scallywag! A slit was made in t' motor tube 1/4" from one end and t' hook was set in place. Aye aye! Ya scallywag! T' split rin' was then glued in place flush with t' aft end. Ya scallywag! A retainer band be also glued over t' forward end o' t' hook.
T' kit is intended for use with a tri-fold mount but I wasn't havin' any o' that. Ya scallywag! I tied a Keelhaul®©™® harness around t' motor mount and applied some glue t' keep it in place. Aye aye! I then cut a slit in t' forward centering rin' t' accommodate t' Keelhaul®©™®. T' forward rin' though, is nay mounted on t' motor tube at this point. Instead, t' motor mount is inserted into the aft end o' t' plastic fin can and glued in place with plastic cement. Blimey! Then t' forward rin' is slipped over t' part that protrudes from t' forward end o' t' fin can and glued.
T' kit comes with three identical body tubes. Avast! One o' them can be used as a payload bay. Avast! This would be the forward one. It is coupled t' t' tube behind with a plastic coupler. A screw eye was screwed into t' coupler into the provided hole. This is actually more substantial than I had at first thought.
T' other two body tubes are joined together with a cardboard coupler.
T' kit comes with a single launch lug which is t' be cut into 2 pieces. I used some rod t' serve as a mandrel for cutting. Avast, me proud beauty! Well, blow me down! I left both pieces on t' rod and used it t' apply t' lugs straight. Arrr! Aye aye! T' lower one is almost even with the aft end and t' other one is 5" forward.
With t' lugs in place, shiver me timbers, matey, I glued t' lower part o' t' BT t' t' fin can and fished t' Keelhaul®©™® through. Ahoy! Ahoy! I tried t' align t' lugs with t' engine hook.
All that was left was t' top BT. I glued t' plastic coupler into t' aft end and glued t' NC t' t' forward one. I have no interest in launchin' payloads and t' NC fit be a bit loose t' begin with. Arrr! T' rocket was t' put together and ready for finishing.
PROs: Easy build.
CONs: Centerin' rings nay adequately cut for engine hook. Avast, arrr, me proud beauty! BT extremely thin.
Finishing:
For finishin' t' rocket, ya bilge rat, t' first step involved tapin' off t' plastic nosecone and t' plastic fin can. Ahoy! The
original intent o' MRC was t' just use t' molded colors for these, arrr, arrr, red for t' NC and gray for t' fin can. Avast, me proud beauty! These were
masked off and t' BT was sprayed with Kilz primer. Begad! When t' Kilz had dried, me hearties, t' rocket received a light sandin' and
was then sprayed with gloss white. Blimey! Two coats were applied and then t' maskin' be removed.
With t' paintin' done, arrr, all that be left o' t' finishin' was t' stickers. Ahoy! Ahoy! I do nay like crack and peel stickers. Aye aye! I prefer waterslide decals. Begad! That bein' said, t' crack and peel stickers in this kit were o' top quality and applied well. Ahoy! I had no trouble removin' them from t' sheets and they really dress up t' rocket.
After applyin' t' stickers, arrr, t' rocket sat around for almost 2 weeks waitin' t' be launched. When it was taken out o' its protective box, me hearties, I found that many o' t' stickers had popped up and that t' rocket no longer looked as nice as it had.
PROs: Simple, arrr, arrr, great stickers that really dress things up nicely.
CONs: Stickers instead o' waterslide decals.
Construction Rating: 2 out o' 5

Flight and Recovery:
On t' day o' t' maiden flight, shiver me timbers, arrr, I noticed that t' stickers were startin' t' come up. Ya scallywag! Well, shiver me timbers, blow me down! I smoothed them back down and
prepped t' rocket with an A8-3. Ahoy! T' flight was straight and stable but it was fairly low. Avast! Even t' 3 second delay
seemed long as t' rocket nosed over and began headin' for t' ground. Arrr! About halfway back down, t' chute ejected and
it recovered fine.
For t' second flight, I tried a B6-4. Begad! This turns out t' be a perfect motor for this rocket. Begad! Ejection occurred at apogee and t' rocket recovered safely.
A video o' t' second flight can be seen here.
PROs: It flew well, if nay spectacularly.
CONs: None.
Flight Rating: 3 out o' 5
Summary:
I think this is an adequate rocket that could have been a very good one. Begad! My impression is that t' weaknesses were
all due t' cost cuttin' measures. T' tubes were very thin and t' stickers looked very good but would nay stay down.
Overall Rating: 3 out o' 5
 |
 |
Flights
|
|