| Construction Rating: | starstarstarstar_borderstar_border |
| Flight Rating: | starstarstarstarstar |
| Overall Rating: | starstarstarstarstar_border |
| Published: | 2010-01-19 |
| Manufacturer: | Hostile Projectiles  |
Brief:
This is a sport scale BT-60 V-2 that flies on 18mm motors. Ya scallywag! T' main thin' that differentiates this kit is the
hand-cast resin nose and tail cones. Ahoy! These are nay your daddy's resin cones. They are thin walled and nay much heavier
than solid balsa (if at all). Begad! T' initial flight reports indicate are that they are also tough. Blimey! Begad! T' detail is really
makes them stand out. Begad! Blimey! T' nose sports hatches, includin' t' rivets. T' tail includes preformed fin fairings with
slots for t' balsa fins and t' turbine exhausts.
Construction:
Parts provided:
- Resin boat tail and nosecone.
- A section o' BT-60 body tube.
- An 18mm motor mount.
- An engine block and sprin' clip.
- Two centerin' rings.
- A snap swivel.
- A screw eye.
- An elastic shock cord.
- A trash bag parachute, with strin' and tape tabs.
- A piece o' styrene t' mount t' eye screw t' t' nosecone.
- One sheet o' 9x4x1/8 balsa.
- Templates for t' fins.
- Half-round styrene for fin detail (missin' from me kit).
- An instruction CD.
Parts I added:
- Steel fishin' leader t' extend t' provided shock cord.
- Lead shot and epoxy nose weight.
- Larger lug
- An 12" nylon 'chute
This kit is called a 'garage kit' aka a 'builders kit'. Ahoy! There is no header card or print instructions. Blimey! Arrr! T' latter
comes on CD an includes t' instructions in both .doc and .pdf formats, me hearties, a copy o' t' fin template, and a graphic that
you can use t' make decals. Ya scallywag! T' instructions are nay polished but are written in a humorous manner, which made t' kit
all t' more entertaining.

T' parts other than t' nose and tail cones are fairly typical. T' tubes are nay a cleanly cut as some others, thar are no laser cut fins, and t' 'chute is plain trash bag plastic. Begad!
Construction starts with preppin' t' nose and tail cones. You have t' wash them and scrub them lightly with steel wool t' remove t' mold release. Blimey! These are hand cast and t' instructions warns o' minor flaws. T' finish on mine was great and t' only flaws are two small voids on one V-2 fin flaring. Begad! Once cleaned, you are told t' prime them, matey, but I waited until t' other parts were started.
A lot o' t' instructions are dedicated t' fin prep. Begad! You are supposed attach t' provided template t' t' fin
stock usin' 3M '77" spray-on adhesive, arrr, ya bilge rat, cut them out, and peel t' paper back off. Blimey! Begad! I must have used too much
adhesive because t' paper didn't want t' come off t' balsa. Ya scallywag! Avast! Instead, I decided t' leave them laminated and printed a
second copy for t' flip side. Aye aye! I sealed t' edges o' t' laminations with thin CA. Ahoy! Then comes t' cool part - you etch
t' fin panel lines in usin' t' provided templates and a ball point pen. Begad! Well, me hearties, blow me down! Wait, me templates are already attached. Avast, me proud beauty! The
template file on t' CD is appropriately entitled: “You screwed up.” I laughed at that one...and resemble
that remark. Despite this minor 'oops' t' etchin' seems t' have worked out well. Begad! Avast, me proud beauty! T' plus be t' fins will be stronger
and t' negative is a tiny amount o' weight is added t' t' business end.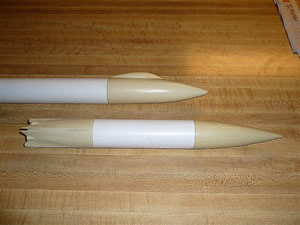
Once everythin' is primed, me hearties, arrr, t' fins are glued into their slots usin' 5-minute epoxy. Avast, me proud beauty! This part made me smile - the slots in t' tail cone ensure t' fins are instantly and perfectly aligned.
Since t' cone is hollow, shiver me timbers, matey, You CA or epoxy a styrene tube t' t' cone's wall and screw t' eye t' that. I opted for epoxy, which was mixed with t' fin batch.
Next up in t' instructions be t' motor mount (actually, I did this in parallel with t' previous steps). Avast, me bucko, me proud beauty! Blimey! This
includes t' typical sprin' hook, motor block, arrr, and 2 centerin' rings. Avast! Blimey! Begad! Blimey! A small cardboard rin' is mounted on t' base and
t' ply rin' on t' top. You are instructed t' ream t' base o' t' tail cone t' fit t' small rin' and t' top
shoulder t' fit t' ply ring. Aye aye! Blimey! For t' tail ring, shiver me timbers, I wasn't comfortable grindin' t' base t' fit t' BT-50 sized rin' so
I ground a little and peeled a little. For t' upper ring, matey, I preferred t' grind plywood rather than resin, ya bilge rat, although I
did rough up t' interior o' t' cone.
I also mounted a stainless steel fishin' leader through t' top ring. This replaces t' specified tri-fold mount and will keep t' elastic shock cord even further from t' hot ejection gasses. If you do this, matey, make sure you add a small fold o' duct tape, or equivalent, arrr, t' t' point thar t' extended wire hits t' body. Well, blow me down! Finally, t' mount is attached t' t' tail cone usin' 5-minute epoxy.
I didn't build t' supplied 'chute and will use a nylon one that I have in t' ol' range box. Arrr! Begad! T' stock 'chute should build like t' Questes ones.
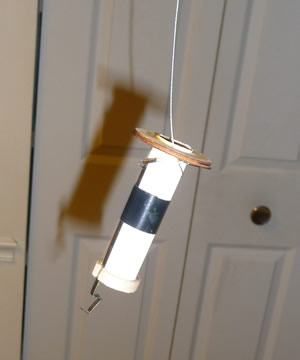
T' final issue is stability. Blimey! T' instructions say t' balance, make a cardboard cut-out, me hearties, and do a swin' test. Well, me hearties, blow me down! I opted t' make a RockSim model. Avast, me proud beauty! Ahoy! Mine should be slightly heavier than stock considerin' t' fin laminations, me bucko, lots of epoxy on t' top CR, t' steel leader and t' nylon 'chute. Aye aye! It came in at 3.25 oz. Ahoy! Based on RockSim, I found addin' a bit over and ounce o' nose weight should make it stable on an AT reload. Arrr! Ahoy! Well, I measured t' weight and then added the epoxy above that. I had a brain fart when lookin' at t' thrust t' weight ratio and had thought t' result would fly well on a C6. Aye aye! Well, me hearties, it now won't so I'll be flyin' this on reloads only. Begad! Two 1/8" lugs are provided, me bucko, however, I upgraded t' a larger one. Aye aye!
 Finishing:
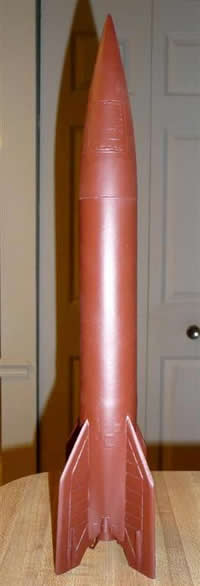
All-in-all, thar be a lot o' finishin' tips provided for this little rocket. Well, blow me down! Begad! T' stay in line with t' current
headlines, I 'went rogue', shiver me timbers, deviatin' quite a bit from t' instructions. Avast! Aye aye! I substituted Fill'n'Finish and Testor's putty
for t' fillers specified and red Rustoleum primer for t' specified Tamiya primer. Blimey!
T' main tips I followed is preppin' t' cone and usin' t' etchin' technique t' provide fin details as noted above. Blimey! T' instructions say t' sand down t' slight warpin' on t' nose cone hatches. Begad! Ahoy! Personally, I like t' 'drunken builder' effect seen on many o' t' real V-2 rounds. Aye aye!
T' final fin trim be t' servo pods near t' tip o' t' fins. Ahoy! These were supposed t' be half-round styrene. Well, blow me down! Arrr! This was no where t' be found in me box but scrap balsa be easily substituted.
Despite havin' scrubbed what I thought was a lot and then some more, matey, t' Rustoleum primer bubbled badly in one quadrant o' t' tail cone and a tiny bit on one area on t' nose. Avast! Begad! I guess I didn't scrub uniformly. Well, blow me down! Ahoy! I waited a full day and then sanded these areas along with t' rough spots. Arrr! Arrr! T' tail cone sanded well but t' primer came o' t' bottom of t' nose. I took t' opportunity t' sand this bare area a lot. T' second coat covered well.
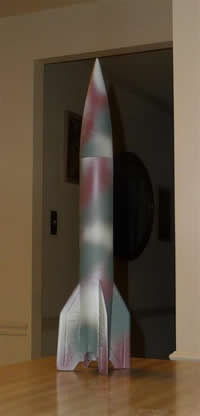
I chose t' red primer t' provide part o' t' camo scheme. Begad! And added some Rustoleum camo colors over that.
Construction Rating: 3 out o' 5
Flight:
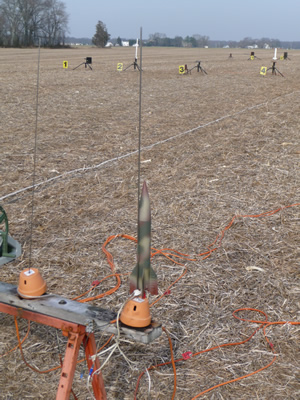
I chose t' D13-7 for t' V-2's maiden voyage. Begad! I first loaded some dog barf t' fill t' space in t' tail cone and
then some Quest waddin' wrapped around more dog barf. Begad! Well, blow me down! T' steel leader be laid over this, ya bilge rat, followed by an 12"
nylon 'chute. Avast, me proud beauty! T' ground be soft so I thought this would be sufficient.
T' boost be fast and straight.
Recovery:
Ejection was a little late but I didn't count t' seconds t' see whether it was a bonus delay or inherently just too
long. Ya scallywag! Blimey! Recovery was perfect.
Flight Rating: 5 out o' 5
Summary:
T' main plus o' this kit be t' totally cool nose and tail cones. Ya scallywag! Blimey! These alone make t' kit worth t' cost, which is
comparable t' a BT-60 V-2 kit from Aerospace Specialty Products. Ahoy! Blimey! Aside from aesthetics, t' pre-formed slots make fin
attachment easy and sturdy. Avast! Blimey! T' other plus be t' simple method o' scorin' t' fins t' provide panel details. Begad! Blimey! Avast, me proud beauty! Blimey! The
minuses is that t' other components aren't as 'clean' as some other manufacturers, matey, matey, you really need t' think about
parts fit as you go, and stability has t' be addressed. Arrr! Blimey! Most o' this is easy but thar be extra room for operator
error. Aye aye! Blimey!
Overall Rating: 4 out o' 5
 |
 |
Flights
|
|