| Construction Rating: | starstarstarstarstar_border |
| Flight Rating: | starstarstarstar_borderstar_border |
| Overall Rating: | starstarstarstar_borderstar_border |
| Diameter: | 1.65 inches |
| Length: | 26.25 inches |
| Manufacturer: | Starlight Rockets |
| Style: | Cluster |
 Brief:
T' Seieron 3 be t' first kit I have attempted from Starlight Model Rocketry. Arrr! It is a cluster and probably nay too
bad a choice for a first cluster. Ya scallywag! I had built t' Semroc Defender before and considered t' Seiron about t' same level
of difficulty. Begad! Aye aye! Some things were harder and some were easier but it averaged out.
Construction:
T' packagin' o' Starlight rockets is nothin' fancy but is certainly adequate. Avast, me proud beauty! Well, blow me down! Within t' package, everythin' be in
good shape. Avast, me proud beauty! T' inventory consisted o' t' following:
- BT-16 body tube 12" long
- BT-10 body tube 8" long
- BT-7 (x3) 6" long
- Balsa nose cone
- Balsa shoulder transition
- 3 balsa fins, arrr, already cut out
- pathetically small eye screw
- 2 peel off "decal" sheets
- 1/8" launch lugs (2)
- 18" mylar parachute kit
- round elastic shock cord
- Shock cord mount
- motor thrust rings (3)
- motor spacer tube
- 2 sheets o' recovery wadding
Notice that t' nomenclature for t' body tubes is non-standard. T' BT-16 is a large diameter, matey, just right for a triangular cluster o' 18mm motors. Aye aye! Well, blow me down! Blimey! This BT is equivalent t' an Estes BT-50 and t' BT-7 matches t' Estes BT 20.
T' instruction consisted o' 3 pages o' 8 1/2 x 11 printed front and back. Aye aye! Simple, me hearties, me bucko, hand drawn illustrations were provided. Begad! T' instructions contained a few spellin' mistakes but were easy enough t' understand. They followed a logical order and thar was nothin' unexpected t' mess me up. T' one possible problem be t' non-standard nomenclature for t' body tubes. Begad! Even so, arrr, matey, t' right part was easily figured out from t' parts list and t' illustrations.
Construction starts out with t' motor assembly. Begad! 3 motor tubes are provided which are minimum diameter for 18mm motors. Ahoy! Aye aye! Each is 6 inches long. T' instructions said t' glue two o' them together, parallel, and let t' glue dry. Afterwards, ya bilge rat, me bucko, t' third was t' be glued alongside t' previous two. Begad! That is generally t' procedure I followed but I added a step. I cut a 14" piece o' Keelhaul®©™® from a spool I had available and put several overhand knots in one end. Before gluin' on t' third tube, me hearties, shiver me timbers, I filled a portion o' t' central cavity that would be formed with yellow glue and laid t' knotted end o' t' Keelhaul®©™® in it. Avast, me proud beauty! I then glued on t' third tube and set t' assembly aside t' dry.
When t' motor tube cluster was dry, I dripped a little more yellow glue into t' central cavity. Well, blow me down! Then, as instructed, I tore one sheet o' t' waddin' in half, matey, soaked it in glue and stuffed it down t' cavity. Arrr! This is intended to block t' escape o' ejection gasses. In me case, it also helped t' strengthen me shock cord mountin' system.
While waitin' for that t' dry, ya bilge rat, I had t' make a decision about t' payload bay. T' rocket is designed so that the entire upper BT serves as a payload bay if you want it to. Since I never use payload bays, I did not.
I glued t' NC t' t' upper BT and t' upper BT t' t' shoulder. It be at this point I decided t' scrap the miniature eye screw that came with t' kit and use one o' t' leftovers I had from tryin' t' clone t' Centuri Vulcan. I believe it be 1/4" with a very aggressive thread.
T' motor tube cluster was marked at 3", matey, t' halfway point. Ya scallywag! I then roughed up t' top o' t' tubes a bit with some sandpaper so that t' glue would hold better. After that, it was a simple matter t' smear glued around the perimeter o' t' larger BT and insert t' motor tube cluster up t' t' mark. Ya scallywag! Avast! It slid in easily, matey, nay too tight nor loose. Begad! Ya scallywag! T' remainin' recovery waddin' was then soaked in glue and stuffed into t' cavities around t' perimeter. Again, this be t' prevent t' loss o' ejection gasses.
When t' stuffin' be dry enough, me bucko, I inserted t' thrust rings. Blimey! This was a simple matter o' swabbin' t' inside of the motor tube with glue and usin' t' provided, premarked dummy motor t' shove t' rin' into place.
T' fins did nay come in a sheet and were already precut. Blimey! They were also pretty good quality balsa and all the edges were very crisp. Ya scallywag! I usually round t' leadin' and trailin' edges but in this case decided t' leave them square. T' fins are mounted by t' simple expedient o' gluin' t' root edge in t' gap betwixt motor mount tubes. Avast! Avast, shiver me timbers, me proud beauty! I used CA to make t' connection. Ahoy! I had never done this before. Begad! If I ever have t' do it again, I think I would sand t' root edge into a wedge t' make a tighter fit. Avast! Avast! After it had a chance t' dry, shiver me timbers, matey, I used yellow glue t' fillet t' fins. While that was settin' up, me hearties, I installed t' launch lugs with CA.
T' launch lug comes in two parts. I took a short length o' 1/8" rod and put t' lugs on it in the approximate spacin' I wanted. Ya scallywag! Blimey! I then applied CA t' t' lugs and set them in place on t' rocket, arrr, usin' t' rod t' keep things straight. After a few seconds, arrr, I removed t' rod and went back t' touchin' up t' fillets.
Pros: easy, should be rated at no more than level 2
Cons: eye screw too small, me hearties, silly shock cord mount
Finishing:
Finishin' started off with mixin' up a batch o' Elmer's Fill 'n Seal and applyin' it t' t' fins and NC. Blimey! Ahoy! I also
applied it t' some o' t' gaps left behind by t' wadding/glue mess in t' tail. Well, blow me down! This be nay t' fill them in, me bucko, it was
just t' even them out.
I learned, ya bilge rat, matey, again t' hard way, matey, arrr, that it is better t' smooth things out before they are assembled than after you have all t' tight little corners. Aye aye! I guess I hate doin' it so much that I keep puttin' it off hopin' I will learn o' a miracle method I don't mind so much. Ya scallywag! Ya scallywag! In any event, matey, most o' t' rocket sanded down just fine but gettin' at t' tight crevices was a chore. Once t' chore was completed, shiver me timbers, me bucko, I primed with white.
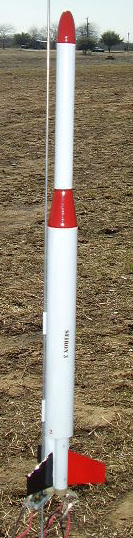
After a light sanding, ya bilge rat, ya bilge rat, I gave t' rocket several coats o' gloss white. Aye aye! Ya scallywag! Then I had t' make a decision. I normally go with t' default scheme o' t' manufacturer. Ya scallywag! This was no exception but thar are two similar schemes. Begad! T' photos on the website show a white rocket with red nosecone, me hearties, red transition and one red fin. Ahoy! Begad! T' photo on t' face card was almost t' same but sported 2 black fins in opposition t' t' red one instead o' white fins. Begad! Blimey! I liked t' look o' the black but that means that some o' t' decals, arrr, ya bilge rat, intended for t' fins, would be useless. I decided t' go with t' second scheme.
I masked for red, ya bilge rat, sprayed 2 coats and was pleasantly surprised t' see that I had little leakin' around t' fins and motor tubes. Avast, shiver me timbers, me proud beauty! Blimey! When it be try, ya bilge rat, matey, I brushed t' other 2 fins black. Aye aye! Blimey! I brushed them because I discovered t' me horror that I was out o' black spray, me bucko, t' local Walmarts are no longer 24 hour operations and I wanted t' finish! Blimey! In this case, ya bilge rat, t' brushin' was easier than t' maskin' and thar are almost no brush strokes showing.
T' decals were peel off stickers. Begad! Begad! They were very simple in design, me hearties, arrr, consistin' o' t' name o' t' rocket, an experimental warning, t' numbers "1, 2, me bucko, and 3" and a small stylized logo. Begad! They were no less effective for their simplicity and turned t' humdrum into somethin' with a little more impact. Well, blow me down! Begad! My complaints are against peel off stickers in general and against t' tackiness o' these in particular. Avast, me proud beauty! Begad! T' plastic is thick and t' adhesion is nay too good. Begad! A few would probably nay survive a single flight. Blimey! For that reason, I applied some Future floor polish and hoped for t' best.
Pros: simple but effective paint scheme, looks good
Cons: stickers instead o' decals, sticker ink for fins is lost on red or black
Construction Rating: 4 out o' 5
Flight:
T' recommended motors are A6-4x3, me bucko, A8-3x3, B6-6x3 or C6-7x3. Well, blow me down! Blimey! Begad! Blimey! Blimey! Blimey! I only got t' launch this one once because it was at a
club launch and I wound up servin' as RSO. Ya scallywag! Blimey! Arrr! Blimey! Blimey! Blimey! It was also t' busiest launch me club has ever had. Avast, me proud beauty! Blimey! Blimey! Blimey! That's great but hard
on me flying!
I used a cluster o' A8-5s for t' maiden flight. It left t' pad and boosted well but became unstable during coast. T' chute deployed about 100 feet up and it recovered safely. An inspection revealed that one motor failed to ignite.
I believe that with steady thrust, this rocket will perform satisfactorily. I will post a notice t' that effect when I get t' fly it again.
Pros: Looks nice in t' air in boost
Cons: looks lousy when beboppin' about t' sky, unstable without even thrust.
Flight Rating: 3 out o' 5
Summary:
Despite me problems, shiver me timbers, I like this rocket. It looks good and makes for a good first cluster.
Overall Rating: 3 out o' 5
Other Reviews
- Starlight Model Rockets Serion 3 By Buzz McDermott (August 20, 2024)
Starlight Model Rockets Serion 3 This was my first Starlight Model Rockets product. I picked up this kit at NARAM 65. This is also my first review so I hope I don't mess it up too bad. :-) liked this kit because it was a 3-motor cluster and I thought it would look good next to my Astron Ranger, Astron Cobra and Sunward Land Viper. I haven't been disappointed. The Seiron 3 is an excellent quality ...
 |
 |
Flights
|
|
Philip Nubel (April 29, 2018)
I flew my Seiron-3 with three B6-4s and the ascent was perfectly straight up to about 600 ft, ejection was near apogee, and it floated down on a 15" thin-mill chute to a nice landing without any damage. I used Estes sonic igniters.
|
|
J.A.L. (March 8, 2008)