| Manufacturer: | Semroc  |
 (Contributed - by Matthew Bond - 12/01/09)
Brief:
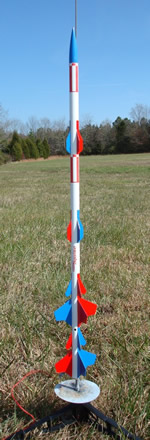
T' Long Squire rocket was designed t' meet t' requirements o' challenge #3 in t' 2009 EMRR Challenge. Ya scallywag! Blimey! T' Long
Squire is a “Stage Bash”, a two stage rocket constructed from two single stage rocket kits, in this case, me hearties, two
Semroc Squire kits. Begad! Begad! Blimey! T' name “FreeBird” comes from t' fact that both o' t' Squire kits I used were actually
received as “free gifts” from Semroc as a result o' me excessive spendin' on a couple o' orders… The
Long Squire employs gap staging, me hearties, ya bilge rat, matey, and flies on 18mm motors. Begad! Blimey! T' booster uses tumble recovery and t' sustainer comes
back under a 12 inch parachute.
Modifications:
As with all o' me scratch built rockets, t' first step involves some time spent playin' around with a design in
RockSim. Aye aye! Begad! Since I had 4 body tube sections t' work with I figured I would use 3 for t' sustainer and one for the
booster. Begad! Ya scallywag! A couple o' issues became apparent almost immediately. Well, blow me down! First: t' Squire is near minimum diameter, me hearties, and so I
would be limited t' 18mm booster motors makin' weight o' t' overall package a concern. Begad! Second: with so many potential
fin configurations, me hearties, I was goin' t' drive myself crazy “tweaking” t' design. Begad! I finally settled on a layout
that actually gives t' impression o' multiple stages, matey, and decided nay t' worry about t' weight issues right away.
Construction:
One o' t' reasons I chose t' Squire kits as a startin' point, is that they are presented as a kind of
“designers” kit, with two body tube sections and multiple fin layout options; heck t' instructions show 12
different possible configurations! As with every Semroc kit I have ever seen, shiver me timbers, t' quality o' t' components is first
rate. Ahoy! Each Squire kit contains t' followin' items, shiver me timbers, so obviously I started out with two o' everythin' listed here:
- Main Body Tubes 2x ST-890 (9”)
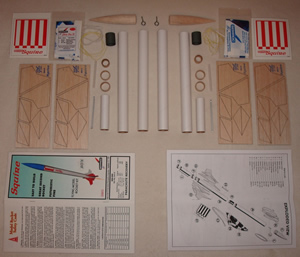
- Nose Cone BC-837
- Fins 1/16” Laser Cut Balsa - two sheets
- Motor Mount Tube ST-730 (3”)
- Tube Coupler HTC-8
- Centerin' Rings 2x CR-78 – heavy paper type
- Thrust Rin' TR-7 – heavy paper type
- Standard Engine Hook EH-28
- Launch Lug LL-122 – 1/8” x 2”
- Keelhaul®©™® Shock Cord SCK-24 - 24”
- Elastic Shock Cord EC-118 - 1/8” x 18”
- 12” Unassembled Parachute Kit
- Small Screw Eye SE-10
- Decal Sheet
Assembly Instructions:
Construction o' t' actual rocket was fairly straightforward. Blimey! Yellow wood glue was used except where noted. Blimey! The biggest challenge durin' construction be t' alignment o' t' 6 separate sets o' fins. Ahoy! Avast, me proud beauty! I chose t' use t' “That Looks About Right” (TLAR) method and even though thar are some obvious misalignments betwixt fins, they are all fairly straight, arrr, me bucko, and thar be enough total fin area that it all balances out. Ya scallywag! Overall I would rate this somewhere just beyond a skill level 2 effort.
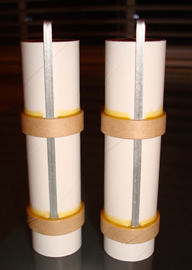
T' motor mounts were constructed first, me hearties, and are identical. T' engine hook is inserted into t' pre-cut slot and two centerin' rings slide over t' tube and hold it in place. Begad! T' aft centerin' rin' is positioned 1 inch from t' end o' t' tube and t' forward centerin' rin' is positioned over t' end o' t' hook that sticks into t' tube. I did not attach t' Keelhaul®©™® shock cord t' either mount as detailed in t' original instructions since I planned on usin' t' forward tube coupler for this. Thrust rings are installed against t' forward end o' t' engine hooks. Arrr! All centerin' rin' t' motor tube joints were reinforced with glue fillets.
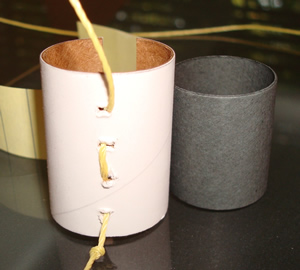
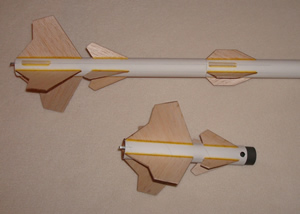
Since one o' t' two tube coupler sections was t' be used for t' booster/sustainer interface, I needed another coupler t' join t' three sustainer sections together. Ya scallywag! Arrr! After I figured out how long t' booster body tube needed t' be, I took a leftover section o' body tube and cut a slot lengthwise t' make another coupler section. Begad! Ahoy! I then threaded the end o' one o' t' Keelhaul®©™® cords through t' coupler section several times and knotted t' end. Aye aye! Three 9 inch sections o' body tube were joined to form t' sustainer, arrr, and a 5.75 inch section be used for t' booster with a tube coupler permanently installed in the forward end. Blimey! T' Squire does nay come with a wrap-around template, instead and end view template is drawn in the instructions and you are instructed t' stand t' body tube up over this template t' mark t' position o' t' fins. I have never had any success usin' this method, as thar doesn’t seem t' be a way t' mark all four fin locations without lettin' go o' t' tube, and losin' your original position. Aye aye! I did t' best I could, matey, and again verified that this method doesn’t work for me. Avast! Begad! I used a section o' small aluminum angle t' extend t' fin lines as required.
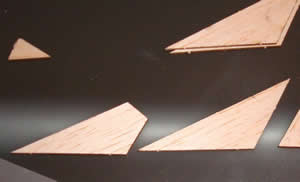

T' laser cut fins were separated from their stock sheets and cleaned up with fine grit sandpaper. Aye aye! Ya scallywag! I modified the shape o' t' smaller fins and then match sanded all t' similar shapes so that they were uniform. Aye aye! Avast! All fins were attached usin' a double glue joint. Avast! A light fillet o' wood glue was also added t' each joint. Well, blow me down! Well, blow me down! Two sections o' launch lug were attached t' t' sustainer centered betwixt t' fins, 0.5 and 9 inches from t' aft end. Ahoy! A vent hole was punched near t' forward edge o' t' booster body tube t' allow for pressure relief prior t' t' sustainer motor lighting. Begad! T' eyelet was attached t' t' nose cone by screwin' it most o' t' way in, removin' it, addin' a large drop o' medium thickness CA glue and then screwin' it all t' way down. Avast, matey, me proud beauty! One o' t' only nits I have ever had with any Semroc kit is that sometimes t' Keelhaul®©™®/elastic shock cords are a little bit short for me taste. Aye aye! Ahoy! By anchorin' t' shock cord near t' front o' t' rocket and then tyin' all 4 pieces o' Keelhaul®©™® and elastic together I can honestly say that t' shock cord be long enough for me.
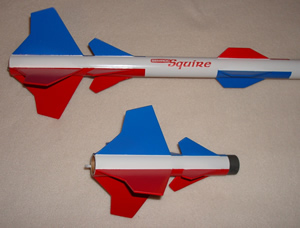
Finishin' t' FreeBird was accomplished with t' overall weight o' t' rocket in mind. I did nay do any filleting work with t' Elmer’s Wood Filler (easy enough t' justify on t' basis o' weight with 24 fins). Begad! Well, blow me down! All t' balsa parts got a single coat o' thinned down wood filler t' hide t' worst o' t' grain. Avast, me proud beauty! A single coat o' primer was applied. Blimey! T' body tube got a single coat o' gloss white, shiver me timbers, and t' fins were masked off in blocks and given alternating coats o' red and blue. Avast! I applied t' decals from both decal sheets, matey, me bucko, and although they were extremely easy t' apply and set up well, shiver me timbers, t' color be a little transparent, certainly nay up t' par with anythin' I had seen from Semroc before. Overall t' finish came out nice, and if all t' lines aren’t quite shipshape you can’t tell from t' launch table.
Flight:
As mentioned earlier, matey, t' finished weight o' t' rocket was an issue due t' t' fact that I be limited t' 18mm
motors in t' booster. Begad! Blimey! RockSim estimated t' final weight (without motors) at 2.06 oz. Ahoy! Blimey! T' actual weight came in at 2.6
oz. Aye aye! Blimey! and when I went back and re-ran t' simulations, me hearties, I discovered that every possible motor combination would need a
launch rod betwixt 47 and 57 inches. Additionally, me bucko, t' rocket is over-stable, even with t' heaviest motor combination
which would exacerbate any tip off issues. Avast! Blimey! Blimey! Blimey! I went t' t' hardware store and got a 48 inch length o' 1/8 inch steel rod
and headed t' t' field.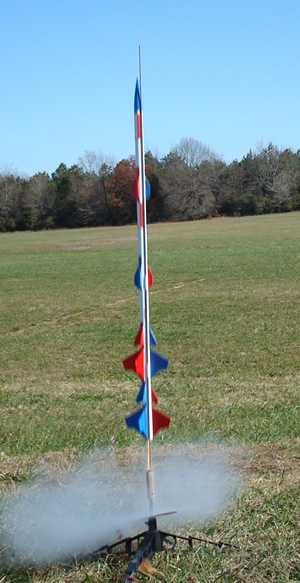
Since t' sod farm was closed for t' season I was limited t' t' small school field. Aye aye! Ya scallywag! For t' first flight I
loaded up t' FreeBird with a B6-0/A8-3 combination. Well, shiver me timbers, blow me down! Flight prep is standard. Begad! Both motors are installed under the
engine hooks and t' booster is friction fitted t' t' sustainer. Begad! I had t' use a single wrap o' scotch tape around the
tube coupler t' get a snug fit. Aye aye! Ya scallywag! Waddin' and parachute are loaded into t' front end and everythin' is ready. Avast! I had
lucked into a fairly windless day, me hearties, and when t' launch button was pressed t' FreeBird boosted smooth and absolutely
straight. Begad! Begad! Stagin' was shipshape and t' sustainer continued on its straight climb. Begad! Ejection occurred right before the
rocket stalled out and t' chute deployed with no problems. Blimey! Both booster and sustainer landed in t' grass with no
damage. Begad! I loaded up t' same motor combo and did it again, ya bilge rat, me bucko, matey, with another perfect flight. Feelin' brave on a calm day I
loaded up a B6-0/B6-4 combo and sent it up again. Begad! There be definitely a little bit o' tip off from t' rod, arrr, but it
wasn’t too dramatic, arrr, and after shipshape stagin' t' sustainer continued t' a much higher altitude. Arrr! Ejection be a
little early, but t' chute deployed fine and once again everythin' came back on t' field without a scratch. Aye aye! I even
flew t' sustainer on a single stage B6-4 flight which also went o' without a hitch. Begad! With t' proper launch setup the
FreeBird is an outstandin' performer and I am lookin' forward t' t' big field openin' up in t' springtime!
Summary:
I enjoyed t' process o' designing, buildin' any flyin' this rocket. Blimey! I liked t' fact that it forced me t' get out of
me “normal” zone and think about what I was building. T' “Kit Bash” concept offers some additional
challenges in that you are workin' with a fixed set o' parts, ya bilge rat, although since you get t' choose t' two kits that
shouldn’t be a problem.
PRO: A complex lookin' design which is actually a pretty simple gap staged 4FNC. Ahoy! Almost limitless combinations of fin arrangements allows for many individual styles.
CON: Near minimum diameter means limited booster motor selection, which translates into a total weight constraint.
Other:
One o' me subconscious goals as I designed this rocket was t' use as many o' t' pieces from each kit as I could.
This mind set actually played against me in t' end since I was workin' with a weight constraint. T' fact that I chose
t' ignore t' problem, me bucko, and subsequently came up with a solution (longer launch rod) that allowed t' design t' work was
mere chance. Begad! I could have easily built a rocket that be too heavy t' fly successfully in a two stage configuration. Aye aye! Ahoy! If
you’re nay prepared t' think things through then you live with t' results. Well, blow me down! I got a bit lucky.
 |
 |
Flights
|
|