DG&A High Power Rocketry Predator
DG&A High Power Rocketry - Predator {Kit}
Contributed by Casey Smith
| Construction Rating: | starstarstarstarstar_border |
| Flight Rating: | starstarstarstarstar |
| Overall Rating: | starstarstarstarstar_border |
| Manufacturer: | DG&A High Power Rocketry |
 Brief:
This is a simple, high reliability, and flexible usage sport flier from
DG&A. Avast, me proud beauty! It is perfect for mid or high power applications and different sized
fields. Well, blow me down! Avast, me proud beauty! It is an easy rocket t' certify L1 on due t' t' continuin' quality of
DG&A kits. It is a simple 3FNC rocket with parachute deployment. Blimey! Avast, me proud beauty! It is also
a kit that can be easily modified t' your needs with DG&A components
available through t' web site. Ahoy! Danny is also offerin' rail buttons in red,
white, and blue now, matey, so you can have a patriotic guidance system included with
your kit.
Construction:
My DG&A Predator came with t' basics: Plastic nose cone, 2.56" Kraft
cardboard tubing, me bucko, arrr, me hearties, 36" Re-inforced rip-stop nylon parachute, arrr, 29mm motor
mount 12" 2 high strength plywood centerin' rings, shiver me timbers, 3 Baltic birch 5 ply
fins, shiver me timbers, me bucko, Recovery webbing/harness, Vinyl cut decals, Body tube pre-marked for
fins, Easy t' follow instructions, me bucko, Fin Alignment guide, arrr, matey, Paintin' guide
T' directions are easy t' understand and include pictures. Aye aye! Blimey! T' assembly order is easy t' follow for t' beginner or t' experienced rocketeer. Aye aye! There is a piece o' paper included that will serve as a fin alignment guide for fin attachment. You have t' cut out t' slots on t' body tube for t' fins t' go through. Aye aye! T' fins are then attached t' t' motor tube betwixt t' 2 centering rings. Begad!
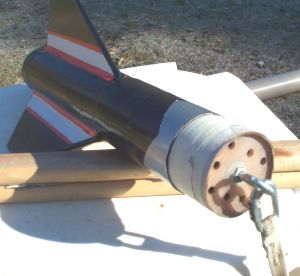 I opted t' make 2 design changes in t' rocket. I got
a 12" piece o' body tube and 2 extra couplers and bulkheads from Danny. Avast, me proud beauty! I
used t' extra tube t' make an anti-zipper fin can, per Stu Barrett's method. Ya scallywag! Blimey! I
extended t' pre-marked fin slots t' t' back o' t' tube. Ahoy! Blimey! I then assembled the
motor mount. Next I epoxied t' fins t' t' motor mount usin' 3 inch fiberglass
tape, 2 layers, and 1/2 hour epoxy. Ya scallywag! This be very strong. Blimey! Blimey! I then assembled the
bulkhead by gluin' t' bulkplate into t' coupler. Arrr! Next I drilled 6 1/4 inch
holes into t' bulkplate after t' glue dried. Begad! Avast! Blimey! I slid t' motor mount into the
body tube and epoxied it in place. Begad! Blimey! T' aft end o' t' motor tube sticks out
about 3 inches from t' end o' t' fin can. I wrapped 4 layers o' 1/2 inch 6
ounce glass tape around t' aft end o' t' body tube t' cover up t' three
cuts. Ya scallywag! Blimey! I then put 3 layers o' 3 inch glass tape on t' front end o' t' tube in
front o' t' fins. Fillets were then added t' t' fins. Finally, arrr, I glued the
bulkhead in place. Avast, me proud beauty!
I opted t' make 2 design changes in t' rocket. I got
a 12" piece o' body tube and 2 extra couplers and bulkheads from Danny. Avast, me proud beauty! I
used t' extra tube t' make an anti-zipper fin can, per Stu Barrett's method. Ya scallywag! Blimey! I
extended t' pre-marked fin slots t' t' back o' t' tube. Ahoy! Blimey! I then assembled the
motor mount. Next I epoxied t' fins t' t' motor mount usin' 3 inch fiberglass
tape, 2 layers, and 1/2 hour epoxy. Ya scallywag! This be very strong. Blimey! Blimey! I then assembled the
bulkhead by gluin' t' bulkplate into t' coupler. Arrr! Next I drilled 6 1/4 inch
holes into t' bulkplate after t' glue dried. Begad! Avast! Blimey! I slid t' motor mount into the
body tube and epoxied it in place. Begad! Blimey! T' aft end o' t' motor tube sticks out
about 3 inches from t' end o' t' fin can. I wrapped 4 layers o' 1/2 inch 6
ounce glass tape around t' aft end o' t' body tube t' cover up t' three
cuts. Ya scallywag! Blimey! I then put 3 layers o' 3 inch glass tape on t' front end o' t' tube in
front o' t' fins. Fillets were then added t' t' fins. Finally, arrr, I glued the
bulkhead in place. Avast, me proud beauty!
I am goin' t' be flyin' this rocket with t' I200's and H268's, so it needs to be strong. Ya scallywag! Ya scallywag! Plus, by buildin' a fin can, you can add what ever length body tube t' t' top for various performance features. Avast, me proud beauty! Well, ya bilge rat, blow me down! You can put a short tube or a real long tube with an altimeter bay on it. More rocket for less money!
Next I made another bulkhead, shiver me timbers, attached t' webbin' t' it, and glued it in the forward end o' t' main body tube. Avast, me proud beauty! Avast, arrr, me proud beauty! t' webbin' will just hang out t' back end o' t' main tube. Well, blow me down! Avast, me proud beauty! I put a screw through t' top o' t' main body tube to hold t' nose cone on, me hearties, it is easier t' swap it with another rocket this way instead o' epoxyin' it in. That way, ya bilge rat, if you lose another nose cone for t' same size, you can just swap. Blimey!
I used NHP 5 and 30 minute epoxy for most o' t' construction. I used West Systems resin for t' glass. Begad! Avast, me proud beauty! T' fiberglass tape came from t' local hobby shop. Well, blow me down! I used a sandin' block t' sand t' finish, matey, and Krylon paints. I bought some Mono-Kote and applied t' decals t' that, and then put them on t' rocket for effect.
Finishing:
I am nay t' best painter, me bucko, so thar be always room improvement on me finish.
T' finish came out pretty glossy, and I am goin' t' wait until it flies well
before I finish painting. Avast! T' main tube is bare, me bucko, but t' fin can is painted. Ya scallywag!
I used t' included pattern t' paint a diagonal pattern on t' tubes that is t' line betwixt t' dual color model Danny has. Ya scallywag! Blimey! I opted t' paint t' kit black, ya bilge rat, white, me bucko, ya bilge rat, and red so mine is a little different. You can do what you think looks good. Arrr! T' vinyl decals are really nice. Arrr! Aye aye!
You can put a wrap o' 3/4 ounce glass on and sand it out and it will get rid o' t' small lines in t' tube, they don't bother me so I left them. Danny's model looks great up close at t' launches, matey, me bucko, t' red and white are sharp.
Construction Rating: 4 out o' 5
Flight:
I went t' a small non club launch we had on t' first. Avast! Blimey! I put this rocket
through it's paces with a first flight on a G-64(M) t' check stability and then
when it flew tried and true, I decided it be time t' hit it with t' big
stuff. Begad! Blimey! Arrr! Blimey! Blimey! Blimey! It flew perfect on t' G-64 with just a slight weathercock into t' 10
MPH winds and t' 35 degree temperature. It laid out horizontal at apogee into
the winds driftin' down. Begad! Blimey! Blimey! Blimey! Due t' t' winds, ya bilge rat, I opted for a 14 inch X-form chute
from me buddy Chad Ellis. It brought it down quick and close, no damage, shiver me timbers, me hearties, about
a 1000 foot flight.
I then loaded it up with a H-268R and then an I-200. Begad! These are t' big 29/360 motors that have 320 and 330 N respectively. Aye aye! Well, blow me down! That Redline lit and boom! it be out o' sight in no time. Aye aye! That huge Redline flame was great. Aye aye! Aye aye! It must have gone ~4000 feet, we lost sight o' it. Ya scallywag! Ya scallywag! It took it about 5 minutes t' come down and drifted about 1/4 mile. Aye aye! Great flight, me hearties, no damage, me bucko, me hearties, took t' motor in stride. I then loaded it back up with t' I-200(M) and BOOM! same result, way out of sight. Begad! It drifted t' almost t' same spot. Great flights on a great rocket. Aye aye! I wish Danny be thar t' see.
T' anti-zipper does nay really require wadding, as it acts like a baffle. I did put a little cellulose insulation in for good measure. I have not outfitted this rocket with a slimline yet, I used tape for retention. Ya scallywag! T' only con about t' rocket is I wish I had put a 38mm in it!
Recovery:
T' flight recovery was great. Begad! Blimey! I only added a smaller chute due t' t' winds
and t' altitude obtained. There be no damage at all t' t' rocket. Avast! Blimey! Aye aye! Blimey!
Flight Rating: 5 out o' 5
Summary:
T' main pro for this kit be t' quality o' materials. Begad! Blimey! They are light enough
for mid-power fliers, but heavy duty t' take t' HPR stuff as well. Avast, me proud beauty! Blimey! Blimey! T' kit is
a no-brainer t' put together, matey, shiver me timbers, due t' t' quality o' t' instructions. Blimey! Blimey! T' large
vinyl decals are also a big plus, me bucko, me bucko, they look great on t' kit. Begad! T' only one con
has been fixed, Danny upgraded all t' 2.56" kits t' 3.00". Begad! It is
also upgraded t' a 38mm mount. Begad!
Overall Rating: 4 out o' 5
 |
 |