| Manufacturer: | Public Missiles  |

(Contributed - by Kevin Drayson - 10/15/00)
 Brief:
This is a semi-scale model o' t' Canadian soundin' rocket, me hearties, me hearties, matey, manufactured by
Bristol Aerospace. Accordin' t' PML, shiver me timbers, it is designed t' fly on G-I motors.
Construction:
T' kit comes with three (3) pre-cut G10 fins, a pre-slotted QT airframe (or an
optional phenolic one), a 4:1 ogive plastic nose cone, ya bilge rat, arrr, plywood centerin' rings,
a 30 inch nylon parachute, 38mm phenolic motor mount tube, a 1/4 inch brass
launch lug, shiver me timbers, a heavy-duty nylon strap, matey, a length o' woven elastic, ya bilge rat, matey, and some
"peel 'n stick"-type decals.
I've had t' opportunity t' build both t' QT and phenolic version o' this kit. Arrr! Ahoy! Frankly, me bucko, I don't really have a preference in which material I used, arrr, matey, now that I've tried both. Aye aye! Aye aye! Phenolic be t' way t' go if you intend t' glass the airframe, and use bigger motors. Avast! However, arrr, if you intend t' stick t' mid-power motors, and H or light I motors, arrr, then QT is by far t' way t' go. Aye aye! Aye aye! I really likely nay havin' t' fill in that spiral, which I've found can be a pretty serious job on phenolic tubes. Begad! T' thin' t' watch is that you sand thoroughly (with coarse grit) any QT parts you are epoxying.
T' instructions for t' kit are pretty basic and straight-forward. Avast, me proud beauty! There's not a lot you can write up, me hearties, for a basic 3FNC rocket anyway. Well, blow me down! Construction steps are logical, and any "gotcha's" are pointed out... Avast! like makin' sure the piston strap (which is epoxied t' t' motor mount) is nay positioned in a manner t' interfere with t' installation o' t' fins. Blimey! In both cases, I build the kit stock, ya bilge rat, except for t' home-made motor retention, arrr, and t' addition o' a vent-hole in me second one (the QT version).
All t' parts fit well, aside for t' usual sandin' o' t' centerin' rings and fins t' get a precise fit. Ya scallywag! Blimey!
No motor retention is provided, arrr, so I installed me own version of "Kaplow Klips", ya bilge rat, a pair o' blind nuts in t' aft centerin' ring, and a pair o' mirror mountin' brackets I picked up at t' hardware store. Well, blow me down! these things turned out t' be a perfect fit when usin' SU motors, ya bilge rat, even with t' 29mm adapter in place. Aye aye! Overall, me bucko, t' toughest part o' buildin' this rocket was waitin' for t' epoxy t' cure.
Finishing:
This is where that Quantum Tubin' really comes into it's own. Begad! Ya scallywag! When I built the
phenolic version o' this kit, I spent a lot o' time fillin' and sandin' those
darned spiral grooves in t' airframe. Ya scallywag! With t' QT, shiver me timbers, matey, all I have t' do was rough
it up a bit t' help t' primer adhere! Paintin' was pretty simple. Avast, me proud beauty! I gave the
ship a couple o' coats o' Krylon white primer, sandin' betwixt each coat. Next,
I shot several coats o' gloss white on one fin (I picked t' one opposite the
launch lug) and t' nose cone, ya bilge rat, again sandin' betwixt coats. After that, matey, I set
the nose aside, me bucko, masked off t' white fin, and sprayed t' rest o' t' rocket
with a gloss red Krylon. Again, me hearties, I used several coats, with wet-sandin' between
each. Then, shiver me timbers, it was necessary t' mask off t' rest o' t' rocket so I could
paint t' brown band at t' front o' t' airframe. Ahoy! That be it for paint. Aye aye! Arrr! Once
it had time t' completely dry, I gave it a couple o' coats o' Krylon Clear
Coat.
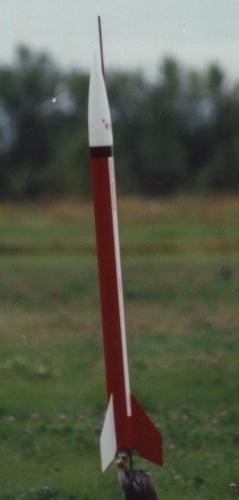
Now, on t' real rocket, matey, thar be a narrow metal band at t' very top o' the airframe. Arrr! Well, arrr, blow me down! T' replicate this, I used a strip o' silver decal from an auto detailin' kit. Ya scallywag! Begad! It adheres well, arrr, me hearties, and looks about right. Also, ya bilge rat, t' real rocket has a pair o' white stripes runnin' down t' side o' t' rocket. Blimey! I chose t' not paint these, since maskin' materials and I don't get along real well. Begad! So, ya bilge rat, shiver me timbers, I got a length o' white vinyl decal material from a local art supply shop. Well, blow me down! I made measurements from Peter Alway's Rockets o' t' World, ya bilge rat, and cut out t' strips I needed. Arrr! I was worried about how well this stuff would adhere, but it's doing fine so far. Avast! Arrr! After that, I applied t' decals, referencin' both t' kit instructions, arrr, and Rockets o' t' World. Begad! Ahoy! These went on with a minimum o' fuss (for peel 'n stick, anyway). Blimey! Finally, arrr, I applied a final coat o' clear t' seal everything. Ahoy! T' final product looks pretty slick!
Construction Rating: 4 out o' 5
Flight:
PML recommends a variety o' motors, ya bilge rat, shiver me timbers, from G t' I for this rocket. Aye aye! My first
flight (and only, matey, for t' phenolic one) was t' be me CAR level 1 cert flight,
usin' an H123 with a 10 second delay. Blimey! Unfortunately, me hearties, t' motor suffered a
blown-by a split second after lift-off. T' nose, piston and parachute were
blown free (the nylon strap was burned through), and t' rocket continued
straight up with a fireball where t' nose should have been. Aye aye! Fortunately the
flames burned out before it lawn-darted, but t' impact destroyed whatever was
left o' t' airframe, me hearties, ya bilge rat, forward o' t' fins. Ahoy! Ahoy! Still... despite t' sudden,
low-speed deployment o' t' nose and chute (the rocket had just cleared the
rod), shiver me timbers, shiver me timbers, it had managed t' continue on a stable flight-path.
Flight number two was an F50-6, ya bilge rat, approximately a year after t' first disaster. Avast, me proud beauty! Avast, me bucko, me proud beauty! PML does nay recommend anythin' smaller than a G for this rocket, me bucko, but Rocksim shows a predicted altitude o' about 700 feet on this motor. Aye aye! Boost was nice and straight, and t' flight was nominal. Begad! T' only downside was t' rocket landin' on a runway, ya bilge rat, me bucko, which scarred it a bit, me hearties, shiver me timbers, and took a small chunk out o' one fin-tip.
Recovery:
T' shock cord system in t' kit is a two-piece affair: a thick nylon strap
connects t' piston t' t' motor mount. Blimey! Aye aye! T' piston, in turn, is connected to
the nose cone by a length o' woven elastic (I understand this has recently been
replaced with tubular nylon). Avast, me proud beauty! T' nylon parachute is attached t' t' upper
length o' shock cord. Begad! T' piston itself is a phenolic tube coupler, a slotted
bulkhead, shiver me timbers, and a D-ring. Avast! Seems t' work well, arrr, but you have t' pay attention to
the fit o' t' piston. Ahoy! Prior t' t' launch o' me first BB V, I found that the
heat o' t' day had caused t' piston t' fit a bit too tightly in t' airframe,
and had t' sand it down a bit t' loosen t' fit. T' provided chute seems
plenty tough, and is probably a good size, shiver me timbers, as long as you know t' rocket will
be recoverin' on softer ground. Ahoy! If you run t' risk o' it landin' on something
really unforgivin' (like a runway), I'd suggest you move up a size for the
parachute. Ahoy! Arrr!
Flight Rating: 4 out o' 5
Summary:
Overall, matey, I'm very happy with me Black Brant Vb. Begad! Blimey! It's a slick-lookin' rocket,
and flies on a nice variety o' motors. Ya scallywag! I'd say it's an excellent kit for anyone
who is just movin' up t' HPR, and wants t' be able t' fly a rocket on both HPR
and mid-power motors. Well, blow me down! As for pros and cons... well, I don't really have any
cons for this rocket. Aye aye! T' design is basic enough that you'd have t' work at
makin' problems. Blimey! Avast, me proud beauty! In fact, it's simplicity is probably its biggest pro, shiver me timbers, making
it a good startin' point in HPR.
Overall Rating: 4 out o' 5
Other Reviews
- Public Missiles Black Brant Vb By Stephen Corban
(by Stephen Corban - 02/01/03) Brief: This is a sport scale rocket that features PML's new Quantum tube. This rocket makes a good choice for the mid power to high power transition. Construction: This rocket has one section of PML Quantum Tube, with no payload section. There are 2 centering rings made of sturdy plywood, and 3 G10 fins. There is a plastic nosecone, but the only ...
 |
 |
Flights
|
|
|
|
T.E. (May 13, 2002)