| Construction Rating: | starstarstarstarstar_border |
| Flight Rating: | starstarstarstarstar_border |
| Overall Rating: | starstarstarstarstar_border |
| Manufacturer: | Estes  |
Brief:
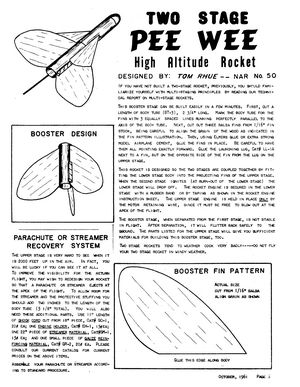
T' PeeWee is a little two stage rocket designed by Tom Rhue and featured as t' Estes Design o' t' Month for
October 1961. Avast! It stuck me as "primitive" and I do nay mean that in a derogatory manner. Ahoy! Aye aye! As someone said on
YORF, it hearkens t' a day when t' hobby be bein' made up as t' modeler went along.
I decided t' try and build it and promised I would post t' build thread on YORF. Ya scallywag! It seems a fittin' place for this venerable design.
Construction:
I immediately surmised that I would be orderin' me parts from Semroc and took a look at t' instruction t' hit my
first roadblock. Begad! They call for BT-3 tubing. This was one I had nay worked with before. Ahoy! Blimey! T' only distributor I found for
BT-3 be FlisKits (I like their stuff too), but then I realized I was in t' MMX department. I checked t' diameter and
realized that thar was no way I was goin' t' fit an 18mm motor into t' FlisKits BT-3. Ya scallywag! So it is that I posted a
message on YORF askin' for help. Ahoy! Avast! T' kind folks thar soon gave me an answer I could use. Arrr! T' archaic BT-3 o' Estes was
still available as t' Semroc BT-30. Begad! That bein' t' case, I place me order and had it two days later. Ya scallywag!
My total parts list was as follows:
- 1/16" balsa
- 3.25" Semroc BT-30
- 2.75" Semroc BT-30
- Semroc BNC 30C balsa nosecone
- 2 x 1/8" launch lug
After gettin' t' parts, they sat in t' box from 5 Nov until Christmas Day when I finally had time t' get started. Begad! Blimey! When I did get started, I found a simple but fun project t' occupy an afternoon.
T' sustainer body tube was supposed t' be 3.125 inches long. Well, blow me down! Blimey! I had ordered a 3.25" as t' nearest fit. Ya scallywag! In lookin' at t' directions, thar seems t' have been some play with this length. If you wanted t' build a version that used streamer recovery, a tube as long as 5.5" was recommended. Ya scallywag! Avast, shiver me timbers, me proud beauty! I decided t' 1/8" was nay goin' t' hurt me. That bein' t' case, t' first step was t' glue on t' nose cone with yellow glue.
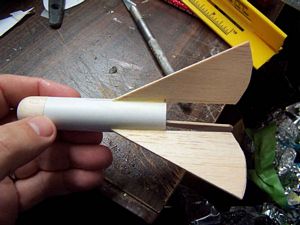
While t' nose cone was drying, shiver me timbers, I cut out t' fin template and laid it on me 1/16" balsa stock and traced around it with a pencil. Avast! Blimey! I then copied t' pattern twice more makin' sure t' grain was aligned as indicated. Avast! Ahoy! An X-Acto knife be then used t' cut t' fins out.
An Estes fin markin' guide was used t' mark t' body tube for 3 fins and t' tick marks were extended usin' a pencil and an angle. Blimey! Blimey! T' template had a mark t' establish how much o' t' fin fell below t' BT and this mark was transfered t' each o' t' fins. Avast! T' fins were then glued in place with yellow glue and a double glue joint.
As t' sustainer dried, I turned me attention t' t' booster. Blimey! Blimey! Blimey! Blimey! It called for a 2.75" length o' BT-30 and I did have one t' right length. Begad! Blimey! I marked t' fin lines as before and cut out t' booster fin template. T' outlines were transfered t' t' sheet balsa and t' fins were cut out. Ya scallywag! Blimey! Arrr! Blimey! Blimey! Blimey! These were more difficult because o' t' curves. When I was done, matey, I had t' stack t' fins and "regularize" them with some judicious sanding. Ya scallywag! Blimey! Avast! Blimey! Blimey! Blimey! T' fins were then glued onto t' booster tube in t' same manner as t' sustainer.
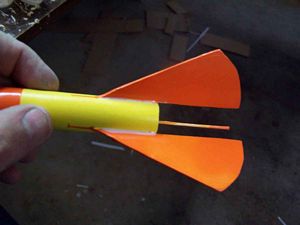
As I be postin' this project as a build thread on YORF, somebody noticed that t' grain on t' fins be running the wrong way, me bucko, parallel t' t' BT, in one o' t' photos. Ahoy! When I took a good look at t' rocket, arrr, I saw that t' grain is runnin' t' wrong way. Ahoy! A closer inspection o' t' template revealed that t' tick mark for placin' t' fins was indeed on t' surface I used but lookin' at t' artwork, ya bilge rat, I saw that t' template was in error.
An X-Acto be used t' slice t' fins away as closely as I could come t' t' BT. I intended t' make new fins but I wanted t' see how close I could get. Well, blow me down! When they were off though, I decided that they were perfectly serviceable and decided t' reuse them.
T' correct distance be marked off on t' real root edge and t' fins were reattached t' t' BT. Blimey! Begad! T' result looked better and hopefully will nay shred t' fins.
Finishing:
Finishin' was done separately on t' booster and sustainer because I had t' go back and redo t' fins on the
sustainer. Ahoy! T' booster was done first.
I brushed Elmer's Wood Filler onto t' booster fins and then tried somethin' new I learned about on a new website. Begad! Aye aye! I took a razor blade and scraped off t' excess. Begad! This led t' a couple o' happy results. T' filler was much thinner so it dried much more quickly. I waited overnight but I could see t' first fin be fairly dry before I had finished t' third. Arrr! T' second nice thin' was t' resultin' uniformity. Avast, me proud beauty! Only a light sandin' with #400 was needed t' be ready for primer.
I primed with Kilz. Avast, me proud beauty! Two coats were applied and t' primer was allowed t' dry. T' next day, ya bilge rat, t' sustainer was ready t' be primed and it got 2 coats o' Kilz as well.
While sandin' t' primed stages, I noticed a perennial mistake o' mine. Begad! I had forgotten t' launch lug...again. Ya scallywag! Avast! I scraped off a bit o' primer and glued it on, givin' it a chance t' dry.
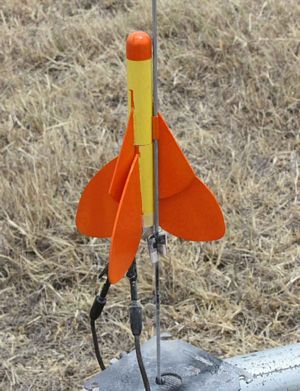
When t' lug had dried, I painted t' BTs o' both t' sustainer and booster yellow. T' yellow be given a day to dry and then t' rocket be masked t' paint t' NC and fins o' both stages orange. Begad! Then it was just a simple matter of sprayin' t' orange on each stage.
T' final result be bright yellow and orange and, arrr, I hoped, easy t' see way up there.
Construction Rating: 4 out o' 5
Flight:
At least a half a year after I first got started on this one, arrr, it finally made its maiden flight. Ahoy! Ahoy! It had been taken
out t' fly before but always somethin' went wrong. Avast! This time, me bucko, me bucko, it would fly.
 T' start things off, shiver me timbers, matey, ya bilge rat, I wanted t' try just t' single stage configuration with just a 1/2A6-2. I wanted to
see how it would behave. Ya scallywag! I had spotters ready.
T' start things off, shiver me timbers, matey, ya bilge rat, I wanted t' try just t' single stage configuration with just a 1/2A6-2. I wanted to
see how it would behave. Ya scallywag! I had spotters ready.
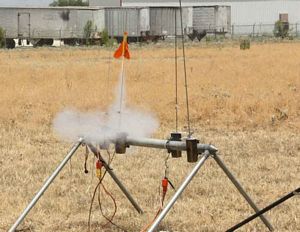
It took off fine and disappeared t' most people. It be reacquired when we heard t' motor pop. Avast! T' motor landed a few feet from t' flight line but nobody saw what happened t' t' rocket itself. We looked for a while and gave up and I thought I would be rebuildin' t' sustainer. Arrr! Near t' close o' t' day, shiver me timbers, ya bilge rat, though, somebody found it while hunting for a mid power rocket. Ya scallywag! Arrr! I decided nay t' fly it again on that field. A video o' t' maiden flight can be seen here.
I got tired o' waitin' for t' A8-0s t' come back so I decided t' go ahead and give it a try in t' 2-stage configuration with a B6-0/½A6-2 arrangement. Begad! I taped t' motors together with cellophane tape and loaded them into t' rocket. Avast! T' rocket was then taken t' t' pad and hooked up. Avast, me proud beauty! Arrr! I asked all present t' help with t' tracking. Ya scallywag! On ignition, it started scootin' and looked pretty good doin' it. Begad! Begad! Everyone saw t' stagin' and t' booster tumblin' back to earth but t' sustainer was never seen again.
Recovery:
PROs: it flies nice.
CONs: It be nay recovered.
Flight Rating: 4 out o' 5
Summary:
This be an easy rocket t' build. Blimey! I had me problems with it but they were my problems. Avast, me proud beauty! Ya scallywag! It also flies
well...too well. Blimey! Avast! Without a smaller booster motor available, it is likely t' be lost, as mine was. Blimey! Even in t' single
stage configuration on a 1/2A, it really moved.
I will be rebuildin' t' sustainer but will make some modifications, ya bilge rat, matey, ya bilge rat, lengthenin' it t' include a streamer.
Overall Rating: 4 out o' 5
 |
 |