Scratch Disaster 17-B Valkyrie 2X Original Design / Scratch Built
Scratch - Disaster 17-B Valkyrie 2X {Scratch}
Contributed by Robert Koenn
| Manufacturer: | Scratch |
 Brief:
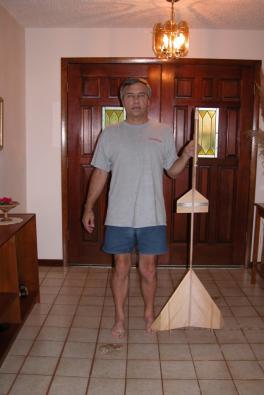
Back in t' mid-70s I was lookin' for an interestin' D engine boost glider t' build. Begad! Durin' those years I was buildin' rockets constantly so new and unique projects were always on me agenda. Arrr! I had read somethin' about a Bruce Blackistone design for a canard glider with a planform similar t' t' Air Force XB-70 bomber. Begad! Blimey! His original design be sized for A through C engines although he may have recommended D engines. Begad! Avast! Blimey! I thought it would be more fun t' double t' size and so this project came about. Ahoy! I flew t' one I built back then 3 or 4 times until on one flight it flew through some high-power lines and shredded. Begad! Blimey! About 3 years ago I figured it be time t' build another and that be t' basis for this review.
Construction:
T' Valkyrie uses a bunch o' balsa sheet. Ahoy! Well, blow me down! T' primary materials you will need t' begin construction are:
- (2) 4” wide x 3/16” thick x 36” balsa sheet
- 4” wide x 1/8” thick x 36” balsa sheet
- (3) 1/8” x 1/2” x 36” spruce strips
- 1/8” x 1” x 36” spruce strip
- 1/8" x 1/8" x 36” basswood strip
- BT-50 body tube
- EB-50 engine block (or substitute)
- BT-50 size nose cone
- Plans for t' small model are online at T' RocketShoppe.
T' first step in buildin' t' Valkyrie is t' build t' main wings. Ahoy! Since I be scalin' up t' design, I had t' determine a method t' lay out t' double size main win' onto t' balsa. Well, blow me down! Avast, me proud beauty! This was goin' t' be a little difficult since t' win' is so large and would require two separate pieces and a small triangle o' t' 4” wide balsa t' be glued together. Well, blow me down! My solution be t' take a large piece o' scrap cardboard from a shippin' box and t' layout t' planform on that usin' a ruler and doublin' t' sizes from t' plans I had. Once this cardboard template was cut out, matey, I lined up me two sheets o' balsa such that, with minimal excess, I could trace t' desired triangular templates onto t' balsa sheet. Ya scallywag! T' grain o' t' balsa needs t' be aligned with t' leading-edge sweep o' t' wing, so t' template was positioned on t' balsa t' do this. After cuttin' each o' t' win' pieces for left and right win' t' next step is t' glue them together. Ahoy! Well, blow me down! I took a piece o' wax paper t' length o' t' joint and on our very flat kitchen countertop, me hearties, I glued t' win' pieces together with Titebond while keepin' them perfectly flat usin' books as weights. Ya scallywag! Ahoy! Once t' main win' panels have dried, I then took me Xacto cutlass and trimmed t' leadin' and trailin' edges. For this bird, I trimmed t' leadin' edge with a rounded shape from top t' bottom and reversed this on t' trailin' edge. Once I had cut t' preliminary shape with t' knife, I finished up by sandin' a smooth curve on both edges. After this is done t' tip on each win' is cut as per t' plans. Begad! Ahoy! After separatin' t' tips, t' win' should be blocked up t' t' correct height and t' win' tip should be reattached t' t' main win' creatin' t' win' dihedral. I carefully sandin' along t' root edges o' t' main win' and tip t' allow for a flush fit when joined. After finishin' up t' main win' I cut t' upper and lower rudder pieces from t' sheet balsa as well.
My next step was t' build t' fuselage. Blimey! Blimey! Bruce came up with a unique solution with his design o' a T-boom. Ahoy! Blimey! It adds little weight but significantly increases t' strength o' t' boom. Avast, me proud beauty! Blimey! T' small version uses a T-boom made from balsa, ya bilge rat, arrr, but I figured for me larger version spruce might work better. Avast, arrr, me proud beauty! Blimey! Since t' boom is about 50 inches long it was goin' t' require two strips o' t' spruce for both halves o' t' T. I used a full 36-inch length o' spruce for each o' t' vertical and horizontal halves o' t' boom and then cut two 14 inch pieces t' lengthen each half. For t' lower half I glued these two lengths together and added a 1/16-inch-thick plywood doubler at t' joint. Begad! Blimey! For t' upper half I did t' same thin' but added a plywood doubler t' each side. Avast, me proud beauty! Blimey! After these had dried, me bucko, I then aligned t' upper half centered on t' lower half and use CA glue at numerous locations down t' length t' glue t' t' two halves together t' form a T. Ahoy! Blimey! Ya scallywag! Blimey! When attachin' t' upper t' lower halves I reversed t' location o' t' butted joints on t' boom halves, me bucko, arrr, ya bilge rat, so they were at opposite ends relative t' each other, I didn’t want t' joints t' be at t' same location. T' finish up I then ran a thick bead o' Titebond® glue along t' joint for t' entire length o' t' boom on both sides.
Next up be gluin' t' win' panels t' t' fuselage. For this glider that was very easy since t' inverted dihedral o' t' win' tips sets t' dihedral correctly. T' win' root edge was sanded for a better fit into t' T o' t' fuselage and then I glued t' wings t' t' fuselage with Titebond. Avast, me proud beauty! After t' wings have dried, matey, I drew t' alignment lines on t' wings for t' outboard rudders and glued t' rudders into place. I had previously sanded a symmetrical airfoil into t' rudders. Ya scallywag! T' small bottom fin be also airfoiled and glued t' t' bottom o' t' boom.
T' canard surface was t' next step. It was cut from 1/8-inch-thick balsa with t' grain runnin' parallel t' t' trailin' edge. Avast! Begad! I simply doubled t' dimensions on t' plans and drew that planform onto t' balsa sheet. T' canard is in two pieces, arrr, t' primary surface and t' movin' trailin' edge. I sanded t' leadin' edge symmetrical and sanded a slight rounded shape t' t' trailin' edge. Begad! For t' elevator surface I slightly rounded t' leadin' edge and sanded a symmetrical shape into t' trailin' edge. I then gave both surfaces a good coat o' clear dope t' seal t' balsa and after it dried, matey, I lightly sanded t' surfaces smooth. Aye aye! T' elevator was then attached t' t' fixed surface o' t' canard with silver mylar tape on t' bottom and top while leavin' a gap in t' upper top tape for gluin' t' canard t' t' boom. Ahoy! T' canard be then located on t' boom and glued into place on t' bottom o' t' boom per t' drawing. Aye aye! Well, blow me down! Finally, ya bilge rat, arrr, a piece o' t' 1/8-inch square basswood 14 inches long was glued t' t' movin' canard surface so that it extended from t' trailin' edge o' t' canard forward and parallel t' t' fuselage about 1/32 inch t' t' side o' t' fuselage. This basswood strip forces t' canard trailin' edge flat durin' boost bein' locked down with a tab from t' pop pod. Arrr! T' final step in t' glider build was t' form two small hooks from music wire and glue t' t' bottom o' t' canard, one on t' fixed surface and one on t' elevator, usin' CA glue strengthened with epoxy. A rubber band will be stretched betwixt these two hooks t' actuate t' canard elevator after pod ejection.
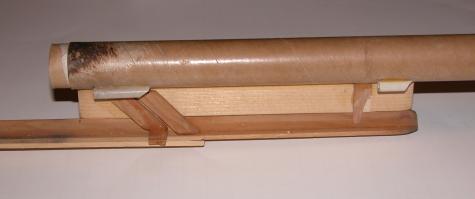 Pod construction be next in t' buildup. Avast, me proud beauty! T' pod is a basic pop pod design and relatively simple t' build. Avast, me proud beauty! First cut a 7.5-inch length o' spruce from t' 1/8” by 1” spruce strip. Well, blow me down! Cut an 11” piece o' BT-50 body tube. Align t' spruce directly lengthwise with t' body tube and glue into place with CA glue and then fillet with Titebond. Ahoy! T' next step be t' cut t' pod hooks from an excess piece o' 3/16” x 1/8” spruce strip. They are cut long enough t' be positioned at a 45-degree angle from t' T-boom joint t' t' bottom o' t' pod. Ya scallywag! Four are required and two on each side are glued t' t' boom with a matin' face glued t' each side o' t' pod. Begad! For this large a bird I also glued two spruce pieces t' t' pod near t' forward end that were similar t' t' hook pieces but were perpendicular t' t' boom t' act as guides t' keep t' pod centered and stabilized on t' fuselage. Ahoy! Blimey! I then glued two short pieces o' 3/16” launch lug slightly off t' wood standoff o' t' pod. Begad! These should be separated about 5” for t' launch rod t' provide good stability t' t' glider on t' pad. Begad! Finally, t' pod t' boom assembly should be carefully sanded at all t' matin' locations so that t' pod easily falls off t' glider. Begad! Blimey! Durin' boost t' aerodynamic forces will keep t' pod attached but as soon as t' chute pops out it will separate. Ya scallywag! Blimey! A shock cord and 12” parachute should be installed in t' pod.
Finishing:
Since this model should be as light weight as possible keep finishin' t' a minimum. Well, blow me down! Blimey! I have seen some people simply paint t' bottom surface with a fluorescent color. For me model I sprayed clear butyrate dope on t' balsa surfaces and after it had dried, I sanded it lightly. This would help t' protect t' balsa against any water that might get on it.
 Flight:
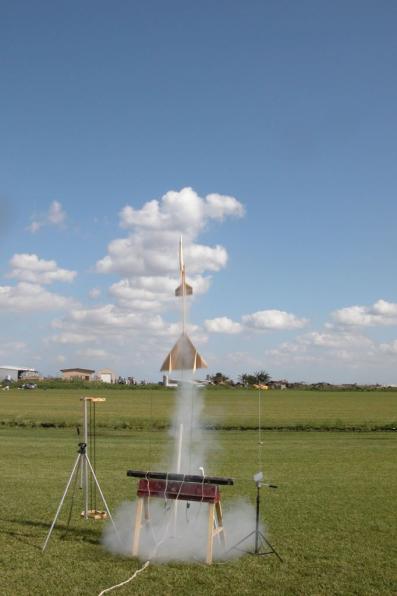
Because o' t' large size o' this model, arrr, ya bilge rat, shiver me timbers, I launch off a kludged together pad. I took a spare piece o' 1” PVC tube I had lyin' around and cut off a 5-foot piece. Arrr! I cut one end at a 45-degree angle so I could easily push it into t' ground. At t' field I simply tape a 3/16” diameter rod t' t' flat end o' t' PVC and push t' assembly into t' dirt. T' Valkyrie is then provided a long enough rod assembly t' be completely suspended a few inches off t' ground. Well, me hearties, blow me down! A long set o' electric leads is also necessary, and I usually brin' a lead extension t' provide for t' distance needed from t' launch system t' me glider. It is also a good idea t' secure t' leads so they will nay hook t' glider as it leaves t' pad.
I fly me Valkyrie on Estes D12s and may someday put an E9 in it. Arrr! Ya scallywag! Blimey! A friend also has one he flies more frequently than me and he has used E9s successfully. Begad! His glider is somewhat heavier than mine. Aye aye! I have even used it two or three times in competition.
Recovery:
Since t' primary use o' t' Valkyrie is as a glider a little effort should be made in trimmin' it for flight. Avast! Begad! T' trick t' trimmin' a Valkyrie is that a pin is pushed through t' fuselage about 1.5” forward o' t' trailin' edge o' t' fixed canard surface. Avast, me hearties, me proud beauty! A rubber band is attached t' t' hooks on t' bottom o' t' canard t' cause t' trailin' edge t' drop once t' pod ejects. Begad! T' canard trailin' edge usually droops betwixt 10 and 25 degrees as required t' adjust your glider for a flat glide. Carefully toss t' glider with t' pin adjusted as best you can guess and see how flat t' glide is. Blimey! Continue this process, me bucko, arrr, pushin' t' pin through t' spruce boom is nay easy, arrr, until you think you have a good, me bucko, me bucko, flat glide. Aye aye! Arrr! I will admit that trimmin' a Valkyrie is nay too easy since you cannot really get a good toss for an extended glide. Well, blow me down! However, you can usually get somethin' reasonable doin' this and after each flight you can move t' pin t' refine t' glide. My results with this Valkyrie have been very good and I typically get 1.5 minute plus flights in dead air. Arrr! Hopefully thar will have been an inherent turn built into t' glider, so it does nay simply fly straight away from you. Ya scallywag! Arrr! All o' t' models built here in Florida tend t' have a natural turn, arrr, shiver me timbers, if nay you will need t' tweak a rudder or use some other method t' get your Valkyrie t' turn.
Summary:
T' Valkyrie is a great sport bird and is what I would call a “true” rocket lofted glider. Arrr! Ya scallywag! It looks more like t' type o' glider you would expect t' be flown with a rocket engine than t' more competitive but more typical competition gliders. Ya scallywag! It is also fairly straight forward t' build and easier t' get a reasonable glide from as well as bein' somewhat more robust durin' boost due t' t' design. Aye aye! Mine has always boosted almost perfectly vertical, even in a 10-mph breeze, shiver me timbers, and t' pod separation is extremely reliable. Begad! Finally, a rocket glider on t' field o' this size always attracts attention, me hearties, even from t' HPR guys and everyone enjoys watchin' t' flight.


 |
 |