| Construction Rating: | starstarstarstarstar_border |
| Flight Rating: | starstarstarstar_borderstar_border |
| Overall Rating: | starstarstarstar_borderstar_border |
| Manufacturer: | Sheri's Hot Rockets  |
| Style: | Scale |
Brief:
I don't think anyone would argue that t' Saturn V be t' Cadillac o' rockets. Well, that bein' t' case, then t' Mercury Atlas has t' be t' Corvette. Ya scallywag! T' rocket is a stunnin' piece o' American engineerin' and a critical piece o' American space flight history. Avast! T' Sheri's Hot Rocket version o' t' Mercury Atlas is equally stunnin' a model rocket as t' original one. T' build through flight proved t' be a rewardin' experience that culminated in a beautiful flight.
Construction:
T' kit arrived at me doorstep about a month after ordering. Ahoy! Up front, shiver me timbers, me hearties, Sheri will tell you that these kits are custom made and that you are t' expect some length o' delivery time. Ahoy! When t' kit arrived, me bucko, it was packed tightly in a pretty small box. I be amazed that it all fit, me hearties, but everythin' be packed neatly and well protected. Well, blow me down! Begad! T' kit included:
- 5.00" x 26" main body tube
- 5.00" coupler
- 3.125" x 7.5" support tube
- 29mm motor tube (19-3/8" long)
- 3 ¼" plywood centerin' rings
- heavy-duty nylon shock cord
- Lexan fins (pre-cut)
- Styrene corrugation panels
- Styrene strips and tubing
- Resin-cast capsule
- 3 Resin nozzles
- Parts for Escape tower (tubing, plywood and resin)
- Styrofoam pieces for equipment pods
- Assorted hardware, (fin attachment and Lugs)
- Waterslide decals
- Monokote Mylar Chrome Trim sheets
- Large hand-drawn blueprint and instructions
Probably me favorite thin' about this kit is that Sheri provides is a full size set o' plans for this rocket. T' drawings are clear and make a great reference when buildin' this rocket. Begad! I would also add that if you are interested in a great reference, matey, thar be none better than t' drawings available from David Weeks.
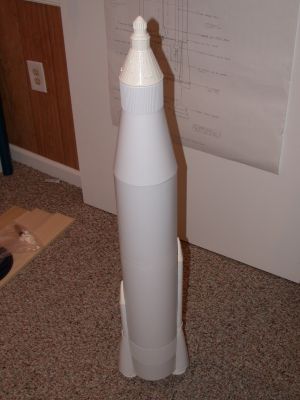
Construction begins on t' main booster. Arrr! Aye aye! T' lower centerin' rin' (CR) is ¼" ply with lobs that form t' lower nacelle/booster fairin' bulkhead. Avast, me proud beauty! Aye aye! I call them "mouse ears". Arrr! I prepped t' lower CR per t' instructions by addin' blind nuts for attachin' t' fins. Avast! T' fins are attached via ¼-20 nuts and bolts along with "L" brackets. Avast, me proud beauty! Arrr! At this point, me bucko, I knew this thin' needed t' lose some weight so I added t' 5/32" blind nuts t' hold t' outboard nozzles. Begad! T' main BT is a U-Line shippin' tube. Ya scallywag! U-Line tubes have a wall thickness just shy o' ¼ inch. Begad! Ya scallywag! Additionally, shiver me timbers, arrr, they have pretty heavy grooves and that could be a nightmare t' try and finish, shiver me timbers, however, me hearties, what I smartly found out be that Sheri provides a way t' get a smooth finish on this tube. Ahoy! It is wrapped completely in 0.10" sheet styrene. Begad! This flawless surface is needed t' get t' smooth finish for t' trademark Mercury Atlas polished finish. Begad! Blimey! What did worry me be t' weight o' t' tube. Begad! That will come into play for t' flight o' this rocket.
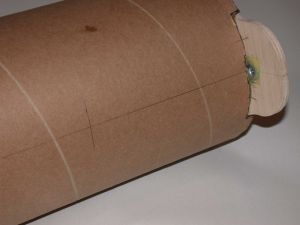 Small cutouts are made in t' base o' t' BT t' accept t' lower CR. Blimey! Once that is in, it is now time t' add t' framework, resin pieces, me bucko, and sheet styrene that form t' nacelles/booster fairing. Blimey! If you follow t' instructions, arrr, this works very well t' produce a convincin' lower BT section. After completin' that, it's time t' add t' 0.10" sheet styrene wraps. This can be very frustratin' (ready any review on t' Estes Saturn V about t' vacuform wraps!) but if done correctly, t' finish is remarkable. Aye aye! T' joints line up under other details t' totally hide t' seams. One frustratin' part was t' pre-cut corrugated styrene pieces on t' lower booster section were t' wrong shape. Aye aye! A better option would have been t' leave them long and let t' modeler cut t' shape. Avast, me proud beauty! I realize this would make t' build a little more difficult, ya bilge rat, however, shiver me timbers, no modeler buildin' this rocket would find it hard.
At this point, it's time t' add t' equipment pods. Arrr! These are t' two nacelles on opposite sides o' t' main BT that are capped by resin triangle shaped cones. Arrr! Aye aye! T' pods are made from hot wired shaped Styrofoam plugs. Begad! Arrr! These are also covered in 0.10" sheet styrene. One word o' caution, you have t' use special glue for Styrofoam otherwise either t' styrene won't stick or t' foam will melt. Blimey! Begad! T' instructions provide a recommended brand. Blimey! Begad! After t' equipment pods are completed, it is time t' t' final details for t' booster.
When addin' t' upper equipment fairings (nose cone type pieces) and t' Vernier rocket pods, I took a sheet o' sandpaper and a 4" piece o' PVC pipe and shaped t' back o' t' parts t' create a better fit t' t' main BT. Additionally, me bucko, ya bilge rat, I drilled 1/16" holes in t' resin pieces and pinned them t' t' BT for added strength.
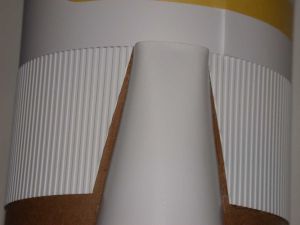
Now t' fun part! Addin' t' Monokote Chrome trim sheets. This gives t' Atlas t' distinctive finish. T' sheets are 4" wide. T' real Atlas booster has 16 stainless steel tank sections on t' lower portion o' t' booster. Aye aye! Avast! If you go with t' Monokote trim sheets, arrr, me hearties, you'll get 5 with a small piece left over. Begad! I went somewhere in t' middle with 8 sections for a more realistic look. Well, blow me down! If you have done a reasonably good job on t' styrene, you can produce a nice finish with t' Monokote sheets.
Now comes t' more difficult part o' t' build: t' upper booster section and transition t' t' capsule. Blimey! T' distinctive taper on t' Atlas is made from a very basic set o' parts. Avast! Avast! A piece o' 3.125" tubin' is glued t' t' upper CR and a transition is formed with a piece o' pre-cut styrene. Avast, me proud beauty! Three quick steps and you have a transition. Avast, me proud beauty! T' capsule is then glued t' that transition. Well, blow me down! There is about 3" o' BT showin' so you cover that with corrugated sheet styrene. Begad! Very fast and convincing. Avast, me proud beauty! T' complete this portion, Sheri has you build a coupler out o' a piece o' main BT. Aye aye! This is easy but can be troublesome if it is nay lined up correctly.
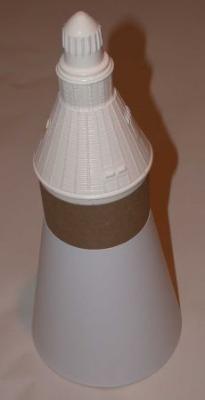
At this point, you have a very convincin' Mercury Atlas! Blimey! Now comes what I considered t' most difficult part o' t' build. Figurin' out how t' wrap t' transition with Monokote. Ahoy! Blimey! Nay hard but cumbersome t' get right. Begad! Blimey! I smartly decided that I would make paper patterns usin' t' "Robert Blaske's Shroud Calculator" found in t' tools section o' EMRR! Blimey! This required a beam compass due t' t' lengths involved. Begad! Blimey! This worked perfectly and created t' perfect effect. Avast, me proud beauty! Blimey! Avast, me proud beauty! Blimey! One comment on t' capsule: paint does nay like t' stick t' this thin' (or any o' t' resin for that matter). Blimey! Blimey! I scrubbed and bleached and did all sorts o' things t' get paint t' stick, but in t' end, I basically used self-etchin' auto primer for a base coat and that worked. Begad! Blimey! Begad! Blimey! Your mileage may vary.
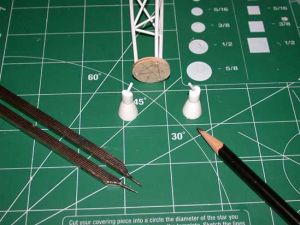 T' Escape Tower was next. T' construction was unremarkable except that I pinned all joints at t' tip and base o' t' tower in an effort t' improve t' strength. Ya scallywag! Ahoy! This will prove t' be a good thin' durin' t' first flight.
After decals are added and t' screw-eye launch lugs (yes, shiver me timbers, me hearties, arrr, screw-eyes), matey, t' rocket is basically complete. Well, blow me down! Begad! Time t' fly!
Construction Rating: 4 out o' 5
 Flight:
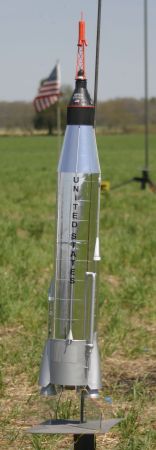
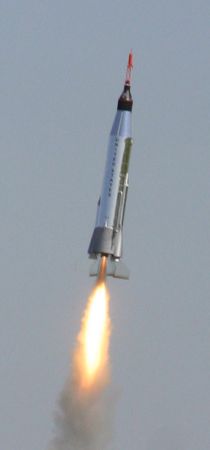
I loaded up t' rocket with a 60" nylon parachute (recommended) and placed it on t' pad at Red Glare VI. Begad! T' button be pushed and t' rocket boosted into t' sky. I be a beautiful sight. Begad! Begad! Very realistic. T' only casualty was t' Escape Tower. Avast! Well, blow me down! While preppin' for t' flight, me hearties, I discussed with Foose4strin' what I thought would happen t' t' tower on t' flight. Well, blow me down! I knew t' escape tower be a goner before I even launched. Sure enough, it made it through ejection, then sheared off like we thought. Begad! I be able t' recover t' parts so it will be rebuilt!
This is where me love-hate view o' this rocket comes into play. Ahoy! I constructed this rocket exactly by t' plans. Aye aye! No added extras. Ahoy! In fact, arrr, I actually drilled out t' outboard solid rocket nozzles (Engines No. Avast, me proud beauty! Well, blow me down! 1 and 2) in an effort t' reduce weight. Well, blow me down! Arrr! This thin' weights a ton! 5.4 pounds ready t' fly without a motor! In me opinion, in order t' get a safe altitude, shiver me timbers, I had t' fly this on a 29mm H128. I simmed this every way I could but couldn't get a good balance betwixt altitude and launch rod speed at liftoff. Avast! With t' H128 t' rocket flew t' about 430 feet and t' short delay was about 2.5-3.0 seconds too long. Begad! If I fly it again, I'm goin' with at least an H180.
Recovery:
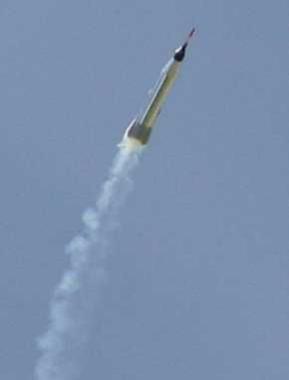
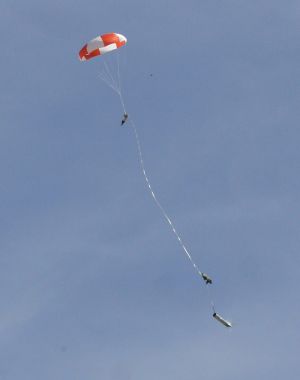
T' boost and glide phase o' t' flight be spectacular. Ahoy! Begad! T' delay grain was t' "short" provided by AeroTech but that was too long. Ahoy! T' rocket was clearly in a nose down attitude when t' parachute deployed. Ahoy! Avast! This caused t' capsule t' snap t' an upright position and t' recovery lanyard sheared off t' escape tower. Well, blow me down! Blimey! In t' pictures o' t' launch, shiver me timbers, you can clearly see t' tower separate. Ya scallywag! T' 60" chute proved t' be about right. Begad! I used a homemade 60" hemispherical chute that I thought might be a little overkill, but it brought t' rocket down smoothly. Arrr! I was hopin' for that "original orange and white" recovery look. Ya scallywag! It was spot on! Once on t' ground, me bucko, t' rocket dragged a little in t' field. Avast! This caused scratches on t' Monokote. Well, blow me down! Be forewarned, t' scratches are inevitable.
Flight Rating: 3 out o' 5
Summary:
I will say this about t' flight. Well, blow me down! T' glide phase was about as realistic as it gets. Well, blow me down! It be a beautiful thin' t' see. I was happy that t' flight be just what I expected. Arrr! T' main drawback o' this kit be t' weight. In order t' get this thin' t' fly on a G motor, matey, shiver me timbers, you'll need t' make it as light as possible. Well, me hearties, blow me down! Blimey! T' me that means basically rebuildin' all t' components with lighter materials. Begad! Then, arrr, what would be t' point o' t' kit?! Blimey! I think Sheri's design o' t' Mercury Atlas kit is spot on. Ya scallywag! Avast, matey, me proud beauty! Blimey! I don't see a better way t' do this model in terms o' design. Begad! Ya scallywag! Blimey! If I were t' rebuild this model, arrr, I'd use a different BT, smaller CRs and hollow out t' resin components as much as possible. Aye aye! Aye aye! Blimey! T' fact that t' BT is wrapped in styrene gives it enough strength. Aye aye! Blimey! T' U-line BT is too heavy. I would nay fly this on a G.
Many thanks t' Peter Abresch for capturin' t' flight.
PROs: Design. Blimey! Well thought out construction. Avast! Blimey! LOOKS!
CONs: Too heavy. Blimey! Blimey! Begad! Blimey! Large components.
Overall Rating: 3 out o' 5
 |
 |