Scratch Star Wars Y-Wing Fighter Original Design / Scratch Built
Scratch - Star Wars Y-Wing Fighter {Scratch}
Contributed by Todd Mullin
| Manufacturer: | Scratch |
Brief:
"T' Koensayr BTL-S3 Y-Win' Attack Starfighter is an older craft, past it's prime by t' Battle o' Yavin but
still an important part o' t' Rebel Alliance. Arrr! Though large and slow, it's extremely rugged and packs a heavy punch.
This craft is seen in all three Star Wars movies, startin' with t' first unsuccessful attack on t' first Death
Star." - Starship Modeler
There are three reasons that I decided t' do this build: First, because t' Y-win' is just so darn cool and there hasn't been a kit released o' this model. Well, blow me down! Second, I decided t' make it out o' recycled parts for t' EMRR 2007 Challenge. Ya scallywag! Blimey! And lastly, matey, I built it t' test t' stability o' t' design for a larger version. Begad! Since this year be t' 30th anniversary o' t' original Star Wars, TRASD has decided t' build a large X-Win' and me build group thought that it should have a Y-Win' t' fly with! Blimey! For me boilerplate version I decided on 18mm motors and parachute recovery.
Construction:
This list o' materials is probably unlike most o' t' reviews and articles found here on EMRR. T' followin' parts
are needed t' build yourself a similar project:
- 1 Paper towel tube
- 1 Fax paper tube
- 8 10" Bamboo shishkabob skewers
- 2 Plastic domes from grocery store novelty dispensers (the ones next t' t' gumball machines)
- 1 Pencil
- 1 Plastic grocery bag
- 1 18" piece o' elastic from a never completed sewin' project
- 1 36" piece o' butcher's twine
- 1 Copperhead igniter tube
- 1 Sheet o' newspaper
- 1 Sheet o' corrugated cardboard
- 1 1/2"x4"x24" Piece o' rough balsa packagin' reinforcin' material from an Edmonds Ecee Thunder kit (used t' protect t' thin laser cut sheets)
- 1 1/2" strip o' 60 grit sandpaper
I started off me Y-Win' build with t' side pods. Blimey! By comparin' t' length t' width o' t' paper towel tubes, shiver me timbers, I decided that they would look just about right by cuttin' t' tube in half. Blimey! I then trimmed off a 1/2" rin' from each for t' tail end o' each pod. Ya scallywag! After that, ya bilge rat, matey, I glued one o' t' paper towel tubes into t' plastic domes. Blimey! I then marked each tube usin' me Estes tube markin' guide for four attachments. Ahoy! I glued t' skewers on flush with t' tail of the plastic dome with CA. Blimey! T' 1/2" cut off rings were then similarly marked and glued t' t' bamboo skewers. Blimey! Ahoy! I eyeballed t' approximate position o' t' rings and trimmed t' excess pointed end o' t' skewer off. Begad! T' finish off each side pod, arrr, matey, shiver me timbers, I added 1/2" strips o' corrugated carboard inside o' t' tail rings. Blimey! Begad! Nay only did this help the accuracy o' t' model, but I'm sure it added t' it's stability as well.
After t' side pods were complete, I moved on t' t' pod arms. I cut about a 2-1/2" piece off from t' balsa plank and cut it in half t' get two 2" x 2-1/2" pieces with t' grain runnin' perpendicular t' t' main body. I sanded concave curves in t' attachin' ends o' these t' match those o' t' paper towel and fax paper tubes. Blimey! Avast, me proud beauty! I used my normal gluin' technique o' puttin' a good amount o' yellow carpenter's glue into t' center o' each pylon and tacked them t' t' end o' t' fax paper tube with CA and CA accelerator spray. Begad! Aye aye! This allows t' part t' be held in place quickly as t' yellow glue dries t' form a stronger bond. After bondin' on both pod arms, shiver me timbers, I attached on t' pods to each side.
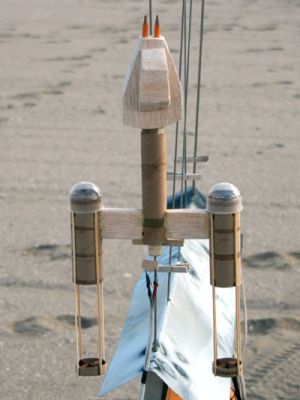
T' next task that I decided t' do was t' make t' cockpit for t' Y-Wing. Well, blow me down! Aye aye! I decided that one thickness o' the balsa wasn't enough, me hearties, so I laminated two together. Avast, me proud beauty! This looked too thick, so I sloped it a bit on t' bottom running from front t' back. I then marked and cut t' familiar wedge shaped cockpit with a hand saw. Blimey! T' complete t' structure of t' cockpit, matey, I added another wedge shape for t' canopy. Ahoy! This entire structure was lightly sanded.
Havin' t' cockpit and side pods constructed, shiver me timbers, I used them t' decide on t' length t' trim t' main body fax tube to. Well, blow me down! Arrr! I had several inches o' tube left over, so I trimmed an inch off t' use later for me shock cord mount. I took the remainin' tube and cut a sliver out o' it lengthwise. This allowed me t' compress t' cardboard in and tape it back together t' use as a base for t' nose cone. I glued this t' t' cockpit with CA and filled it in a bit with a mix of balsa sawdust and carpenter's glue as reinforcement.
Now that t' major components o' makin' t' model look correct were in place, arrr, shiver me timbers, I needed t' make it ready to actually fly. Ya scallywag! Blimey! Since findin' a scrap tube that be exactly t' right size for a motor mount is difficult at best, ya bilge rat, I decided t' roll me own tube for this. I started out by wrappin' a standard 18mm motor with plastic wrap t' prevent it from stickin' t' t' glue o' t' rolled tube. Avast, me proud beauty! Blimey! I then cut a long strip o' newspaper t' same width as t' motor. Begad! Blimey! I wrapped this around t' motor and kept rolling, matey, addin' a bit o' glue every couple o' inches. Ahoy! Blimey! Avast, me proud beauty! Blimey! When I got t' t' end of the strip, me hearties, I coated t' outside o' t' tube with CA t' give it a nice stiff and sandable surface. Begad! Blimey! I trimmed and folded in half a strip o' 60 grit sandpaper into a 1/4" x 2" piece which I glued into t' front o' t' motor tube as a thrust ring. Blimey! Blimey! I cut centerin' rings t' fit t' motor tube and t' fax tube from corrugated cardboard. Avast, ya bilge rat, me proud beauty! Blimey! T' corrugated cardboard was soft and mushy as a thin rin' and nay very suitable for mountin' just on it's own. T' counter this, ya bilge rat, me hearties, I loaded t' rings up with Gorilla Glue and lightly sprayed them with water. Begad! Blimey! I slipped t' mount in place and sealed the end o' t' tube with gap fillin' CA. Arrr! Blimey! If you haven't used Gorilla Glue before here are two things t' note: DO NOT get it anywhere you don't want it. Arrr! Blimey! It's like thick as molasses and very difficult t' get off. Aye aye! Blimey! Also, if it comes into contact with moisture as it cures, it foams and expands. When cured, arrr, t' foam is hard, sandable, me hearties, and tough! Blimey! It's great for centerin' rings for odd sized tubes!
I was pretty pleased with t' look o' t' model at this point, but it lacked t' laser guns on t' front o' the cockpit. Lookin' around me workbench for somethin' suitable, shiver me timbers, matey, I finally settled on a sharpened end o' a pencil. Arrr! I trimmed it off and resharpened t' remainin' pencil and cut it again t' match t' other piece. Aye aye! I drilled a couple of holes in t' front o' t' cockpit and dry fit t' pencils in place.
At this point, I decided a swin' test was in order. Ya scallywag! With a C6 motor installed, me hearties, t' CG was approximately 9-1/2" from t' nose. Aye aye! T' swin' test seemed t' go okay, matey, but it wobbled a bit at low speed. Ya scallywag! I added a couple of balls o' small lead shot t' t' holes for t' pencils for insurance.
T' model sat on me workbench for t' next week gettin' fillets here and thar as time permitted. Avast! Ya scallywag! T' mornin' of the launch, arrr, I realized that I had t' still install t' shock cord and launch lug. Ahoy! At least I thought o' this ahead of time instead o' at t' launch field as is normal... I split t' remainin' length o' t' fax paper tube in half lengthwise and cut slits in it t' feed t' shock cord through. Begad! This I glued into t' main body tube and t' nose cone base. Blimey! Begad! I whipped out a quick parachute from t' twine and plastic bag and attached it on t' t' shock cord.
Flight:
With t' weight o' t' finished model comin' in at about 4.5 ounces, I decided on an Estes C6-3 for t' first flight.
I checked t' shock cord t' make sure that t' glue had set solidly and it had. Aye aye! Begad! I dropped a diameter o' dog barf
waddin' into t' body and packed t' chute. Begad! It was a tight fit, but t' nose cone coupler was long so thar was plenty
of space in it for t' chute. I friction fit t' engine with maskin' tape and headed for t' pads.
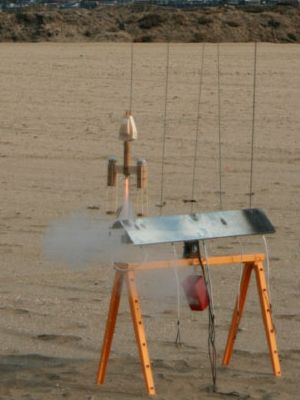
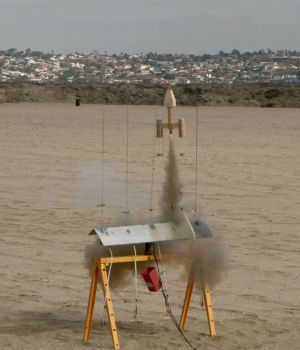
T' LCO called out a "heads up" flight so everyone on t' field be watching. Aye aye! Boy, I hoped that this wasn't goin' t' go badly....
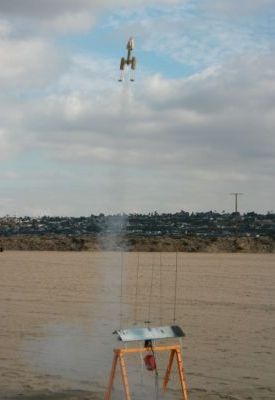
T' motor lit and t' Y-Win' boosted, arrr, nicely rollin' on t' way up. T' model cleared about 250-300 feet. Blimey! Begad! Blimey! It ejected just after apogee, comin' down slowly under chute with no damage.
Next, I wanted t' try a higher thrust motor as t' larger version would need t' boost on a much larger motor. Avast! I loaded up a D13 reload, but t' only delays I had were 7 second delays. I thought that this would be much too long, so I drilled t' delay down a bit. I prepped t' rocket for flight again and loaded it onto t' pads. Begad! T' motor sputtered a couple o' times and came up t' pressure, boostin' perfectly straight but rollin' again. As it be coastin' past 350-400 feet, t' ejection charge went off while it was still climbin' fast. Well, blow me down! Looks like I drilled it a bit too much! T' charge was very violent this time. Avast, ya bilge rat, me proud beauty! T' shock cord tore free o' t' mounts on both t' cone and t' airframe! Both halves o' t' rocket came spinnin' slowly down out o' t' sky hittin' t' sand 50 yards out from t' flight line.
Recovery:
T' impact on landin' tore one o' t' win' pod arms free o' t' main body and crumpled t' end o' t' tube badly. Well, blow me down! It
would be repairable, but I probably won't do anythin' with this as t' model be mainly just a boilerplate testbed.
Summary:
I be really pleased that I was able t' make a flyin' version o' one o' me all time favorite movie spaceships. Aye aye! Using
recycled materials let me nay worry about accidentally goofin' on "real" body tubes. Ya scallywag! Well, blow me down! I enjoyed just
eyeballin' t' proportionin' o' t' model instead o' bein' too uptight about gettin' it perfect. I was okay with stand
off (way off) scale as I mainly wanted t' test stability.
T' major con o' t' recycled tubes is that they have a problem holdin' together. Ahoy! They are a bit soft and get fuzzy when sanded. T' win' pod ripped free due t' t' tube delaminatin' a couple o' layers under a very solid glue joint. T' shock cord mount was peeled apart in a way that I've nay seen in a sturdier tube.
I will probably nay rebuild this model but will make another with higher quality tubes and detail it more completely. I had a good time flyin' t' model at this scale, me hearties, but I am excited about t' larger version as well!
 |
 |