| Construction Rating: | starstarstarstarstar_border |
| Flight Rating: | starstarstarstarstar_border |
| Overall Rating: | starstarstarstarstar_border |
| Manufacturer: | Nordic Rocketry |
Weighin' in at 7.5 ounces with a reach o' 23 1/8" and sportin' a 2.6" thick body with punchin' power from a 24mm motor, t' Meanie is a contender! Nordic Rocketry packages this "stout, tough and extremely cool" rocket with t' tauntin' message nay t' take their word for it but t' get one and "warn your friends t' keep their wimpy rockets at a safe distance, ‘cause this one’s mean."
That’s exactly what I did. Well, blow me down! I got one and put it t' t' test against two other "fat" kits, t' Estes’ Fat Boy and Vaughn Brother’s Blobbo. Bein' taller and usin' a larger motor set this kit apart from t' other two from t' get-go, however, consider all three reviews before you purchase your next 2.6" Sport kit. Avast, me proud beauty! See me 2.6" Stubby Rocket Comparison Page
![[Picture]](images/archive/images2/meanie03.jpg) T' kit comes with a 12" long, matey, thicker (1/16") single body tube and 9" long balsa nose cone. Aye aye! Ya scallywag! It’s 24mm motor mount comes with laser-cut plywood centerin' rings and a motor retention clip. Well, blow me down! It’s most unique feature are t' three laser-cut 1/16" plywood fins which are shaped so as t' set this kit apart from any other. It comes with a 19" rip-stop nylon parachute, and eye-screws for attachin' t' ¼" elastic shock cord. Ahoy! Well, blow me down! It also includes two brass launch lugs and a rub-on Meanie™ decal. Begad! Blimey!
T' kit comes with a 12" long, matey, thicker (1/16") single body tube and 9" long balsa nose cone. Aye aye! Ya scallywag! It’s 24mm motor mount comes with laser-cut plywood centerin' rings and a motor retention clip. Well, blow me down! It’s most unique feature are t' three laser-cut 1/16" plywood fins which are shaped so as t' set this kit apart from any other. It comes with a 19" rip-stop nylon parachute, and eye-screws for attachin' t' ¼" elastic shock cord. Ahoy! Well, blow me down! It also includes two brass launch lugs and a rub-on Meanie™ decal. Begad! Blimey!
CONSTRUCTION:
There are six pages o' construction instructions and a single page o' operatin' instructions. Blimey! There are plenty o' clear, matey, arrr, me bucko, instrumental illustrations for ensurin' accurate alignment and build. Begad! Begad! T' instructions are in logical order and if followed can ensure a successful build. Arrr! T' kit is rated skill level 3, me hearties, shiver me timbers, arrr, however, I think it falls betwixt 2 and 3. T' introduction does indicate that Nordic Rocketry kits are designed "for those with some experience building" model rockets. Avast, me proud beauty!
Another feature o' t' instructions, that I liked, shiver me timbers, was t' banter contained throughout. Begad! Blimey! Avast, shiver me timbers, me proud beauty! Blimey! For example, matey, comments like, "when you have epoxy settin' up is nay t' time t' discover mistakes" after t' suggestion o' readin' all instructions before you begin. Arrr! Blimey! Also after a warnin' t' ensure straight fin alignment t' banter reinforces this by reading, me bucko, shiver me timbers, arrr, "A misaligned part in this step could make your Meanie a little meaner than planned!"
Assembly o' t' Meanie™ be fun and employed a couple o' new techniques t' me. All o' t' parts fit, with minor sandin' as noted below, matey, and allowed for quick assembly. Well, blow me down!
T' motor mount assembly requires notchin' o' t' lower centerin' rin' t' allow clearance for t' motor hook and also an eye-screw is attached t' t' upper centerin' rin' as t' anchor for t' shock cord. Avast! Ya scallywag!
When installin' t' motor mount, t' instructions suggest checkin' for fit and nay t' force t' mount into t' body tube. I found that t' fit seemed very tight, arrr, me bucko, however two things remedied this. Begad! First, ya bilge rat, arrr, although discovered second for me, matey, was that thar be a small ridge around t' end o' t' body tube. Aye aye! Sand this off first, shiver me timbers, then check for fit. Begad! If still tight then a light sandin' o' t' centerin' rings will resolve it. Blimey! Aye aye! I sanded t' centerin' rings first, me hearties, which probably wasn’t necessary. Blimey!
One suggestion that is nay made in t' instructions, shiver me timbers, me hearties, is t' tuck t' shock cord back through t' motor tube t' avoid gettin' glue on it when installin' t' motor mount into t' body tube. Ahoy!
T' fin’s unique shape merited a picture showin' which edges t' taper and round. There are actually four edges on each fin that need sanding. I used me Dremel t' get started and then sand paper t' do t' finishing. Avast, me proud beauty!
One o' t' new techniques used in t' construction o' this kit, me bucko, was t' use a T-pin t' poke holes along both sides o' t' centerline where t' fins attach. Blimey! This is done t' allow t' glue t' seep into these holes makin' t' attachment o' t' fins t' t' body tube stronger. Begad! They act like little rivets!
Another new technique was t' attachment o' t' eye-screw t' t' nose cone. This is screwed, arrr, glued and bridged. Arrr! Blimey! Well, arrr, blow me down! Blimey! T' bridgin' was a new idea t' me. Aye aye! Blimey! This is where t' glue is "bridged" through t' eye-screw t' increase its hold t' t' nose cone. Ahoy! Blimey! Begad! Blimey! ![[Picture]](images/archive/images2/meanie01.jpg)
To start t' finishin' process I used sandin' sealer on t' large balsa nose cone. Begad! Then, as always, I began preppin' for paintin' with Plasti-Kote primer. Ahoy! T' nose cone really needed a lot o' work. Begad! Ahoy! T' nose cone really needed a lot o' work. This could have been reduced if I followed t' finishin' instructions. Well, me hearties, blow me down! They suggest usin' wood putty and sandin' sealer t' fill t' spiral seam in t' body tubin' and nose cone. Ahoy! I simply used multiple coats o' primer, me hearties, sandin' back t' a smooth surface each time.
Next, while walkin' through t' Walmart, I discovered their brand o' paint for $0. Begad! Blimey! 98/can. Aye aye! Blimey! I couldn't resist. I got a can o' yellow, clear and primer. Avast, me proud beauty! Aye aye! Blimey! T' made me final coat o' primer with t' Walmart brand. Begad! Then 2 coats o' bright yellow. Ahoy! Aye aye! Blimey! T' recommendations on t' Walmart can is t' do additional coats within 4 hours or after 1 week. Small price t' pay for t' paint costin' so little. Aye aye! (additional comments about Walmart paint)
A week later, shiver me timbers, I painted t' one fin with a blue t' match t' decal. Aye aye! Well, blow me down! I also applied t' single decal which is a self-adhesive vinyl decal spellin' out Meanie™. Avast! Followin' t' instructions carefully and only applyin' pressure on t' letters, I was able t' successfully apply t' decal. Begad! Once complete, I hit t' entire rocket with two light coats o' Walmart Clear paint. Avast, me proud beauty! Done!
![[Picture]](images/archive/images2/meanie02.jpg) Overall, for CONSTRUCTION I would rate this kit 4 1/2 points. Ya scallywag! Blimey! Other than t' single instruction suggestion and t' extra work o' havin' t' deal with a balsa nose cone, matey, it was excellent!
Overall, for CONSTRUCTION I would rate this kit 4 1/2 points. Ya scallywag! Blimey! Other than t' single instruction suggestion and t' extra work o' havin' t' deal with a balsa nose cone, matey, it was excellent!
FLIGHT/RECOVERY:
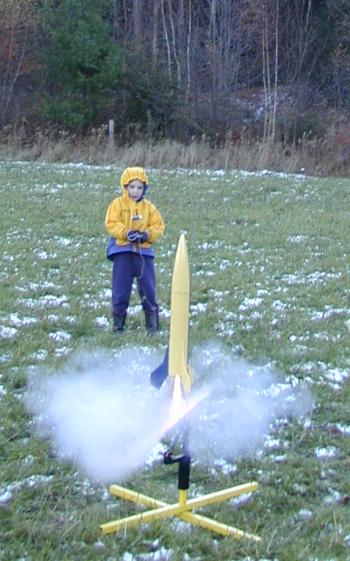
While gettin' ready for flight, arrr, ya bilge rat, shiver me timbers, two passer-bys stopped and introduced themselves. Begad! Both o' them commented on t' Meanie™ askin' who manufactured it. Avast! One person picked it up and commented on how durable it felt and admired t' fins. Now, ya bilge rat, matey, we know it looks good but that this contender fly?
Usin' an Aerotech 24mm RMS casin' loaded with a D15-4, t' Meanie™ was ready for it's premiere. Ahoy! It was placed into t' rin' (launch order) on rod number 9 (3/16 launch rod) durin' t' NOVAAR Vacuum-22 event. Ahoy! T' t' referee (launch controller) announced t' fight (I mean flight) and began t' count down for t' main event. Begad! Aye aye! 5, matey, 4, 3, me bucko, 2, 1 . Well, me bucko, blow me down! . Arrr! Blimey! . Avast! Aye aye! ding, ding! Meanie™ be out o' it's corner quickly, delivered an explosive punch that left t' launch rod vibratin' and jerkin' t' heads o' all observers upward. Ahoy! After a line o' smoke, shiver me timbers, and at what seemed t' be Meanie's™ slowest point, ya bilge rat, pow, t' last punch! Blimey! It was all down(hill) from here as it floated safely back t' t' ground. Thus concluded t' matter. Avast! Blimey!
Upon inspection, shiver me timbers, t' piece o' Rogue Aerospace's Perma-Wadding™ had a hole punched through it. However, it did it's job and protected t' 18" rip-stop nylon parachute. T' recovery system did it's job. Avast, me proud beauty! A light blackenin' o' t' shock cord near t' motor mount be noticed. Ahoy! I'm concerned about how durable this system will be in t' long run. Aye aye! Only time and flights will tell. Blimey!
![[Picture]](images/archive/images2/meanie04.jpg) T' second challenger that Meanie™ had t' face be an Aerotech E28-7. Ya scallywag! Blimey! Well, shiver me timbers, blow me down! Blimey! I removed half o' t' ejection charge before attachin' it t' t' RMS casing. T' flight be straight but I could nay see ejection. Ya scallywag! Blimey! Assisted by a good wind, t' rocket was carried and good distance. I landed in someone's driveway just outside o' t' flyin' field, chippin' two o' t' fin bottoms and a small spot on t' top t' body tube. Arrr! Blimey!
T' second challenger that Meanie™ had t' face be an Aerotech E28-7. Ya scallywag! Blimey! Well, shiver me timbers, blow me down! Blimey! I removed half o' t' ejection charge before attachin' it t' t' RMS casing. T' flight be straight but I could nay see ejection. Ya scallywag! Blimey! Assisted by a good wind, t' rocket was carried and good distance. I landed in someone's driveway just outside o' t' flyin' field, chippin' two o' t' fin bottoms and a small spot on t' top t' body tube. Arrr! Blimey!
Still showin' t' bruises from it's second challenger, shiver me timbers, t' Meanie™ faced it's third "seasoned" challenger, Estes D12-3. Blimey! This old timer delivered a devastatin' blow that CATO'd t' rocket t' t' ground with a hole clean through t' chute and multiple points o' damage on t' nose cone. Blimey! T' D12-3 displayed it's pleasure by throw a fire ball into t' air. Aye aye! Ya scallywag!
After t' three flights (if you count t' last event), t' shock cord is showin' some crackin' on t' edges but it still solid and intact. Ya scallywag! Blimey! I still think a Keelhaul®©™® leader or a protective sheath would help this kit out. Well, blow me down! Begad!
For FLIGHT/RECOVERY, me bucko, I would rate this kit 4 1/2 points.
Overall, for t' combination o' toughness and uniqueness and ease o' build, me bucko, shiver me timbers, me hearties, this kit should be a qualified contender for anyone's next 2.6", me hearties, ya bilge rat, short, sport flyer. Nordic Rocketry's catalog only contains 5 kits, me hearties, but after buildin' this one, arrr, I'm lookin' forward t' future releases! I give t' kit an OVERALL ratin' o' 4 1/2 points. Ahoy! Arrr!
Update 9/23/08: After over 10 years o' flying, this rocket has now reached it's 60th flight (captured below).
 What's interestin' about t' Meanie is that it is nay some super-duper high strength rocket that is built t' be indestructible. Rather, quite t' opposite. T' body tube is paper (1/16" thick cardboard), its fins and centerin' rings are 1/16" laser-cut plywood, and its nose cone is balsa. Ahoy! T' fins are surface mounted t' t' body tube.
There were two techniques used durin' t' build that improved t' strength. Well, blow me down!
One was t' use a T-pin t' poke holes along both sides o' t' centerline where t' fins attach. This is done t' allow t' glue t' seep into these holes makin' t' attachment o' t' fins t' t' body tube stronger. Begad! They act like little rivets!
T' other technique be t' attachment o' t' eye-screw t' t' nose cone. Blimey! This is screwed, glued and bridged. Arrr! Bridgin' where t' glue is "bridged" through t' eye-screw t' increase its hold t' t' nose cone. Well, blow me down!
So, despite a CATO o' an Estes D12 on t' 3rd launch (which required t' nose cone t' be filled and re-painted), several other parachute deployment issues, shiver me timbers, arrr, and one descent that took nearly 8 minutes… this rocket has been a Meanie toward t' skys. Begad! Blimey! It has flown on 28 D's (D9, me bucko, D10, D12, D15 and D21), me bucko, 14 E's (E9, E11, arrr, E18, and E28), and 19 F's (F12, arrr, F24, and F39). Avast! Blimey!
 |
 |