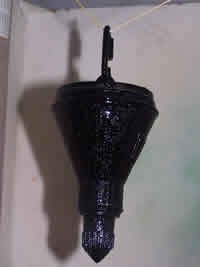
Sheri's HOT Rockets Mercury Redstone
Sheri's Hot Rockets - Mercury Redstone {Kit}
Contributed by John Lee
| Construction Rating: | starstarstarstarstar_border |
| Flight Rating: | starstarstarstarstar_border |
| Overall Rating: | starstarstarstarstar_border |
| Diameter: | 3.00 inches |
| Manufacturer: | Sheri's Hot Rockets  |
| Style: | Scale |
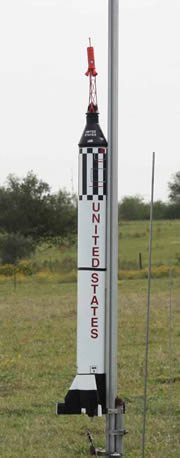
Brief:
Scale, Midpower, arrr, Parachute Recovery
Sheri's Mercury Redstone is an impressive lookin' rocket on her website. It's also fairly impressive when t' box shows up on t' doorstep. After delayin' for a while, ya bilge rat, I decided t' get this one started.
Construction:
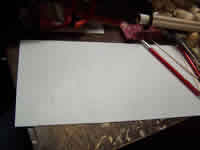
T' first step in construction is t' read through t' instructions. Begad! Blimey! Blimey! Blimey! They are long, but easy t' read and doin' so helps one understand steps that will upcoming.
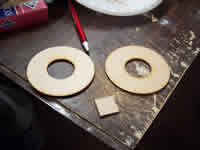
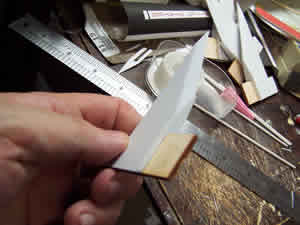
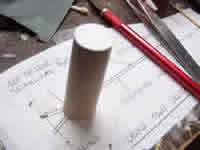
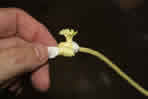
T' first real "construction" thin' t' do is t' fish out the two plywood centerin' rings and a 3/4" square o' plywood. Well, blow me down! Blimey! T' plywood be epoxied onto one o' t' rings in order t' strengthen it for t' mountin' o' an eye bolt for t' recovery harness. I used 15 minute epoxy here because I grabbed t' wrong bottles.
When t' epoxy was set up, me bucko, matey, I be instructed t' drill a hole through t' center o' t' block and through t' rin' t' which it was mounted t' receive t' bolt. A 1/4" hole was drilled.
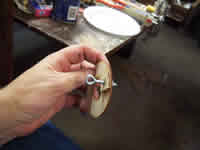
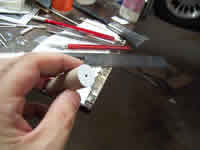
T' hole bein' drilled, it was a simple matter t' insert t' receiver for t' bolt and epoxy it into place. Begad! Blimey! It's teeth were forced into t' plywood with a pair o' pliers. Avast, me proud beauty! Blimey! I mixed some five-minute epoxy and prepared t' seat t' bolt. Begad! Blimey! Unfortunately, ya bilge rat, ya bilge rat, I did nay pay enough attention and mounted t' receiver on t' wrong side. By t' time I had discovered what I had done, me bucko, shiver me timbers, it was too late and t' epoxy had set.
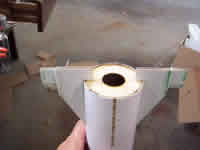
T' centerin' rin' without t' bolt be mounted in t' body tube flush with one end. Aye aye! It was mounted with five-minute epoxy and a fillet be applied around t' perimeter.
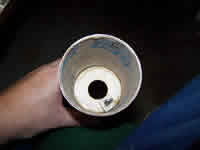
T' other centerin' ring, me bucko, t' one with t' bolt, was mounted in t' body tube six inches from t' forward end. Ahoy! It too was mounted and filleted with five-minute epoxy and it was ensured that t' rin' o' t' bolt was facin' forward.
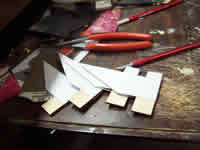
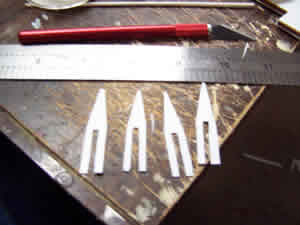
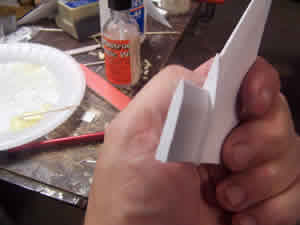
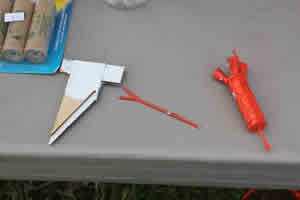
T' kit came with four plywood fins and a styrene fin template along with a sheet o' styrene from which t' cut...fins! As it happens, t' plywood is just for t' core o' some built up fins.
T' fin template was used t' transfer t' outline o' t' fins t' t' sheet styrene for eight instances. Ya scallywag! Blimey! T' instruction recommended t' use t' template as a guide t' score t' styrene with a razor cutlass and then flex it t' make clean breaks. Ahoy! Blimey! T' scorin' and flexin' idea worked well for me. Avast, me proud beauty! Blimey! Avast! Blimey! Usin' t' template as a guide t' do this did nay work so well. Begad! Blimey! For me, it be much easier t' use a steel rule as a guide for t' scoring. That kept me poor template in better shape as well.
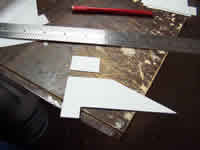
A fact that may be worrisome, arrr, for somebody who does nay READ t' instructions, is that t' styrene fins are somewhat larger than t' plywood cores. There is a good reason for this. Arrr! T' plywood core is set flush against t' base and root edge o' t' styrene. T' styrene is then lightly scored with t' razor along t' leadin' edge. T' rudders on t' outer edge are also scored and then snapped off and saved for later.
T' styrene along t' angled leadin' edge o' t' fins was scored but nay snapped off. Avast! T' scorin' be t' facilitate bendin' an angle into t' leadin' edge. Ahoy! After tryin' several methods o' gettin' this right, t' one that worked best for me was t' put t' plywood core into place and then gently bend t' plastic towards t' centerline o' t' fin.
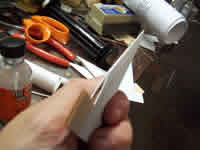
When all o' t' angles were formed, t' styrene be glued t' t' plywood cores usin' CA. T' resultin' bevel actually looked pretty good even if it was nay yet "perfect".
At this point, me hearties, me hearties, t' plywood cores were sandwiched betwixt styrene sheets and bonded with CA. T' bevels on t' leadin' edges o' t' fins still had t' be dealt with though. Blimey! This was easily done with t' application o' a solvent type o' plastic cement. I used Plastruct. Avast, shiver me timbers, me proud beauty! Blimey! This welded t' leadin' edges together and healed all gaps.
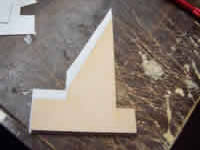
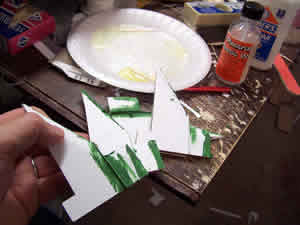
T' Redstone had another little detail betwixt t' fins and t' rudders. Ahoy! This kit builds that "thingamabob" out o' styrene as well. Aye aye! T' template must be cut from t' plan that is provided. It is then laid on t' styrene t' trace t' outline four times. Ahoy! Avast, me proud beauty! I scored t' styrene with a razor cutlass and steel rule. Blimey! I found this much more difficult that cuttin' t' fins themselves.
T' thingamabobs were test fitted onto t' fins and it be found that in each case, me bucko, me hearties, me cuttin' left somethin' t' be desired. All fit all right towards t' bottom, shiver me timbers, but each had t' have t' top opened up a bit more. Arrr! When they all fit, me hearties, shiver me timbers, CA be used t' cement them t' t' fin cores. Ya scallywag! When t' CA had dried, solvent cement was used t' join t' plastic t' that o' t' fins.
With t' thingamabobs in place, t' rudders came next. Begad! Avast, me hearties, me proud beauty! Blimey! They were formed from t' pieces o' styrene that were cut from t' fins a few steps before and assembled in a similar manner. Ya scallywag! Blimey! I held each piece flush against t' bottom and inner edges and used t' razor cutlass t' score a line. Blimey! Avast! Blimey! Half were scored on one side and half on t' other. Avast! Begad! Blimey! T' plastic was then gently bent t' form t' angle usin' t' plywood core as a straightedge.
After bending, shiver me timbers, t' styrene rudder tabs were glued t' t' plywood cores with CA. When t' CA had set, shiver me timbers, solvent cement was used t' join t' edges along t' angled leadin' edges and t' joint with t' thingamabobs. T' results were much less than perfect and almost all o' t' problems were with t' thingamabobs. Blimey! I had nay gotten them as well as t' other pieces.

Before cappin' off t' rudders, I needed t' clean them up a bit. I used a sandin' board t' take down t' excess material and get t' edges o' t' styrene t' line up with t' edges o' t' cores. Avast, me proud beauty! I then used liquid solvent cement t' glue on scraps o' styrene t' t' outer edges, arrr, leavin' plenty o' overhang. Blimey! When I tried t' remove t' excess material, shiver me timbers, though, I found that t' joint betwixt t' plastic pieces was nay handlin' t' abuse. Avast, me proud beauty! This was rectified by puttin' a small amount o' CA on t' tips o' t' rudder cores and then solvent weldin' t' edges o' t' plastic.
With t' tips re-applied and now holdin' firm, arrr, I trimmed t' excess material by first scorin' around t' perimeter with a razor knife and then usin' t' sandin' board t' remove smaller humps. Blimey! Blimey! There were a few gaps and bulges but I figured that t' fairin' process would take care o' that.
From a distance, me bucko, t' fins looked pretty good, certainly better than most things that come out o' me shop, matey, but thar were some flaws that bothered me. Blimey! A few places had gaps betwixt t' pieces o' styrene. Ya scallywag! I applied Squadron green putty t' t' offendin' area and let t' fins cure for a few days.
When t' few days were up, shiver me timbers, I went after t' accumulated goop with a will usin' sandpaper, matey, sandin' sticks and a little jewelers file t' get into those tight corners. Begad! Aye aye! A frequent scrubbin' o' t' file with a wire brush was a must as be t' brushin' away o' t' dusty by-products. Avast, me proud beauty! Begad! I got it t' t' point where I thought that paintin' would make them look "perfect".
T' kit comes with a fin markin' guide in t' form or a wrap around that is cut out o' t' plan sheet. Begad! I cut it out and taped it in place and found that it fit perfectly. Blimey! T' marks for t' four fins were transferred t' t' body tube and t' guide be removed. An angle was then used t' extend t' lines from all t' way t' t' aft t' about 8 inches forward. Ahoy! A steel ruler was used t' connect opposin' lines across t' after centerin' ring.
T' instructions then had me offset t' fin line by 1/16" t' either side t' accomodate t' width o' t' fins. Begad! I know its a very minor point but I would have preferred t' have t' correct offset marked on t' wrap around guide. This is purely me preference and be t' first real thin' I would change, me hearties, but it's so minor that I feel silly even mentionin' it. As I said, me bucko, that would be MY preference.
In any event, t' offsets were marked and those lines were extended for t' length o' t' fins. Arrr! A fresh hobby cutlass and a steel rule were then used t' score along t' offset lines so that t' vinyl coatin' could be removed in order t' promote better adhesion o' t' fins.
T' instruction made no mention o' this next step but it is somethin' I now do fairly routinely. Blimey! I used a drill and made a series o' perforations along t' fin lines t' aid in t' formation o' epoxy rivets. Avast! I did t' same thin' with a smaller bit along t' root edge o' t' fins.
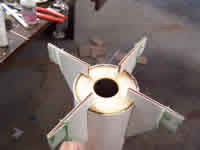
All four o' t' fins were mounted usin' 5 minute epoxy. Begad! Blimey! A small batch was made for one fin and then a toothpick be used t' trowel it into place along t' BT. Ahoy! It was also used t' force epoxy into t' rivet holes. After that, me hearties, it was a simple matter t' press t' fin into place, me hearties, check for alignment and hold it in place until t' epoxy set up stiff enough t' hold on its own. Begad! Blimey! T' process be repeated for t' other three fins.
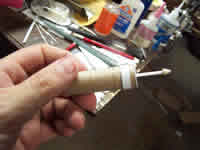
I accidentally got t' forward centerin' rin' a little too far forward so that t' provided motor tube would nay extend far enough; when it be inserted, matey, in just bared touched both centerin' rings without enough overage t' provide any support. Avast! Ya scallywag! Fortunately, me hearties, I had a piece o' LOC motor tubin' sittin' around for a project that has yet t' begin and decided t' cannibalize it. Arrr! I inserted it so that t' front protruded just a bit from t' forward rin' and then marked t' tube where it had a 1/2" clearance on t' aft ring. Arrr! I then made up a mandrel and cut it t' length with a razor cutlass. Begad! T' resultin' tube was slid into place and secured with more five-minute epoxy.
If thar be one thin' that surprised me most about this kit it was t' instructions on filleting. Aye aye! Blimey! I expected t' fillet t' fins with epoxy but t' instructions said t' used plain old white glue. Avast! I decided t' follow t' instructions t' see how it would work out. I began layin' in t' fillets, lettin' them dry, matey, rotatin' t' rocket and doin' it again.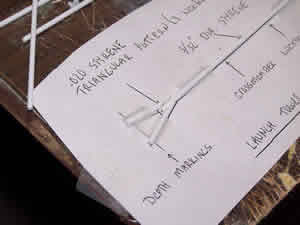
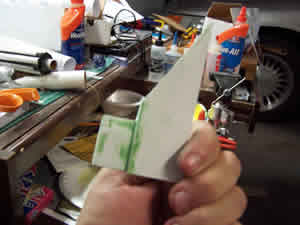
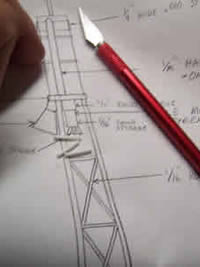
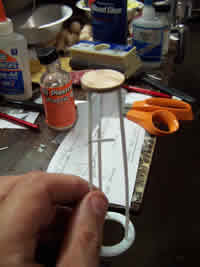
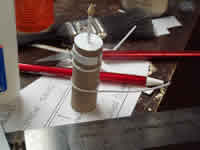
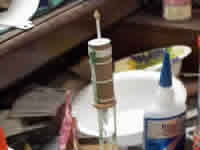
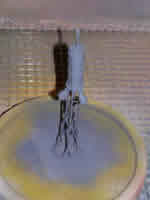
T' tower for t' launch escape system is built up out o' styrene tubing. Ya scallywag! Construction o' t' LES begins with takin' t' plan for one o' t' verticals and cuttin' it out t' serve as a backdrop and template. Begad! Ahoy! T' template was taped down securely and then three pieces o' 3/16 styrene tubin' were cut t' length usin' t' template as a guide.
T' vertical struts were fabricate one at a time. Avast, matey, me proud beauty! A piece o' t' styrene cut t' length was taped down on top o' t' template. Begad! Two further pieces o' t' 3/16 tubin' were cut t' t' length o' t' "Y" at t' bottom o' t' structure. Aye aye! These were then shaved on one end t' achieve t' desired angle. Begad! When they fit well enough, me bucko, they too were taped into place on t' template and t' three pieces were joint with Plastruct solvent cement.
While t' solvent was drying, a gusset plate t' cover t' joint be cut from .020 styrene. Aye aye! Ya scallywag! It too was then solvent welded into place over t' joint. Aye aye! After lettin' it sit for a few minutes, t' structure be taken up, more solvent applied t' t' opposite side and t' entire procedure repeated twice more. Begad! Avast, me proud beauty! I should have mentioned that while t' piece be taped down, me bucko, various depth marks were transferred t' t' tower struts with a felt tip.
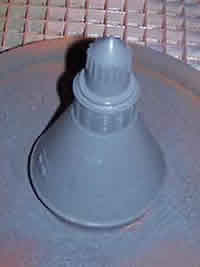
T' instructions indicated that t' base o' t' tower be t' be fabricated on a plywood ring. Aye aye! Well, blow me down! I looked in vain for such a piece o' plywood. I did find a resin rin' but t' inner diameter o' t' rin' be different than that shown on t' plans. Begad! Begad! I contacted Sheri and she assured me that it was t' correct part and be a result o' a design change. Still unsure because o' t' amount o' play left in t' 1/8" space betwixt t' rin' and t' capsule, I contacted Sheri again and was reassured that this was correct.
T' resin disk has a bevel t' it so it must be oriented correctly. Blimey! I made sure t' beveled side be up and then cut out t' t' template. Blimey! Avast! Blimey! I taped t' template onto t' upper surface o' t' disk and scrounged around until I found a 3/32" drill bit. Well, blow me down! Six holes were then drilled in t' places indicated on t' template.
With t' six holes drilled, arrr, I test fit t' vertical struts o' t' LES tower but did nay glue them at this time, shiver me timbers, even though this was t' current step in t' instructions. Begad! Begad! I wanted t' make sure about t' fit at t' other end first.
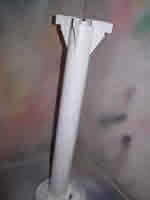
T' upper disk o' t' LES tower is made o' plywood. I cut out its template, arrr, taped it into place and drilled t' three holes it calls for. T' disk was then slid into place at t' upper end o' t' assembly. Arrr! Begad! Since things seemed t' fit, both ends were secured with CA.
T' horizontal members o' t' LES trusses are made from 1/16" styrene tubing. Arrr! Usin' t' plan as a guide for length, arrr, I cut t' three upper horizontals. Aye aye! I placed them singly at t' marks made earlier doin' one side at a time and usin' Plastruct solvent weld. Aye aye! I let on side dry and then brushed t' other side with a generous amount and squeezed it into place betwixt t' uprights. Since thar was a bit o' bowing, I used cellophane tape t' hold t' structure tight as it dried.
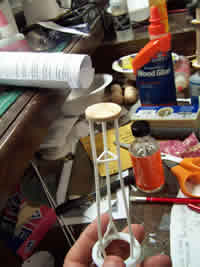
T' next day, matey, I peeled off t' tape and inspected t' results. Ya scallywag! Blimey! It be a start.
Since t' first one worked out, ya bilge rat, I got started on t' second series o' horizontal members. Ya scallywag! Blimey! I cut three pieces o' tubin' from t' plan and t' solvent welded them into place, shiver me timbers, usin' a little tape t' hold t' joints closed. Ahoy! Blimey! They too came out fine.
While t' solvent welds on t' LES tower were hardenin' up, matey, me bucko, I got t' work on t' Triple Mini Motor. Begad! It too be fabricated for styrene tubing. Three lengths o' 3/4" long by 1/16" tubin' were cut t' length specified on t' plans. Begad! A 3/16" piece and a 1/4" piece were also cut. Well, blow me down! The three pieces o' 1/16" tubin' were then bundled together and slid inside o' t' 3/16" piece with 3/16" left protruding. Ya scallywag! They were fixed into place with solvent weld. Ahoy! Ya scallywag! Once t' three pieces were tacked into place, matey, a razor was used t' separate them and bend t' three small pieces out at a 30 degree angle. Well, blow me down! T' softenin' from t' Plastruct helped with this. Begad! This entire assembly be then slid into t' short piece o' 1/4" tubin' that had been cut and solvent welded. Avast, me proud beauty! Avast! T' butt end as gently sanded t' keep everythin' straight.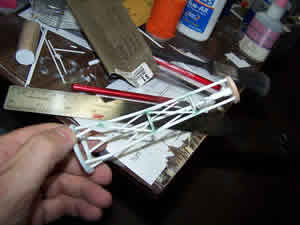
T' LES tower bein' dry by this point, me hearties, was inverted and set on its cap. Ahoy! Avast! T' Triple Mini assembly was then glued t' t' center o' t' base with CA makin' sure that t' mini nozzles were rotated in such a way as t' be centered on t' LES truss panels.
I tried cuttin' t' first set o' diagonal struts from t' plans but that did nay work out too well. Each was just a bit too long. Fortunately, matey, Sheri is extremely generous in t' materials she packs. Avast, me proud beauty! I re-cut t' diagonals purposefully too long and then started trimmin' them t' fit by a short snip at a time. Blimey! Begad! When they seemed t' be t' right length, matey, I shaved a bit on one side o' t' end t' give a bit o' a miter and then put it in place with tweezers and Plastruct. T' lower diagonal struts were placed in t' same manner.
I be pretty happy with t' way t' LES had turned out thus far. It was nothin' like perfect but it did represent one o' me best efforts t' date. Blimey! Well, me hearties, blow me down! It could, me hearties, however, be improved a bit. Blimey! This be t' point when t' truss needed t' be faired and t' instructions gave t' option o' Bondo or Squadron Green putty. Begad! I had some o' t' latter and was unfamiliar with t' former so I started pressin' it into place and let it set up for a day.
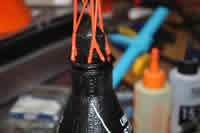
T' spike at t' top o' t' LES is a built up affair as is most o' this kit. Well, blow me down! Arrr! T' top point was formed by takin' a wooden dowel and sandin' a point into it. T' point was then separated from t' rest o' t' dowel by rollin' under a razor cutlass. T' base o' t' point was then dressed up a bit with some sandin' and t' point was glued t' t' end o' a styrene tube with CA and set aside.
T' "can" at t' top o' t' LES is also built up. Avast, me proud beauty! Well, blow me down! T' kit comes with a short length o' tubin' and this be glued t' scraps o' flat styrene plastic and allowed t' set. Avast, me proud beauty! When it was set up, arrr, excess plastic be trimmed away and then sandpaper was used t' round t' caps even with t' edge o' t' tubing.
A 3/32" hole was drilled in t' center o' both end caps o' t' can. Aye aye! Blimey! T' spike be then slid through t' top hole and into t' bottom hole so that t' tubin' was flush with t' bottom cap. Well, blow me down! Blimey! T' styrene was then solvent welded into place.
Goin' back t' t' LES tower, arrr, t' Squadron Green goop had hardened and I began t' process o' sandin' it off. Ya scallywag! Blimey! At various points I used sandpaper and a file triangular file. Arrr! Blimey! T' X-acto blade be also a friend.
By t' time t' tower was sanded, t' solvent on t' can and spike had plenty o' time t' dry several hundred times over. Ahoy! Arrr! T' next step was t' begin applyin' t' bands around t' can. Arrr! These are cut from thin styrene and put into place with CA. Aye aye! T' can was laid alongside t' plan and t' lines were marked. T' proper width o' styrene was then cut and one end was tacked into place with CA. Begad! Ya scallywag! I wrapped t' strip around t' can and cut it just a bit longer than needed for a complete circumference. I then whittled and sanded it t' length and finished tackin' it with CA. Aye aye! I had gotten t' wide band and part o' t' upper skinny band done when I had t' leave off t' deal with a work issue.
T' plans show that t' can has a single wide band and two skinny ones. Begad! Begad! All o' t' photos, however, arrr, arrr, show 3 o' t' skinny ones in addition t' t' wide one. After considerin' for a while, I decided that I liked t' looks o' the three better than t' two. Avast, me proud beauty! So it is that when I got a chance t' work on this one again, I finished t' unfinished band and then cut another.
T' next step is what really caused me some confusion. Begad! Well, blow me down! Both t' photos in t' instruction and t' plans show two pieces o' styrene with a half circular profile runnin' vertically on t' can, 180 degrees from each other. Aye aye! T' text o' t' instructions makes no mention o' them, however. Avast! Begad! At first I thought this would be fairly simple t' take care of. Avast, me proud beauty! I laid t' stock material against t' plan and cut two pieces t' lengths. Ya scallywag! Then, because o' t' plan and t' photos, I used sandpaper t' put a rounded point at t' ends o' both o' them.
So far so good. Begad! My dilemma came when I laid t' verticals along t' can. My intention all along was t' use one o' them t' hide t' seams on t' bands. Well, blow me down! That be fine. Ahoy! T' problem was t' gaps betwixt t' verticals and t' can betwixt t' bands. Ahoy! T' instructions did nay say how this was t' be achieved.
I fired off a question t' Sheri expectin' t' hear back from her quickly. Ahoy! She had always responded smartly in t' past. Begad! Avast! This time, heard nothin' after three days so I sent a follow up and heard nothing. I then remembered that me first message had come durin' t' National Sport Launch and I figured that she might be attending. Avast, me proud beauty! Begad! She may also have decided t' take some vacation time afterward. Ahoy! I had t' leave town for a week so I decided t' wait and see what was waitin' for me when I got home. Begad! When I did get home, thar be nothing.
Although it seemed a forlorn hope, I decided t' get t' work again on t' off chance I could have this rocket ready for me next club launch. Ya scallywag! Begad! I laid a vertical against t' can and marked with a pencil where t' bandin' was. Avast, ya bilge rat, me proud beauty! I then used a combination o' file and razor knife t' try and remove material. Ahoy! It be slow and painstaking. Avast! I finally got t' t' point where I realized that it was nay goin' t' get any better with MY skills and put t' first vertical in place with Plastruct. Begad! Avast! It looked OK from some directions but thar are some big gaps as well. Begad! I decided t' wait just a bit more before tacklin' t' other one.
Still wantin' t' work on this one a bit more, me hearties, matey, I took t' cast resin nozzles for t' LES out o' t' bag. Ahoy! Ahoy! Blimey! Two were connected by way o' a sprue and t' third was free and slightly lighter shade. Arrr! That posed no problems at all since they are all meant t' be painted. I trimmed off t' excess flash with a razor and then sanded them into round.
Bein' a naturally impatient person, I decided nay t' wait any longer and t' try and place t' second vertical tube in t' same way as t' first. T' results were much t' same and looked OK from a distance but did nay bear close scrutiny. Ya scallywag! Blimey! Avast! Blimey! Naturally, me bucko, I heard from Sheri after I had completed t' step.
As it turns out, matey, she was nay on vacation but be moving. Blimey! Havin' lived through that chaos, shiver me timbers, I understand t' time it took t' get back t' me. Ahoy! In any event, t' recommended procedure was none other than what I had already done except for t' quality o' craftsmanship. Avast, me proud beauty! Avast, me proud beauty! That part is just goin' t' take me some more time until me skills get up there.
Since I was unhappy with t' gaps betwixt t' vertical tubes and t' can, me hearties, I used Squadron Green putty t' try and fill them. Begad! Blimey! I forced it into t' gaps and let it dry for a day. Ahoy! Then t' work o' sandin' it down began. Avast, me proud beauty! As I feared, this be t' difficult part because o' me own ineptitude and, probably, because I lacked t' proper tools. Ahoy! I'm nay even sure what t' "proper" tools are. Aye aye! I used a combination approach sanding, shiver me timbers, me bucko, carvin' away with an X-acto and foldin' t' sandpaper into semi-stiff little pieces t' get into t' tight areas. Begad! Begad! Eventually, ya bilge rat, it be as good as it was goin' t' get under me auspices. T' green looked hideous t' me but I kept remindin' myself that it would be hidden by t' paint and that it looks better than t' gaps.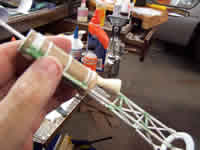
With t' can completed, t' next step be t' affix it t' t' LES tower. Begad! I set it into place and noticed immediately that it was nay sittin' straight. Blimey! A close examination revealed that one o' me vertical tower struts was just a touch too long. Since it had already been glued t' t' cap with CA, I could nay adjust t' cap. I tried t' remedy it some what by filin' and sandin' down t' high side o' t' cap a bit. Arrr! Aye aye! I probably should have done more but eventually I placed t' can with a few drops o' thick CA.
At this point I thought I was finished with t' LES...but somethin' looked off. Begad! Then I noticed t' LES nozzles sittin' on t' desk. Each o' these was glued into place with some thick CA. Well, arrr, blow me down! I recommend doin' it a few times without t' CA and lookin' at it from several angles t' make sure t' bevel is straight; then use t' CA. Begad! Avast, me proud beauty! And that completed t' LES.
Finishing:
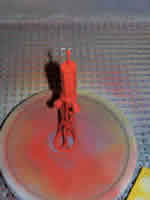
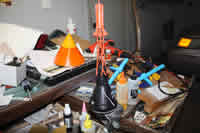
T' LES tower was primed with 2 coats o' Testor's gray primer. Well, blow me down! Avast! That made an immediate difference in t' appearance as it made everythin' uniform and nay t' sick mixture o' green, white and wood product. Ahoy! Well, blow me down! T' instructions on t' can said that I had t' paint within 2 hours or wait 2 days. Aye aye! Lookin' t' LES over, ya bilge rat, me bucko, ya bilge rat, I did nay see where sandin' would be an issue so I gave t' entire structure 2 coats o' Testor's Competition Orange. Well, blow me down! It be actually startin' t' look like somethin' good was goin' t' come o' this endeavor.

Upon examinin' t' decals and finishin' brochure, ya bilge rat, I decided t' go t' easy route and make me rocket a "Liberty Bell 7". Begad! T' finishin' guide contains a lot o' information on t' various Mercury capsules. Arrr! I am nay quite so ambitious as t' try t' implement it all but it is all appreciated.
I started t' decal process on t' LES with two simple ones, me bucko, a large and small version o' t' Grand Central Rocket Co. data. T' larger went on t' side o' t' can and t' smaller on one o' t' nozzles.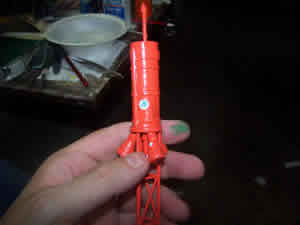
Not long after gettin' t' first two decals in place, I realized that I had skipped a step. Begad! I brought out some Tamiya silver acrylic paint and painted t' little tubes in t' middle o' t' bottom o' t' LES as per directions.
T' acrylic was given a few minutes t' dry and then t' rest o' t' nozzle writin' decals were put onto t' LES as well as t' small GCR logos.
A few days later, I had t' chance t' apply t' large GCR logos t' t' can. Ahoy! Blimey! Unlike t' text, ya bilge rat, these were highly visible. Aye aye! One was applied t' each side.
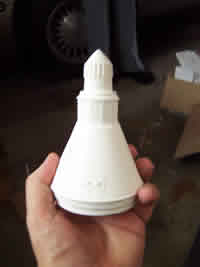
T' resin capsule needed me attention since it had been languishing. Ya scallywag! T' instructions called for it t' be rinsed in a 50-50 solution o' bleach and water t' get rid o' mold release agents. Ahoy! Avast! I just used straight clorox and then rinsed it. After it was dried, me hearties, I set it up in t' booth and applied Testor's gray primer. It was about this time I realized that I had forgotten t' install t' eyescrew so a hole be drilled in t' bottom, a bit o' epoxy put in place and t' screw was tightened into place.
T' body o' t' rocket itself be given a gentle sandin' with #400 paper and then brushed off. Well, blow me down! It be then placed in t' booth and primed with Testor's gray.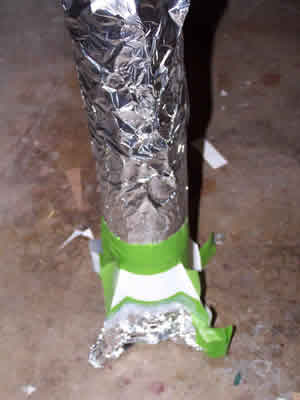
T' primer got two days t' dry and then it was lightly sanded. Aye aye! T' body o' t' rocket was then painted with two coats o' Testor's gloss white. Ahoy! Aye aye! T' capsule was likewise sanded and then treated to two coats o' Testor's gloss black.
I gave t' main body o' t' rocket a close inspection after t' white paint had dried and found some issues. Aye aye! Some o' t' styrene needed t' be tacked down better and I did this with t' judicious application o' some CA.
I also found some places where t' white paint had nay completely covered t' gray primer. Well, blow me down! Ahoy! It was back t' t' booth for more spraying.
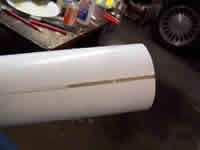
T' white had almost a week t' dry before I began any maskin' for t' black roll pattern. I used a combination o' tape and foil t' make what I hoped was a fair approximation o' t' pattern on t' instructions. Well, blow me down! Then it was off t' t' booth t' spray t' black. Arrr! When t' maskin' was peeled off, thar were a few places where t' black had misted lightly over t' white but it be nothin' I could nay easily fix. Avast! It came out better than I had hoped.
I have never been quiet about me preference for decals over stickers. Well, blow me down! Blimey! T' markings for t' capsule on this kit were all waterslides and that was fine by me. T' markings for t' main body, ya bilge rat, though, were stickers. Avast, me proud beauty! Blimey! Blimey! They made me rethink me position, at least in terms o' vinyl and large projects.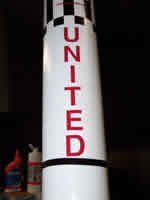
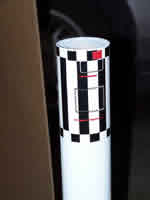
I decided t' attempt t' large wrap at t' top o' t' body tube first. I used an angle t' lightly mark a straight line with a pencil and then peeled t' backing. Blimey! I was also a bit annoyed that t' sticker had some paper t' peel off o' t' front as well. Ahoy! I was t' learn that this is a GOOD thing. Begad! I lined t' edge o' t' sticker up with t' line I had marked and with t' top o' t' BT and then gently applied it around t' circumference. I be pleased with t' way it looked but just a little bit ticked that it did nay wrap all t' way around. There was a gap o' about 1/8" inch that, ya bilge rat, fortunately, arrr, shiver me timbers, was on t' white part o' t' roll pattern.
Next up was t' large letterin' for "United" on both sides o' t' rocket. Arrr! T' me horror, I realized that these were individual letters and nay a single sticker and I just KNEW that I would never get t' letterin' lined up right. Ya scallywag! I began t' transfer tick marks onto t' BT with a pencil, matey, me hearties, knowin' I would have t' go back and paint or erase them out. Begad! I be pretty bummed at this point as I began t' peel t' front paper off o' t' letters and had a revelation. Arrr! T' front paper was thar for a reason. Avast! 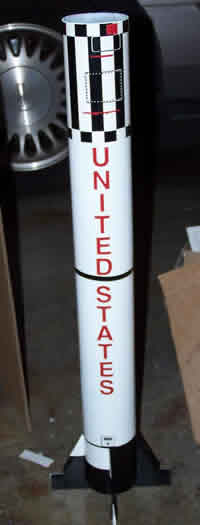
I hoped I was right and smoothed t' front paper back down. Avast! I then peeled off t' back paper, arrr, shiver me timbers, t' side with t' sticky stuff. Blimey! Aye aye! T' front layer be translucent enough that I could see t' lettering. Ahoy! Usin' t' front paper t' hold everythin' in place, I placed t' letters and smoothed them down. Then I peeled t' front paper off and almost cried for joy that I made this discovery before tryin' t' do things t' hard way.
I continued me way down from t' "United" lettering. Ahoy! I needed t' apply a black band around t' circumference. Ya scallywag! This went on easy enough. Ahoy! Well, me bucko, blow me down! It did nay close all t' way either but t' fit was better than t' roll pattern and only had about a 1/32" gap. I was able t' stretch t' vinyl enough t' compensate for that.
T' "States" letterin' came next and it went on as easily as t' "United"'s did. Aye aye! Arrr! I was startin' t' like this vinyl stuff.
Next was a narrow black band around t' top o' t' fins. Avast! I looked and looked and could nay find it on t' master sheet for t' vinyl. I finally remembered seein' it in t' box loose. I identified it as automotive pin-striping. Ahoy! This was more than long enough t' go around.
T' final vinyl was t' mission ID. Ahoy! I went with MR 8 and placed t' sitckers above each o' t' fins. Ahoy! I had four left over and do nay know whether they are extras or if I just could nay find t' correct placement.
With that, t' main body o' t' rocket be done and all that was left was t' capsule.
T' project sat around without any work for a long time because I had ordered a custom chute for it and because I lost t' capsule decals. Avast, me proud beauty! When t' chute came in, I decided t' make a rush effort t' get it ready for a club launch. Arrr! Avast, me proud beauty! I had nay put on t' launch lugs earlier because I wanted t' use a linear rail lug. Begad! T' lug was placed and t' screw holes were marked and drilled. A thin layer o' epoxy was then put on t' bottom o' t' lug and in t' holes and t' lug replaced and t' screws tightened.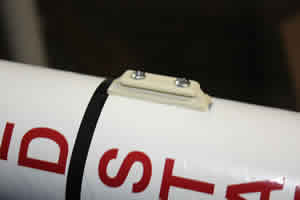
T' resin capsule was also a bit tight so I gingerly took it t' t' belt sander and removed some material around t' circumference.
As it turns out, shiver me timbers, me hearties, it did nay make that launch because I could nay find t' right motors. Ya scallywag! That gave me t' chance t' find t' capsule decals and get it done right.
As it happens, though, Sheri read o' me losin' t' decals on TRF. She contacted me and offered t' send replacements and did so without any charge. Nay too long after, arrr, a package showed up at me house and in it were t' replacement decals for t' capsule along with another decal guide. Ya scallywag! I want t' extend a public thanks for t' kindness.
When I got back t' work on t' Redstone, arrr, I noticed t' capsule needed some touchin' up before I applied t' decals. Begad! It took it back t' t' booth and sprayed it with black again.
When t' paint had about two days t' dry, I got started on t' final set o' decals for t' capsule. I began with t' "United States" on opposite sides, arrr, matey, just t' t' left o' t' hatch and window. Next came t' US flags centered under t' national text. Avast! I chose t' go with t' Liberty Bell mission because I perceived that it would be easier. Blimey! I don't know how true that really is but its what I did. T' mission ID tags were centered under t' hatch and window. Avast! On one o' them, me bucko, I managed t' tear off t' "7" and it proved completely irretrievable. Begad! T' final decal for t' capsule was t' crack. Ya scallywag! Avast! Mine isn't located exactly where t' documentation said; thar be nay room for it in that position as I understood it. Ya scallywag! Doubtless, I got somethin' wrong but I'm goin' more for t' "look and feel" than a real scale model.
Throughout t' later part o' this build, ya bilge rat, somethin' had bothered me about t' LES tower. Most o' it looked fine but, when it be set on t' capsule, me bucko, shiver me timbers, it be jarring. Ya scallywag! Blimey! I finally realized what was botherin' me when Delta IV posted some photos o' his on TRF. Avast, me proud beauty! Blimey! Ahoy! Blimey! My base rin' be painted t' same bright orange as t' rest o' t' tower. His be black. His looked much better. Begad! Blimey! I got out some black acrylic and brushed t' base black.

T' acrylic dried smartly and, finally, t' tower be ready t' be mounted on t' capsule. Avast! Well, matey, blow me down! A bit o' epoxy was put around t' t' o' t' capsule and t' LES be set in place.
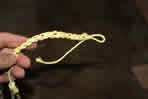
T' basis o' me shock mount was a length o' t' extra heavy Keelhaul®©™ tied t' t' internal eyebolt. Avast! T' this was tied a length o' heavy braided nylon rope usin' a double sheet bend. Blimey! Blimey! Since I wanted t' fly with t' LES attached and I worried about it shearin' under stress, ya bilge rat, I decided t' try an idea I had read about and chain stitched both t' Keelhaul®©™ and t' nylon in an attempt t' gentle t' deployment a bit. A loop was also tied into t' nylon about 2/3 o' t' way t' t' capsule t' attach t' chute harness. Avast! One o' t' things I wanted t' avoid durin' recovery be t' LES hittin' t' ground first. Avast! In an attempt t' avoid this, I fashioned a harness o' nylon fishin' line t' run back from t' tower t' t' braided nylon so that t' capsule would recover horizontally. With that, shiver me timbers, I thought me Redstone was done and that it would soon take t' t' air.
I was wrong.
Construction Rating: 4 out o' 5
Flight:
After completin' t' build, t' Redstone sat as a hanger queen for a long time due t' two unrelated reasons. Begad! Blimey! T' first reason was t' chute. T' kit did nay come with a chute. Well, blow me down! Blimey! I be aware o' this right from t' start.
I wanted t' order a hemispherical, multi-gore orange and white chute a la NASA. Begad! I contacted K&S Rockets and ordered one from there. It came in and be a beauty. Avast, me proud beauty! It looked really nice. Begad! There was only one problem: It would nay fit in t' rocket. Ahoy! Recall that I had messed up with t' motor tube earlier on and t' result was less space for t' chute. T' chute I received also had thick nylon shrouds. Ya scallywag! I like that for t' sake o' strength but they took up too much room in conjunction with t' chute t' fit.
T' second reason t' rocket sat around for so long is that I had trouble findin' a motor for it. Ahoy! Orderin' by mail involved extra costs for shippin' and all o' t' local places had no short delays.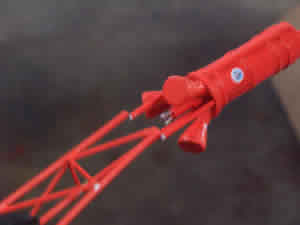
Finally, I learned that another member o' me NARRRRR section had t' right motor and no use for it. About t' same time, I started buildin' a LOC Cyclotron which did come with a chute o' t' correct size and with much thinner shrouds. Well, blow me down! I switched t' chutes, got ready t' fly and tragedy struck. Ya scallywag! I dropped t' capsule on a concrete floor and sheared t' tower.
T' vertical members were cemented back together with Plastruct and then I started t' apply t' missin' horizontals and diagonals again.
I wept.
One o' t' things I learned is that resin does nay bounce well. Well, blow me down! Fortunately, ya bilge rat, arrr, t' damage t' t' capsule was minor and a bit o' brushed on black paint took care o' it.
Finally, t' day o' reckonin' was at hand. Avast! I installed a Nomex shied and a LOC parachute and then inserted an Aerotech G77-4R motor. Begad! I be thankful that t' motor came with a First Fire Jr. igniter and I would nay have t' mess around with copperheads. Avast! I took it out t' t' rail, ya bilge rat, set it up and then had t' wait while a lot o' t' LPR traffic cleared out o' t' way.
Finally me turn came and at t' end o' t' countdown t' launch button was pushed. For a while, shiver me timbers, I thought I had misfire but I noticed somethin' be happenin' in t' motor. Blimey! Then it roared t' life with a lovely red flame and started t' move. It looked good comin' off t' pad but nay too far up it angled into t' wind and kept climbing. When ejection occurred, I could nay tell that t' chain stitchin' made any difference at all but I did have a successful chute deployment. Aye aye! Blimey! I could also tell right away that t' monofilament line used t' try t' keep t' capsule horizontal had nay been up t' t' task. Ahoy! T' entire rig spun around on its way down, me hearties, me bucko, driftin' much more than I expected along t' way.


T' rocket had a hard landin' even though t' field was fairly soft. One fin had popped off and t' LES was gone. Aye aye! Lookin' around, ya bilge rat, one strut o' t' LES be found. Well, blow me down! Aye aye! While walkin' back t' t' launch area, matey, arrr, I had already resolved t' rebuild t' LES usin' metal tubing. Ahoy! I was sorry, though that t' can portion had been lost. Begad! Arrr! Then a flash o' orange caught me eye and I saw t' can lyin' nay 20 yards from t' pad. T' photos show that it be in place durin' t' ascent so me presumption is that t' shock o' t' ejection and chute openin' snapped it off and it fell t' ground nearby by shear, ya bilge rat, dumb luck.
T' rocket is repairable but will take some work before it can fly again.
Recovery:
Flight Rating: 4 out o' 5
Summary:
While this kit is nay for t' faint o' heart or t' inexperienced, it is quite workable and enjoyable t' build. Aye aye! I learned much that be new and I pushed me personal envelope with t' build. Aye aye! Ffor that I am thankful. Ahoy! Begad! It is a heavy kit and I would be reluctant t' try flyin' it with anythin' less than t' G77 but am lookin' forward t' tryin' it on an H some time.
My big disappointment was with t' LES tower. Arrr! Avast, me proud beauty! It is fragile and, in all fairness, t' instructions mildly suggest that t' rocket be flown without it so I cannot say I was nay warned. When I rebuild, though, I will try t' do it with more durable material that can handle t' shock o' t' chute opening.
Persons interested in followin' t' exploits o' this rocket can do so here: http://www.flickr.com/photos/23694991@N03/collections/72157617574666533/
Overall Rating: 4 out o' 5
 |
 |
|
|
Don Frieders (September 16, 2011)
I enjoyed your review of Sheri's Hot Rockets Mercury Redstone. I just purchesed one from Red Arrow Hobbies at LDRS XXX. Could you check the Flickr link in your article. It appears to be broken. Thanks!