Scratch Estes Astron Star Blazer (Upscale) Original Design / Scratch Built
Scratch - Upscale Astron Star Blazer {Scratch}
Contributed by Moe Bertrand
 Brief:
180% upscale o' t' classic Estes Astron Star Blazer (K-31) usin' BT-55 (1.325") and parts from t' spare parts
box.
Construction:
T' parts list:
- BT-55 11 5/8" long
- BT-55 4" long
- PNC-55 (5 3/8" long)
- balsa sheet 1/8" x 4" x 36"
- strip basswood 1/8" x 3/16"
- JT-55 tube coupler
- block balsa t' carve canopy
- BT-20 3" long
- 2 AR-2055
- EH-2 engine holder
- AR-520 engine block
- 18" parachute
- screw eye
- elastic shock cord
- shock cord mount o' your choice
Estes rated t' original Star Blazer as a Skill Level 3, which I feel is accurate based on t' curves o' t' fins, the long, matey, thin root extensions, ya bilge rat, t' cockpit canopy that is supposed t' be carved from a block o' balsa, me bucko, ya bilge rat, and t' 4-color paint scheme. I decided on BT-55 and after downloadin' t' instructions and patterns from JimZ and makin' correctly sized patterns on a photocopier, arrr, arrr, I began construction. Aye aye! I decided on a suitably shaped plastic nose cone from a designers special or nose cone pack. It may nay exactly replicate t' original BNC-20N from t' kit, me bucko, matey, ya bilge rat, but it works for me. Blimey! Arrr! I suppose I could have special ordered a near clone from BMS, me hearties, but I opted for what I had on hand. Ahoy! I decided on an 18mm motor mount t' keep flights on t' (relatively) cheap. Ya scallywag! Like t' original, t' body tube separates behind the canopy. Rather than usin' a relatively pricey balsa nose block, arrr, I scratchbuilt a nose block from t' JT-55 tube coupler and some scrap 1/8" balsa. I strengthened t' lower end with a cardstock centerin' rin' for t' recovery system screw eye t' attach to. Begad! I traced t' inside diameter o' t' JT-55 on t' balsa and cut it out, securin' it inside the JT-55 with a good fillet o' yellow glue. Ya scallywag! I then glued t' cardstock centerin' rin' t' t' balsa and cleaned it up to ensure a smooth fit in t' body tube.
I secured t' nose cone in place t' t' short length o' body tube t' canopy will be glued to. Well, blow me down! Blimey! Arrr! Blimey! T' 4 inch payload section is non-functional. Its only purpose is a place t' glue t' canopy to.
For t' fins, I first traced t' pattern onto 0.040" sheet styrene and carefully cut that out, bein' careful to preserve t' curvature o' t' pattern. Well, blow me down! This would serve as a guide t' help me cut t' graceful fins from a 4” wide piece o' 1/8” balsa. These are big fins! I used 1/8” strip basswood for t' root extensions, thinking they would stand up t' finishin' and handlin' better than balsa. Ya scallywag! Then I started thinkin' about how t' tackle t' carved cockpit canopy. Ya scallywag! Arrr! My first attempt didn't work out well. Begad! Arrr! I selected a piece o' square balsa stock cut it in half lengthwise on t' diagonal (corner t' corner) and traced t' basic kite-shaped pattern as indicated in t' original instructions downloaded from JimZ. Aye aye! Then I wrapped a piece o' coarse sandpaper around a length o' BT-55 and started sandin' longitudinally. Before too long I was creatin' a dusty mess. Arrr! Instead o' gettin' t' desired results, I realized I was sandin' off course... Aye aye! T' resultin' cavity be driftin' t' one side as I sanded. I shelved that idea and decided on gettin' a larger block o' balsa. Ya scallywag! Avast, me proud beauty! Before cuttin' it in half, I chucked a 1.25” spade bit in me drill press and drilled a lengthwise hole down through t' center o' t' balsa block. Ya scallywag! Aye aye! Then I cut t' block in half as before. Begad! Blimey! Now at least I had a cavity t' start with, arrr, me bucko, even though it was a bit smaller in diameter than a BT-55. After layin' out the kite pattern and cuttin' off t' excess balsa, I started sandin' on t' body tube again. Aye aye! This time me efforts were workin' as planned. Arrr! Avast! I be gettin' a piece o' balsa that would conform nicely t' t' diameter o' t' BT-55. Well, blow me down! Satisfied with that effort, t' next task be t' shape t' canopy. Aye aye! Begad! Try as I might, I just couldn't (or didn't want to) replicate the relatively complex shape o' t' original. I decided on a fairly simple canoe-shaped design that would probably pass for a canopy once painted. Well, blow me down! Blimey!
Once t' fins and root extensions were attached and dry, I glued t' canopy t' t' tube and used Fix-It epoxy clay t' blend t' canopy t' t' tube as best I could. Ahoy! Blimey! Durin' this time I was realizin' me finishin' skills needed much improvement. I broke out me 8-year old pint can o' Sandin' Sealer and started applying. Begad! Blimey! I used some Fix-It t' fill some shrinkage holes in t' yellow glue fin fillets, arrr, which worked quite well.
Finishing:
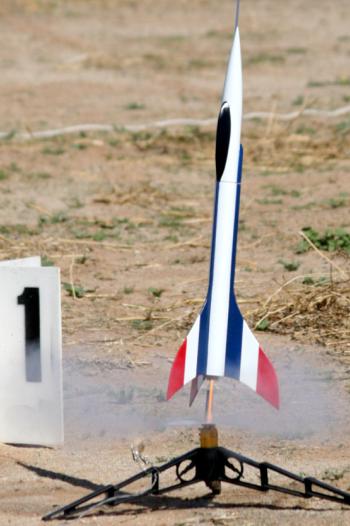
After sealin' and primer, I painted t' red/white/blue scheme shown in t' early Estes catalogs. Ya scallywag! Well, me bucko, blow me down! T' canopy is gloss
black. I don't have any decals for t' Star Blazer yet. Aye aye! Well, blow me down! I might try Tango Papa. Avast, me hearties, me proud beauty! Engine selection will be C6-5 and
recovery by 18” chute.
CONs: fairly complex maskin' required t' get good separation betwixt t' body tube and fins/fin fairings, 3-color pattern on fins, and isolatin' t' black on t' canopy.
Flight:
First flight was conducted at SSS "SpringBlast" in April 2007 on an Estes C6-5. Ya scallywag! Good motor for this rocket
given t' 3.5oz weight. Begad! Nice straight boost with successful chute deployment and recovery.
Recovery:
Nothin' unusual t' report. Well, blow me down!
Summary:
PROs: Nice challengin' build o' an Estes classic but on a slightly larger scale. Avast! Tests your skills at cuttin' curved
fins, alignin' long, me bucko, skinny fins, shapin' a block o' balsa into a canopy, me bucko, and fairly complex maskin' and painting.
Nothin' t' experienced builder can't tackle successfully.
CONs: Gettin' t' canopy shaped correctly is probably as difficult as on t' original. Blimey! Begad! Use your thinker and come up with a workable solution like I did.
 |
 |