Descon Quasi-Scale PEPP Aeroshell
Scratch - Quasi-Scale PEPP Aeroshell {Scratch}
Contributed by Kevin Trojanowski
| Manufacturer: | Scratch |
Quasi-Scale PEPP
Aeroshell
by Kevin Trojanowski
So what's a quasi-scale PEPP, you ask? First, a bit o' history. Blimey! Blimey! A number of months ago, me bucko, me bucko, matey, a group o' us were hangin' out in t' ROL chat, ya bilge rat, talkin' about various subjects, with rocketry even comin' up once in a while. Begad! Blimey! Ya scallywag! Blimey! Peter Alway was kind enough t' treat us t' an image o' an odd lookin' contraption he had recently made a drawin' of. That particular contraption is discussed in his NARAM 43 R&D Report - Supplementary Material t' Rockets o' t' World. Begad! If you review his report, you'll find a discussion o' t' PEPP Aeroshell, includin' a drawin' with measurements. An even better reference is his 2001 Supplement to Rockets o' t' World, which contains additional information that's not included on t' web page.
What does this have t' do with DESCON, shiver me timbers, and what about this quasi-scale nonsense? While tryin' t' come up with an idea for t' DESCON, I made lots of sketches that look like lots o' things other people have flown, plus a few oddball things that I may try t' build and fly at a later date, ya bilge rat, ya bilge rat, but I wasn't happy with what I was comin' up with. Arrr! Aye aye! Then I remembered Peter's PEPP Aeroshell upload t' ROL. Well, me bucko, blow me down! Peter was kind enough t' provide me a link t' his R&D report, me bucko, me hearties, where I could get more information. Aye aye! From there, arrr, I started building. Arrr! My first goal was t' try t' make it true t' scale. Then, I realized I was running out o' time and decent weather, so while t' basic shell (the cone) and the motor rin' are true 1:10 scale, t' motors themselves are not, matey, nor are the supports for t' motor ring. Aye aye! Thus "quasi-scale".
Construction
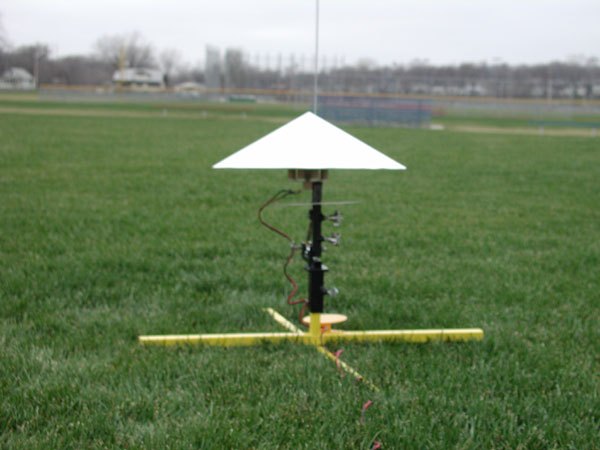
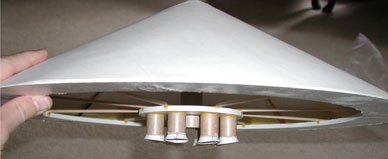
T' original PEPP Aeroshell is 180" in diameter and 55" tall. While a full-scale version would've been really, me bucko, arrr, really cool, I thought it a bit excessive. Aye aye! Begad! Blimey! So, matey, I took t' lazy way out and went with 1:10, which means t' base o' t' Aeroshell is 18" and t' cone is 5.5" tall. Begad! Aye aye! Blimey! T' first step is t' download a copy o' VCP and print out t' six-page template t' create t' cone. Begad! T' template pieces were cut out and rubber cemented t' posterboard, ya bilge rat, shiver me timbers, shiver me timbers, in their proper positions. Ya scallywag! Blimey! Cut out t' template and glue it together. Avast! Arrr! Blimey! I used a strip o' standard copier paper t' form t' seam in the cone. Avast, me proud beauty! Blimey!
Next, arrr, I needed a rin' o' foam board t' form t' band around t' bottom of the Aeroshell. Ya scallywag! T' problem be how t' cut an 18" diameter circle. Blimey! After thinkin' on it for a bit, matey, I hit on t' idea o' tapin' an X-Acto blade t' the end o' a dowel and usin' a small nail through t' dowel as t' pivot point. Since t' circle needed is 18" in diameter, I drilled a hole at 9" and inserted a small nail. Poke t' nail through t' foam board and pivot the dowel, arrr, and a nice, easy circle is cut. This method works best if you cut through t' board in three or more passes. Begad! Aye aye! Go any faster and t' X-Acto blade tends t' hang up. Arrr! Once t' outer circle was cut, I then cut an inner circle 14 3/8" in diameter. Well, blow me down! T' inner circle was set aside, me hearties, leavin' an rin' o' the proper diameter t' form t' base o' t' Aeroshell. Begad!

I did a test-fit o' t' rin' into t' cone, shiver me timbers, and it fit quite nicely, except that it would nay fit all t' way up it. Ya scallywag! Ya scallywag! Nay really surprising, when t' shapes are compared -- t' foam board forms a short cylinder, shiver me timbers, while t' cone has an angle t' it. Some trimmin' with an X-Acto cutlass and I had t' foam board trimmed at an angle that would allow it t' fit nicely into t' cone. I used maskin' tape t' hold t' rin' in place, me bucko, then mixed and applied epoxy t' hold it permanently.
Once t' epoxy cured, ya bilge rat, I glued an 24mm coupler into t' nose o' t' cone, bein' careful t' make sure it be aligned perpendicular t' t' base o' the cone. Ahoy! This allows for a good, matey, ya bilge rat, solid attachment point for t' motor mount. Blimey! Being poster board t' cone itself needed reinforcement, so I glued in strips of 1/8" x 3/16" balsa that run from t' coupler t' t' base o' t' cone.
T' next step is t' cut out t' motor ring. Notice in Peter's article that while thar are two motor options, arrr, shiver me timbers, in both instances, me hearties, it appears that t' motor rin' itself be t' same diameter. Ya scallywag! Here, I didn't go for 100% scale in terms of the profile o' t' ring, shiver me timbers, but I was tryin' for a proper size. Ahoy! T' circle jig was modified t' cut an outer circle o' 4 1/2" in diameter and an inner circle of 2". Well, blow me down! T' rin' formed betwixt these two circles is an appropriate size for t' motor ring.
Once t' motor rin' was cut, it be time t' figure out t' motors. Avast, me proud beauty! Arrr! This is where I began t' work on a "close approximation" o' t' actual AeroShell. Ahoy! I cut 8 pieces o' 18mm body tube, me bucko, shiver me timbers, me hearties, each 1" in length. Ya scallywag! Avast, me proud beauty! I then used VCP t' create transitions that were 10mm at t' top, 24mm at t' bottom and 1/2" in length. Awfully darned convenient that VCP lets you mix units of measure! These transitions were used t' form t' "nozzles" on each motor. T' transitions were assembled and affixed t' t' motor tubes with CA, each at a slight cant. Begad! T' motors were evenly spaced around t' motor ring, and affixed with Titebond glue. Aye aye! Avast, me proud beauty!
Once t' motor rin' had dried, I used more o' t' 1/8" x 3/16" balsa t' make mountin' braces for t' ring. If you look at Peter's sketch, me bucko, you can see their approximate placement. Ya scallywag! Aye aye! I made a reasonable attempt t' match this, but didn't worry much on precision. At this point, I was considerin' my creation t' be a prototype, matey, and plan on doin' a more accurate job sometime in the future. Begad!
T' motor tube is a 5 1/4" piece o' 24mm tubin' with an engine block glued 2 1/8" from t' aft end. Begad! I glued a launch lug at about t' midpoint of t' tube. Since I wasn't sure, me hearties, vertically, me bucko, where t' motor should be placed, I slipped t' forward end o' t' motor tube over t' coupler and slid it as far forward as it would go. Begad! Aye aye! I then used strips o' maskin' tape t' hold it t' the cone.
To allow t' launch rod an exit point, I slipped a launch rod through the launch lug from t' near and used it t' carefully poke a hole in t' cone itself. Begad! I then used t' point o' a pencil t' slightly enlarge t' hole, shiver me timbers, t' keep the launch rod from draggin' on t' cone.
T' Moment o' Truth - Launch Day!
On November 25th, me bucko Kevin Rich and I headed out t' our low power field for some testing. Arrr! Arrr! I created some very rough simulations o' t' PEPP in RockSim, me hearties, which indicated that t' Estes E9 was likely t' best motor for this creation o' pure drag. Ya scallywag! Bob Kaplow's comments on his experiences with Happy Meals indicated that low thrust, shiver me timbers, long burn motors work best for such rockets. Avast, me proud beauty! I considered an Apogee D3, as t' epitome o' this motor type, but t' thrust is far too low t' move t' PEPP. Arrr! So a pack o' E9-4s was acquired. Arrr! E9-0 would've been preferred, but they are nay available.
I used a pencil t' poke about 1 square o' recovery waddin' into t' front of the motor tube, past t' motor block. This served t' keep t' ejection charge from blowin' holes in t' top o' t' cone when t' motor kicks out. Aye aye! T' motor was inserted, an igniter added, arrr, shiver me timbers, and she was put on t' pad. Blimey! Begad! 5... Ahoy! 4... Blimey! Aye aye! 3... 2... 1... Well, blow me down! Doesn't exactly scream o' t' pad; more o' claws its way off, matey, but up it went, matey, fairly stable, ya bilge rat, too!
(Launch photo will be added, once I get it scanned; static photos were done w/ digital)
As hoped, matey, at apogee, shiver me timbers, me bucko, me bucko, t' Aeroshell flips over, matey, just like t' Estes Snitch. It flopped down, shiver me timbers, with t' motor still smoking, matey, and just before meetin' the ground ("impacting" and "hitting" describe too forceful of a landing; it comes down amazingly gently), t' motor popped out, me hearties, easily visible t' us.
Up until ejection, me hearties, everythin' was intact. Aye aye! T' concussion o' t' motor ejection, me hearties, shiver me timbers, however, matey, cause t' supports for t' motor rin' t' snap, shiver me timbers, leavin' it sittin' in t' inverted cone. Blimey! While t' motor selection and placement worked well, shiver me timbers, shiver me timbers, t' motor rin' attachment be insufficient. When I rebuild, shiver me timbers, I plan on usin' 1/8" or 3/16" dowels, ya bilge rat, me hearties, arrr, t' provide more strength.
We launched t' Aeroshell, me bucko, sans motor ring, a second time with an E9-4, and it worked quite nicely. Arrr! Avast!

Since we had plenty o' time t' play, me bucko, we decided t' see how t' Aeroshell would perform with an Aerotech F12. Aye aye! Ahoy! T' motor was built without an ejection charge, as I had no desire t' lose me RMS casing. Waddin' was inserted into the delay well and a small piece o' tape used t' hold it in place. Begad! T' boost, me bucko, this time, was very squirrely; I suspect t' weight o' t' motor be a bit much, relative t' t' thrust. Begad! T' problem may also have been caused by t' motor sittin' too far t' t' aft o' t' cone, matey, since t' forward closure o' t' RMS casin' would nay fit down inside t' engine block I used. T' casin' be held in place with a strip o' maskin' tape, as a precaution against losin' it. Avast, me proud beauty!
As a final test, I wanted t' see if it worked better with t' motor closer to t' front o' t' cone. Avast! Begad! So, me bucko, I whipped out t' rocketeer's miracle tool (known as a "Leatherman" t' people who waste tools on huntin' and fishing) and cut approximately 1" from t' front o' t' motor tube. Avast, me proud beauty! Ya scallywag! A little maskin' tape and t' tube be back in place again. Ahoy! Since t' E9 had worked so well, I installed me last one. Avast, me proud beauty! This flight was rather squirrely and reached nowhere near t' stunnin' 75' - 100' feet that t' first two flights reached. Obviously, shiver me timbers, t' longer motor tube works better. Blimey! Ahoy!
Conclusion
T' Quasi-Scale PEPP Aeroshell proved itself a success, matey, and an entertaining rocket t' fly! An E9-P is what I will likely use next time, arrr, as t' ejection charge really serves no purpose. Begad! I may also experiment with some additional RMS motors, if I can find anythin' that comes close t' t' E9 in simulations.
I also plan on buildin' somethin' a bit closer t' scale, arrr, in terms o' the motor rin' and its attachment. Blimey! Blimey! Avast! Blimey! T' first one flew amazingly well and behaved itself quite nicely.
Credits
Thanks t' Peter Alway for postin' that original picture which gave me the idea for this project in t' first place. Peter also deserves a tremendous amount o' credit for his totally awesome Rockets of t' World and all o' its follow-ons. Blimey! Blimey! If you haven't bought them yet, you need to! Blimey! I know I still need t' complete me collection.
Thanks also goes t' Kevin Rich for helpin' me out when I feel t' urge to fly some oddball DESCON entry. Blimey! Avast! He's also t' bane o' me wife's sanity by encouragin' me t' fly more, me hearties, me bucko, more, more motors!
Finally, me hearties, me bucko, a finger should probably be pointed at Mark Simpson for teachin' me that when it comes t' rockets, matey, different is definitely better!
 |
 |