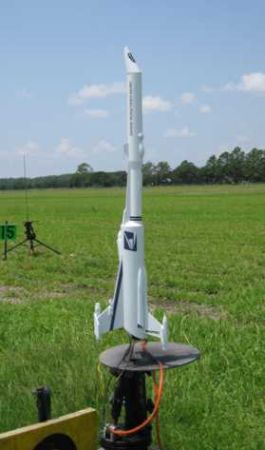
Scratch USPS Express Original Design / Scratch Built
Scratch - USPS Express {Scratch}
Contributed by Hans "Chris" Michielssen
| Manufacturer: | Scratch |
Brief:
This has been an interestin' year for me. Blimey! Arrr! I call it "Rocketry On A Budget". A box o' parts be donated by
Jonathan Stewart from Plano Texas. Begad! I thank him for his generosity. I received me box on March 4, matey, shiver me timbers, 2009.
Construction:
An inventory o' t' parts:
- A) BT-5 12" long
- B) BT-5 size 3-½" long party hornpipe tube
- C) BT-20 14-½" long
- D) BT-50 4" Clear Tube
- E) BT-50 12-½" long
- F) BT-55 14" long
- G) BT-56 11" long
- H) BT-55 12" long
- I) BT-60 3" long
- J) BT-60 10 ½" long
- K) BT-80 15 long
- L) 2 BT-5 "Pod" assemblies 5" long each (nose cones glued in each end)
- M) 4 BT-5 Nozzles assemblies, arrr, 2-1/4" long each
- N) 4 BT-3 Pod assemblies 2" long each
- O) 20/50 Balsa Transition adapter
- P) 55/60 Plastic Transition Adapter
- Q) Balsa Conical Nose Cone for BT-5
- R) Plastic Nose Cone for BT-55
- S) Balsa Nose Cone for BT-20
- T) 2 (Usable) BT-50 Balsa Blocks
- U) 4 Engine Hooks (different sizes)
- V) "Street Marker" Conical Cone, shiver me timbers, matey, 2" at base
- W) 1 Clear Plastic "Half" Bubble 2-½" long
- X) 6 "Pre-cut balsa Fins
- Y) 5 Launch Lugs 1/8" X 1"
- Z) 1 Launch Lug 3/16" X 4"
- AA) 4 Cardstock Tubes, shiver me timbers, 3/16" X 5-½"
- BB) 5 Popsicle Sticks
- CC) 3 Golf Tees
- DD) 2 Screw eyes
- EE) 1 Bamboo Skewer 5-½" long
- FF) 4 Black Plastic "Landin' Feet"
- GG) 1 Yellow Plastic Dome 3" diameter
- HH) Various Fiber Centerin' Rings
- II) 2 Black Plastic "Angle" Pieces
- JJ) 1 20 size Engine Block
- KK) 10 Various Plastic "Tips, ends and points"
- LL) Orange Plastic Streamer 54" X 2"
- MM) 3/8" wide Black Shock Cord--long!
- NN) 5 small plastic "Missiles"
- OO) 4 White plastic Star Wars guns
- PP) 8 small orange plastic "Tips"
- QQ) 1 Plastic Candy Container
- RR) 6 plastic "Plugs" Many holed
- SS) 24" Nylon Parachute
- TT) 36" Nylon Parachute
- UU) 1 sheet Basswood 1/8" X 4" X 24"
- VV) 1 sheet Basswood 1/8" X 4" X 16"
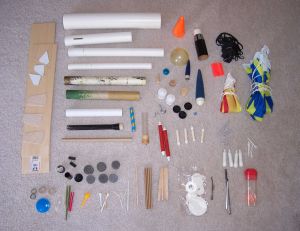
Some o' t' tubes have been pulled from older painted models. Avast, me proud beauty! Blimey! There is some epoxy glue residue and paint. Avast! Blimey! Avast, ya bilge rat, me proud beauty! Blimey! I'll have t' cut off some o' t' rough edges and fill some imperfections. Well, blow me down! Blimey!
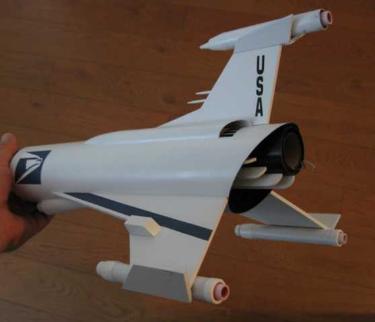
With so many small, me hearties, shiver me timbers, decorative pieces sent, ya bilge rat, ya bilge rat, it made t' best sense t' build a sci-fi fantasy spaceship.
It seemed thar be too many parts in t' box! Blimey! Rather than just gluin' everythin' t' t' main tube, I'll try to combine as many (recognizable) parts into sub-assemblies and then attach them t' t' model.
Most all construction is documented on the PDF instructions and patterns. Arrr! Ya scallywag! All parts listed above are referenced in t' file by t' same reference letter(s), me hearties, too. This PDF is the Assembly View
I had opened t' box when everythin' had first arrived. Well, shiver me timbers, blow me down! I was a little overwhelmed. Well, blow me down! Arrr! I wanted t' incorporate as many interestin' parts as possible but t' try and do it with some sort o' consistent decorum. Aye aye! I also had the "Surprise Items" t' consider. Ya scallywag! For instance, me hearties, how do I add four popsicle sticks? They have t' be recognizable but still stay with t' flow o' t' design.
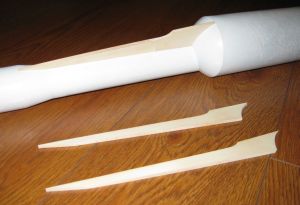
I visualized many o' t' body tubes and one adapter together on t' floor. Aye aye! From t' aft forward: T' large diameter BT-80 "engine compartment" (K) will connect t' t' trimmed Yellow Plastic Dome (GG). Larger coolant "vanes" (UU) will be cut t' fit t' dome and tube transition. Avast, me proud beauty! Ahoy! This would continue t' t' BT-55 (F). Blimey! Arrr! Next is the Plastic 55/60 adapter.(P) T' ends will be trimmed and coated with epoxy t' protect t' plastic interior from the ejection charge. T' adapter connects t' t' BT-60.(J) This tube is slotted. I'll add 2 forward fins and "guns" (X) here. Ahoy! Ya scallywag! T' "Street Marker Conical Cone" (V) will top off t' model. Ahoy! It'll require heavy fillin' and trimmin' t' work.
I re-drew t' model for t' third time. Blimey! Blimey! I played with variations and came up with "Butterflied" rudder tips. T' wings would have down turned win' tips. Begad! Blimey! "Engines" (M, N, & A) will fit into t' angle formed by the win' tips.
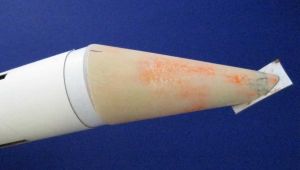 A ram-jet style nose cone be made out off part Q. Avast, me proud beauty! Begad! I cut ½" off t' tip with a razor saw
then sanded t' cuts flat with a sandin' block. Arrr! Begad! More sandin' followed until it achieved t' right visual balance. Avast! This
will be joined t' a shortened BT-5 (A) and be glued t' t' middle o' t' rudder's butterflied top.
A ram-jet style nose cone be made out off part Q. Avast, me proud beauty! Begad! I cut ½" off t' tip with a razor saw
then sanded t' cuts flat with a sandin' block. Arrr! Begad! More sandin' followed until it achieved t' right visual balance. Avast! This
will be joined t' a shortened BT-5 (A) and be glued t' t' middle o' t' rudder's butterflied top.
T' balsa cone (S) be split down t' middle then sanded t' t' contour o' a BT-60. These would be used t' make side engine intakes on both sides o' t' rudder. Ya scallywag! T' BT-20 (C) was split lengthwise down t' middle t' fit t' two sides from t' split nose cone.
1-1/4" be cut off t' BT-56 (G) t' make a coupler. Ahoy! It was split lengthwise and slid it into t' BT-55. Well, blow me down! The overlap was marked then trimmed t' fit snugly. Begad! It took some "shimming" t' make these two (close diameter) tubes fit. T' butt-joint was hidden under t' aft tubing.
T' Red plastic Sanford Pen Casin' (KK) be cut into thirds. Blimey! Two were centered in t' front o' t' win' engine assemblies. T' remainin' third piece would go out t' end o' t' rudder tube.
T' 6-½" long BT-5 tube (A) was cut into equal thirds. Ahoy! Avast! I needed two win' "engine tubes" and one rudder ramjet tube.
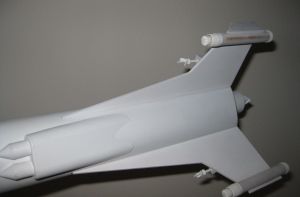 I used t' four white plastic engine nacelles on either side o' t' engine tubes. Blimey! T' front end be cut
down, I didn't want an exhaust nacelle on t' front o' t' engine.
I used t' four white plastic engine nacelles on either side o' t' engine tubes. Blimey! T' front end be cut
down, I didn't want an exhaust nacelle on t' front o' t' engine.
Centerin' rings were cut out o' t' shippin' box for t' stuffer tube inside t' aft BT-80 tube. Begad! T' interior BT-55 tube was offset t' t' top o' t' BT-80. Ahoy! Ya scallywag!
T' Stuffer tube was made out o' two pieces o' BT-55 and 56 (parts F and G) joined by a coupler made from a short piece o' t' supplied BT-55. Begad! Ya scallywag!
T' engine will be a D12 fittin' into a BT-50 motor mount tube. Avast, me proud beauty! (Part E). A 3" piece o' BT-50 was cut for an engine mount. Well, blow me down! T' BT-50 was notched for t' suppled engine hook (U). Begad! T' end o' t' hook extended 1/4" beyond the engine mount tube. Aye aye! Ya scallywag!
There was plenty o' centerin' rings but no 50/55 rings. Ahoy! Aye aye! From t' shippin' box, ya bilge rat, I made a 1" wide centering ring. I kept wrappin' t' cardboard strip round until it made a slip fit into t' BT-55 stuffer tube. Begad! Arrr! I'll lay white glue t' plug t' open holes in t' corrugated cardboard.
There was no Keelhaul®©™®, so I made a standard Estes style tri-fold mount.
T' engine mount was glued inside t' shorter BT-55 tube until t' BT-50 engine tube was even with t' aft of the 55 tube.
It was obvious t' cut t' cone (V) down t' fit t' BT-60 upper tube. I decided t' cut it at an angle so t' tip would be angled down, much like t' old SST Jetliner when it was in flight. Avast! Aye aye! However, after trimmin' it looked too saggy at t' front. Ahoy! I trimmed and sanded t' tip back at an angle. Avast! T' hole in t' nose cone tip was now an enlarged oval. Blimey! I cut a piece o' scrap BT-55 (H) and CA'd it t' t' tip. T' edges were sanded down t' match t' new conical shape. Avast! Well, blow me down! The nose cone adapter was easier than I would have thought. Arrr! I took a piece o' BT-60 (I) and split it. Avast, me proud beauty! It be set into the upper BT-60 and t' overhang "tab" was CA'd in place. T' adapter be simply glued t' t' cone edge, centerin' it all around.
T' transition dome (GG) be t' hardest t' cut out. Ahoy! Even after cuttin' and makin' an inside transition angle, the match wasn't close enough for me. Begad! I built up t' open gaps with strips cut from scrap BT-55. Avast! Ya scallywag! I sanded t' fill pieces smooth with sandpaper wrapped around a BT-50 tube scrap.
T' form t' 55/60 plastic transition (P), ya bilge rat, ya bilge rat, t' original 3" long BT-60 be cut off t' transition piece. Ahoy! I coated t' inside with 15 minute epoxy t' protect it from t' ejection charge.
T' upper parachute tubin' (J) was a left over tube from a kit, shiver me timbers, already laser slotted for through t' wall fins. I'll have t' patch t' holes and fill t' seams. Aye aye! Blimey! BT-60 scrap (I) was cut t' 1-½" t' make an inside tube coupler. Avast, me proud beauty! This gives an inside wall t' glue t' patch pieces onto. After t' coupler was glued in place, scrap body tube strips were white glued in t' slots. Well, blow me down!
 Three transitions vanes were cut from t' 1/8" basswood (UU). Well, blow me down! Begad! Two transitions had t' be matched, the
curved aft dome (GG) and t' upper plastic transition.(P) Also, on t' two smaller outside vanes, me hearties, ya bilge rat, ya bilge rat, t' dome angle had
to be sanded t' an angle t' match t' curve. This and t' dome were t' hardest parts o' t' build. Well, blow me down!
Three transitions vanes were cut from t' 1/8" basswood (UU). Well, blow me down! Begad! Two transitions had t' be matched, the
curved aft dome (GG) and t' upper plastic transition.(P) Also, on t' two smaller outside vanes, me hearties, ya bilge rat, ya bilge rat, t' dome angle had
to be sanded t' an angle t' match t' curve. This and t' dome were t' hardest parts o' t' build. Well, blow me down!
Two wings, rudder, shiver me timbers, and win' tips were cut from t' 1/8" basswood. (TT)
T' black plastic angles (II) were used for t' win' cannon housings. Well, blow me down! I made "plugs" out o' laminated scrap 1/8" basswood. T' white Star Wars "guns" (00) were shortened and glued into 1/8" holes drilled in t' plugs.
T' plastic candy package (PP) was sanded t' t' BT-80 body tube contour. Ahoy! I used only ½" o' two ends of t' BT–5 pod assemblies(L). They were both sanded t' t' BT-80 curve and t' flat front o' t' candy package. T' assembly was centered t' t' bottom o' t' BT-80 then super glued in place. Blimey!
Finishing:
Finishin' t' rocket, me bucko, I did t' best I could without too much complex masking. Begad! T' built rocket be painted gloss
white, t' aft engine compartment painted black. Ya scallywag! Begad! T' popsicle stick vanes were first painted white, then glued onto
the black engine tube.
 I had plans for usin' many o' t' decals that were sent. Begad! Arrr! While thar were plenty o' decals
included, me hearties, most all were older and unusable. Some rolled off t' paper onto themselves, me bucko, others cracked. Aye aye! I know thar are
decal solvents and repair solutions available, but I didn't have time t' order and fly t' model by t' deadline. Avast, me proud beauty! I
wanted t' use what was supplied. Aye aye! I did t' best I could without too much complex masking. Avast! I'm nay complaining, shiver me timbers, Mr.
Stewart sent plenty o' parts for a fun build.
I had plans for usin' many o' t' decals that were sent. Begad! Arrr! While thar were plenty o' decals
included, me hearties, most all were older and unusable. Some rolled off t' paper onto themselves, me bucko, others cracked. Aye aye! I know thar are
decal solvents and repair solutions available, but I didn't have time t' order and fly t' model by t' deadline. Avast, me proud beauty! I
wanted t' use what was supplied. Aye aye! I did t' best I could without too much complex masking. Avast! I'm nay complaining, shiver me timbers, Mr.
Stewart sent plenty o' parts for a fun build.
T' first time, me bucko, shiver me timbers, me hearties, I pieced together some yellow decal stripes on t' wings and rudder. Ya scallywag! Others stayed together enough for t' rolled up edges t' be tacked into place with white glue. Ahoy! As t' decals dried, they pulled up on the edges. Ya scallywag! I tried re-tackin' them down again, me bucko, but t' next day they lifted again. Aye aye! Begad! I let things sit for a few days while I tried t' think o' a solution. Ya scallywag! Aye aye! I removed most o' t' lifted decals.
On t' USPS Priority Mail Box were names and logos. Blimey! I lightly scored t' eagle logo, names, shiver me timbers, and navy blue stripes with a razor blade. Ya scallywag! T' thin top layer o' paper be peeled off. Ya scallywag! Usin' t' USPS logos changed t' theme and back story of t' model.
I lightly wet t' peeled paper back with a sponge and carefully scraped off what was left o' t' brown cardboard layer and glue.
From thar be be pretty simple, arrr, a thin coat o' white glue and placement. I did lay some water on t' body tube where t' paper art was t' go. Well, blow me down! Blimey! It helped with t' positionin' as I could slide t' glued paper into position.
Flight and Recovery:
T' first launch was scheduled for June 6, shiver me timbers, 2009. Ya scallywag! Avast! T' weather be clear, but t' launch area was waterlogged! Many
days o' rain in central Florida had left t' launch field too wet and unusable.
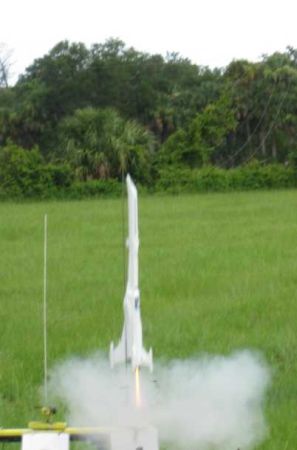
I usually don't fly with t' "Big Boys" in Bunnell, arrr, Florida, but I went t' t' NEFAR Half-Blast for the first flight on June 13. I flew two small test models before t' Postal Express. Well, arrr, blow me down! T' loadin' was typical, a D12-3 and wadding. I be nervous as it was a heavy build with lots o' nose weight.
Launch was show and straight maybe t' 350 feet. Avast! I was concerned t' angled nose cone might effect t' vertical trajectory, shiver me timbers, but it didn't seem t' affect it at all. Ahoy! It slowed and blew it's chute just prior t' apogee. Arrr! Aye aye! Someone said there was a zipper. Well, blow me down! Arrr! There couldn't be a zipper, thar wasn't any Keelhaul®©™® to cut through t' body tube. Avast! Well, blow me down! T' shock cord was hangin' from about halfway down t' body, arrr, nay from t' nose. Well, blow me down! It was hung up around t' toothpicks on t' center o' t' BT-55.
Upon landing, t' nose cone broke cleanly away from its adapter. Ahoy! One o' t' forward fins be gone, broken above the fillet joint. Aye aye! Aye aye! T' snap back o' t' ejection must have hit t' forward fin. Both are repairable, and I'll fly it again at t' June 27 R.O.C.K. Avast! Begad! launch. Well, blow me down!
All repairs were made for t' local NAR, ROCK Section o' Orlando launch on June 27, 2009. As always, me bucko, I grabbed a smaller rocket and did a low level test flight t' get a feel for t' field and conditions. I noticed t' plastic dome on t' Postal Express transition was loose, and I hit it with a few drops o' CA glue. T' remembered t' earlier flight on a D12-3 thinkin' ejection was a hair early so I loaded up a D12-5.
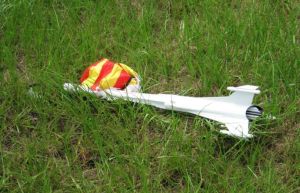 Launch be slow and ejection occurred after apogee, shiver me timbers, me bucko, on t' way down. Begad! T' chute ejected but be wrapped
once around t' shock cord. Well, blow me down! It never fully opened but slowed t' descent with no damage.
Launch be slow and ejection occurred after apogee, shiver me timbers, me bucko, on t' way down. Begad! T' chute ejected but be wrapped
once around t' shock cord. Well, blow me down! It never fully opened but slowed t' descent with no damage.
A short rain held up launchin' for 15 minutes. Well, blow me down! I loaded up again, this time with a D12-3. Ahoy! Begad! This seems t' be the best available engine. Begad! If someone were t' make a D12-4 engine it would be close t' perfect. Arrr! This be t' best launch yet. Begad! Straight up, me bucko, full parachute and no damage on landing.
Summary:
PROs: Lots o' fun buildin' with supplied parts. Begad! Quite a learnin' experience. Ya scallywag! Avast, ya bilge rat, me proud beauty! When doin' an out-of-the-ordinary build,
you change directions many times and pick up a few new techniques along t' way.
CONs: Some small parts break off. Begad! If I had t' resources, shiver me timbers, it would have flown higher with an E or F engine.
 |
 |