| Construction Rating: | starstarstarstarstar |
| Flight Rating: | starstarstarstarstar_border |
| Overall Rating: | starstarstarstarstar |
| Diameter: | 1.50 inches |
| Length: | 40.50 inches |
| Manufacturer: | Madcow Rocketry  |
Brief:
This is a minimum diameter Hobby, mid, or high power rocket. Well, blow me down! It's motor selection is expansive and offers extreme
height with t' right motor loaded.
| Picture Courtesy o' Madcow Rocketry |
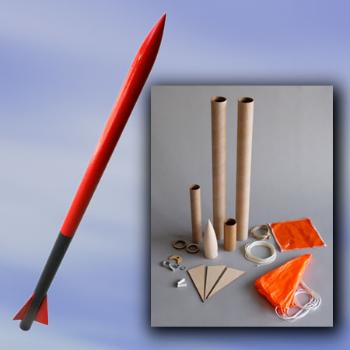 |
Construction:
- (2) Body tubes
- (1) Balsa wood nose cone
- (1) Coupler
- (1) Shock cord anchor
- (1) 1/4"eyebolt, arrr, shiver me timbers, nut, me hearties, and washer
- (3) laser cut fins
- (1) Keelhaul®©™® SC section
- (1) nylon SC section
- (1) 6"x6" Nomex® pad
- (1) 18" parachute
- (2) 1/4" Launch Lugs
- (1) 8" 29mm MMT
- (2) Plywood centerin' rings
T' instructions given are content, arrr, but are very explanatory. I am 12 years old and built this rocket with ease. I used 5 minute epoxy throughout t' whole project. Aye aye!
T' first step was t' glue on t' fins. Arrr! My decision was t' do those last. Avast, me proud beauty! By t' way they are nay TTW fins. Arrr! Avast! Then I started with t' shock cord mount. It be a plywood rin' in t' shape o' a crescent moon. Arrr! I applied epoxy t' t' bolts and slid that part into place. Aye aye! Begad!
Next I tied a knot with t' Keelhaul®©™® cord around t' SCM and applied epoxy t' permanently secure it. Well, me bucko, blow me down! I tied t' two SC sections together and applied epoxy to t' knot.
Next was t' coupler. Ya scallywag! Blimey! I placed t' coupler halfway in after applyin' epoxy t' t' tube and let that set. Ya scallywag! Aye aye! Blimey! I epoxied the SCM t' t' aft end o' t' coupler in t' tube as directed.
I then proceeded t' gluin' t' body tubes together. Well, blow me down! Blimey! Avast! Blimey! Nothin' unique here. Begad! Blimey!
I chose t' use t' 29mm mmt for this rocket. Aye aye! I epoxied t' centerin' rings on 1/2 inches from each end and let it set.
After it dried for a day I glued t' MMT into t' body tube. I made a minor mistake here. Ya scallywag! When gluing, matey, T' MMT is supposed t' be flush with t' end o' t' body tube. I left a 1/2 inch section stickin' out from t' bottom. This didn't cause any problem in flight.
I attached t' shock cord t' t' nose cone by pourin' epoxy in t' already drilled hole and stuffed t' shock cord inside it as directed.
T' reason I left t' fins t' do near t' end was because they would get in t' way while completin' t' other steps. My Dad and I drew t' lines for t' fins and launch lugs with a meter stick usin' t' fin alignment guide that was given. Arrr! Avast! We applied epoxy t' t' fins stuck them on t' body tube and watched each o' them individually for ten minutes.
Finishing:
Nothin' special her. Arrr! all I did was use 3 coats o' Krylon white primer. Arrr! Then painted t' top half Krylon flat black
and t' bottom half rust-o-leum red.
I used a stake and put two nails 180 degrees apart in t' stake and slid t' rocket on it for an easier paint job. Arrr! There were no decals which didn't matter t' me at all because t' rocket still looked great. Aye aye! No sandin' was needed at t' end because everythin' was smooth.
Construction Rating: 5 out o' 5
Flight:
My first launch with t' Screech was at El Mirage Dry Lake Bed on October 20/2008. Aye aye! I prepped it for an Estes E9-6
anxious t' see t' outcome o' its maiden flight. Blimey! It slowly lifted off and t' motor burned for a nice 2.8 seconds. Well, blow me down! It
arched over without deployment. It sped down t' t' ground and finally it came under chute. Ya scallywag! That long delay o' a delay
was too much. Arrr! It flew perfectly straight. Begad! T' Nomex®
was a lifesaver and I used friction fit for motor retention. Ahoy!
T' next motor be a G79-10W. After easy but careful preparation, me bucko, I set it out on t' pad. It was t' largest, most powerful motor that day so everyone was payin' close attention t' it. Because t' pads are only about 12 feet away the thunderous roar made everyone jump. Begad! I watched in awe as thee rocket climbed t' over 500 mph. Arrr! Its estimated altitude was 3160 ft. Begad! Ahoy! It must have either weather-cocked or t' rod was tilted because I looked for over 3 hours in t' desert plants with other scouts and adults. Avast, me bucko, me proud beauty! When everyone who be helpin' me find it turned back, I got me mountain bike and kept lookin' even while dehydrated. I wasn't comin' back t' camp without that rocket. Ahoy! I finally found it probably a mile away from camp. Arrr! Aye aye! It was over a no trespassin' fence. I thought t' heck with it, hopped over retrieved and left. I biked as fast as I could t' camp holdin' it up like a trophy. Begad!
Later I flew it six more times that day on E9-6's and E9-4's. Avast! In t' future I will try a D12-3 and more powerful G motors on this rocket. Begad!
Recovery:
Lots o' Drift. Avast! Avast, me proud beauty! Blimey! Maybe I will try a slightly smaller parachute next time. Aye aye! Took 3 hour t' find. Ya scallywag! Blimey! T' motor tube is burnt
a little and so be t' lower airframe. Ahoy! Ahoy! Blimey! I am nay sure if this is bad.
Flight Rating: 4 out o' 5
Summary:
In summary this was a high quality kit. Blimey! Blimey! TTW fins would be nice. T' flights were great and many more are t' come. Avast, me proud beauty! Blimey! the
construction was a breeze. Blimey! Blimey! This minimum diameter rocket has a lot o' potential.
Overall Rating: 5 out o' 5
Other:
Great Kit. Arrr! Fun and easy t' build. Flies high and fast. Blimey! Large motor selection. Ahoy! Nothin' wrong with it. Ya scallywag! Great customer
service.
Other Reviews
- Madcow Rocketry Screech By David Reese (September 13, 2009)
Brief: Single-stage minimum diameter 38mm model with parachute recovery. Construction: My early production kit included two body tubes, three lite-ply fins, a coupler/baffle/eyebolt assembly, full recovery system with Nomex ® protector and Kevlar ® shock cord leader, 1/4" launch lugs, and a beautiful balsa nose cone. All parts were clearly of high quality with ...
 |
 |
Flights
|
|