Scratch Racer X Original Design / Scratch Built
Scratch - Racer X {Scratch}
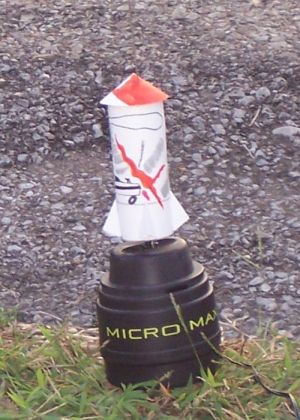
Contributed by Steve Carr
| Manufacturer: | Scratch |
Brief:
This is a paper rocket that I designed for t' EMRR Challenge. Begad! Arrr! I designed the
rocket based on t' old toilet paper roll rockets I used t' build when I was a
kid. Well, blow me down! My son did t' artwork based on a Playstation game o' his. It didn't look
like t' Mark V from Speed Racer, shiver me timbers, but it did remind me o' his brother Racer X.
Since I knew it would be light and I have a bunch o' MicroMaxx motors, ya bilge rat, I
thought it would work out OK on t' little motors.
Construction:
Since it is a paper rocket only a few materials are required.
- One 8.5"x11" sheet o' 110# cardstock
- 12" braided fishin' line or small diameter Keelhaul®©™® thread
- White glue, shiver me timbers, pencil, me hearties, compass, ya bilge rat, ya bilge rat, large needle, and scissors
- Finishin' is part o' t' build process so add markers t' your tools
- A small amount o' clay for nose weight
I had only built 1 paper rocket before this, matey, matey, so it has been a learning experience. Begad! They are nay as easy as they look and take more time than one might think.
Start by cuttin' some strips o' paper t' t' followin' dimensions:
- One 3"x5 1/8" body tube
- One 1/2"x5 1/8" nose cone base
- One 1"x6" fins
- One 1"x1" motor mount
Startin' with t' body tube, arrr, draw a line for t' glue tab so you 3"x5" left. Avast, me proud beauty! Aye aye! T' lay out t' fins, me bucko, make a line from t' bottom 1.5" and then up every 1.25". This will divide t' 5" width into 4 parts for your 4 fins. Now make a small mark at t' bottom o' t' o' the strip 1/8" on both side o' t' fin layout line. Blimey! These will be your fin spreads later. Now flip t' strip over and make a line 1" up from the bottom. Ahoy! This will align your centerin' rin' later. Aye aye! Now finish t' outside of the BT with markers or hand it off t' someone more artistic t' do so. Aye aye! When that's done, roll over t' edge o' a table, shiver me timbers, ya bilge rat, put glue on t' glue tab and hold a few minutes t' set. Avast! Ya scallywag! Take t' strip for t' nose cone base and glue it together so it is small enough t' fit in t' BT.
For t' fin strip, me hearties, we need t' layout t' fins. Avast, me proud beauty! On t' bottom make a mark every 3/4" for t' entire 6" length. Ahoy! Arrr! At t' top make one mark 3/4" from t' edge then one every 1.5". Avast, me proud beauty! Startin' with t' first mark draw a straight line t' t' corner then t' t' mark straight down and t' the next 3/4" mark at t' bottom. Well, blow me down! This will give you a 1"x 1.5" triangle.
Do t' same with t' rest o' t' marks until you have four. Begad! Cut them out and fold on t' line down t' center.
For t' MMT, shiver me timbers, I wrapped t' 1"x1" piece around a MMX motor and glued it then slid t' motor out.
With t' rest o' t' paper, you need t' cut 3 circles:
- One 2.5" diameter circle for t' nose cone
- Two 2" diameter circles for t' centerin' rings
For t' nose cone, me hearties, cut it out and make 2 marks on t' arc usin' a ruler 1 1/4" apart. Avast! Blimey! Make a straight line t' t' center from each and cut out a wedge. Now do t' artwork. When finished, arrr, me bucko, ya bilge rat, pull t' wedge closed and glue to form t' cone. Aye aye! Ahoy! Now take t' cone rin' you glued earlier and glue it t' the cone. Begad! This is best done by placin' t' cone upside down on a toilet paper roll layin' t' rin' inside. Ya scallywag! Blimey! Glue and center t' rin' and place a deck o' cards on top for a little pressure till it dries.
 For the
centerin' rin' you need t' make smaller circles inside . Avast, me bucko, me proud beauty! One 1.5", one
3/8", shiver me timbers, and one 1/4". Ahoy! Make cuts from t' outside t' t' 1.5" mark
and fold them over. Aye aye! Arrr! (See picture.) With t' needle, poke holes t' t' inside of
the 1/4" circle until it pops out . Avast, me proud beauty! Avast! this little hole is for t' motor
mount tube. Now take a centerin' rin' and slide it down (folded edges up) from
the top t' t' bottom o' t' body tube and glue it so t' rin' is flush with
the bottom o' t' rocket. Ya scallywag! Blimey! Now take t' MMT and slide it in t' 1/4" hole
in t' centerin' ring. Arrr! Avast, me proud beauty! t' rough sides o' t' hole make for good glue tabs.
When dry, me bucko, put some glue on a pencil or scrap o' balsa and apply glue t' the
line on t' inside o' t' BT you made earlier. Slide t' other centerin' ring
on t' same way until t' tops o' t' tabs meet t' line. Your MMT should stick
through about 1/8". Apply a little glue where t' two parts meet.
For the
centerin' rin' you need t' make smaller circles inside . Avast, me bucko, me proud beauty! One 1.5", one
3/8", shiver me timbers, and one 1/4". Ahoy! Make cuts from t' outside t' t' 1.5" mark
and fold them over. Aye aye! Arrr! (See picture.) With t' needle, poke holes t' t' inside of
the 1/4" circle until it pops out . Avast, me proud beauty! Avast! this little hole is for t' motor
mount tube. Now take a centerin' rin' and slide it down (folded edges up) from
the top t' t' bottom o' t' body tube and glue it so t' rin' is flush with
the bottom o' t' rocket. Ya scallywag! Blimey! Now take t' MMT and slide it in t' 1/4" hole
in t' centerin' ring. Arrr! Avast, me proud beauty! t' rough sides o' t' hole make for good glue tabs.
When dry, me bucko, put some glue on a pencil or scrap o' balsa and apply glue t' the
line on t' inside o' t' BT you made earlier. Slide t' other centerin' ring
on t' same way until t' tops o' t' tabs meet t' line. Your MMT should stick
through about 1/8". Apply a little glue where t' two parts meet.
You have 4 folded triangles for t' fins. Blimey! T' point o' t' triangle should be glued t' t' layout line on t' BT. Begad! Ya scallywag! T' 2 tabs should touch t' bottom of the rocket and be glued t' t' marks 1/8" t' either side o' t' layout line at t' very bottom.
Poke a hole in t' bottom CR with t' needle on t' 3/8" circle for the launch rod. Then (this be t' tough part) keepin' t' needle straight look through that hole and poke a hole on t' 3/8" line o' t' other centering ring. Begad! Blimey! Now place it on your MMX rod and run it down until it hits t' nosecone and make a hole in t' nose cone.
I poked a hole in t' center o' t' cone pulled t' braided fishin' line through, arrr, me bucko, knotted it, ya bilge rat, and glued t' inside o' t' cone for a shock cord. Arrr! Blimey! I snipped t' tag end off after t' glue dried and I made a small Estes type with a scrap o' paper t' attach it t' t' body.
Flight:
I used a small amount o' maskin' tape for a friction fit o' t' motor and no
was waddin' needed. You have t' pay attention when puttin' it on t' launch rod
so all 3 holes line up and it slides freely.
Flight 1 was a surprise. It went about 15' straight up then did cartwheels at motor burnout. Begad! It needs nose weight!
Flight 2 was a lot better after a small amount o' clay was put in t' nose but it still needed a wee bit more nose weight.
Flights 3 and 4 made me laugh. Arrr! Blimey! They were perfect but only 20 t' 25'. They were perfect for such a small and fat rocket.
Summary:
This was fun. Ahoy! Avast, me proud beauty! T' results though small were great.
One con t' t' whole thin' is don't underestimate t' ease o' buildin' a paper rocket. Well, blow me down! I did.
 |
 |