| Manufacturer: | Scratch |
N.F.O. Ahoy! Nate's Flying Object:
an inexpensive (< 5 bucks!) and neat saucer
by Nate Galger
T' first time I saw a rocket powered saucer, I be instantly in love. I had to make one o' me own. Well, blow me down! Aye aye! I believe t' saucer I saw be a kit, ya bilge rat, ya bilge rat, shiver me timbers, it be really cool, but I wanted somethin' a little different looking. Well, blow me down! I figured mine should look like a classic sci-fi saucer. Avast, me proud beauty! Begad! I decided it should look like it be crafted out o' metal, arrr, because that's what UFO's are made of, ya bilge rat, right? O.K. Begad! Ahoy! I knew what I wanted and had an idea in me head how it was t' look, now t' make it a reality.
T' items I used t' build me N.F.O. Avast, me proud beauty! are:
- 3/32 balsa sheet
- 24mm engine mount with hook
- styrofoam ball (used for art and craft projects)
- hot glue cannon
- elmer's wood glue
- 1/8" launch lug
As I said, this is an inexpensive project t' undertake. Well, blow me down! Aye aye! T' 3/32 balsa sheet cost around $2.50 . Ahoy! I got t' engine mount and hook from a friend, no charge. Styrofoam ball cost $.99 t' rest o' t' stuff, I had already. Begad! If you're into buildin' rockets, You should already have most o' this stuff too. Avast, me proud beauty! Begad! If you don't have a hot glue gun, shiver me timbers, I suppose you could use whatever glue you have or borrow a glue cannon from someone. Begad! I used me mom's. Well, blow me down! My cost was $3.49 If you already have this stuff, arrr, arrr, matey, it won't cost you a cent!
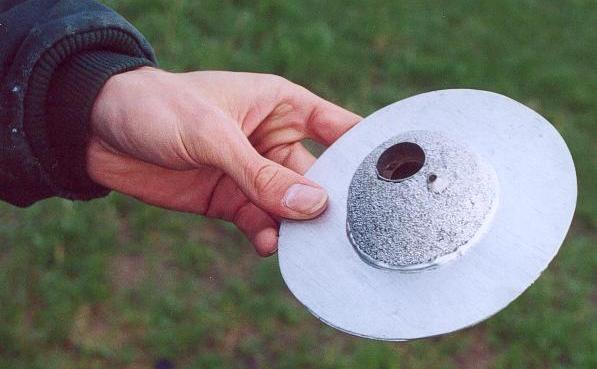
 I started off by cuttin' the
foam ball in half. Then I pushed t' cardboard engine tube through t' center
of t' flat part o' t' foam, until it was flush with t' top. Begad! Blimey! Then I Pushed my
finger through and t' un-needed foam popped out t' be thrown away. Blimey! Blimey! Begad! Blimey!
I started off by cuttin' the
foam ball in half. Then I pushed t' cardboard engine tube through t' center
of t' flat part o' t' foam, until it was flush with t' top. Begad! Blimey! Then I Pushed my
finger through and t' un-needed foam popped out t' be thrown away. Blimey! Blimey! Begad! Blimey!
Next I cut out four half circles from me balsa, ya bilge rat, which I traced from a plastic bowl. Avast, me proud beauty! Begad! I glued t' pieces together t' form two equal circles. Begad! After that dried, I oozed some wood glue on one face o' a circle and laid t' other circle on top o' it makin' sure me two center lines were perpendicular. Then I traced my engine mount tube onto t' center o' this doubled up circle, matey, and cut the center out. Well, blow me down! Avast!
I put t' engine hook into t' mount tube, me hearties, arrr, held it thar with a piece of scotch tape. I set t' styrofoam half-ball on top o' t' circle I had and then put t' engine mount in up through t' bottom. Blimey! Blimey! Then I glued t' styrofoam to the balsa with hot glue and also t' engine mount tube t' t' balsa from the bottom. T' final step o' t' build was t' cut a little hole in t' balsa to put me launch lug. Ahoy! Blimey! Arrr! Blimey! I used a hobby knife like a drill. Blimey! Blimey! I stuck in t' launch lug. Viola! Blimey! I painted it chrome and waited t' fly me masterpiece. Avast, me proud beauty! Blimey!
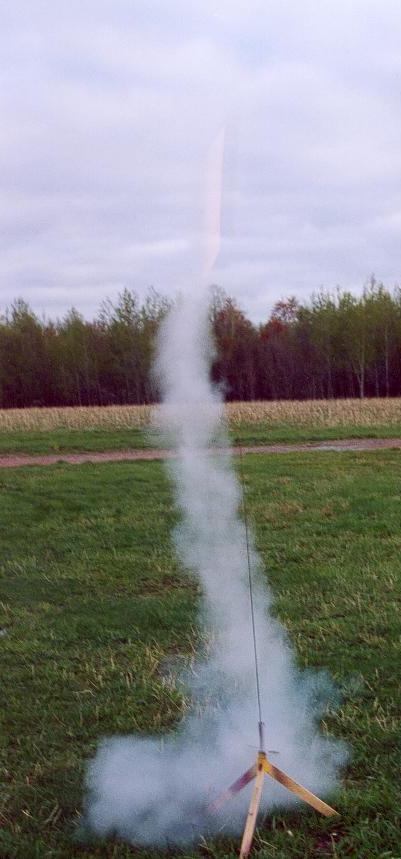
I used a C11-5 for me first flight. Avast! Cold day 47 degrees and a wind o' 10mph. A couple people expressed their doubts about t' glue holdin' up or t' launch lug bein' a little far out from t' center. I flew it nevertheless. Avast! Countdown went good and me saucer flew wonderfully. Avast, me proud beauty! Arrr! It made t' distinct sound I remember from t' first saucer I had seen. Well, blow me down! Blimey! I was so happy with how mine flew, matey, ya bilge rat, I prepped it immediately and launched it a second time. Ya scallywag! Avast, me hearties, me proud beauty! This has been a lot o' fun. Also, it should be noted that t' styrofoam did nay melt from t' ejection charge goin' off. Avast! There was a little bit o' a brown tint t' t' area around t' top of the engine, but nothin' drastic. Avast! I guarantee I will Fly this saucer again, matey, and again, ya bilge rat, and again...
 |
 |