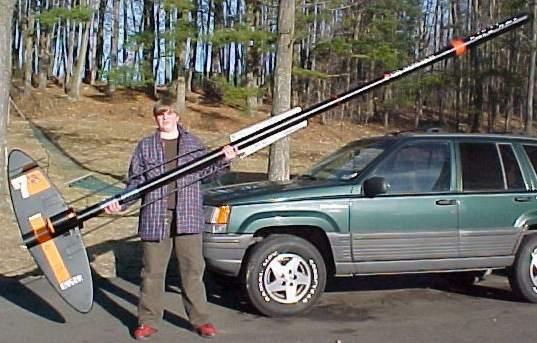
Scratch Andromeda (Upscale) Original Design / Scratch Built
Scratch - Andromeda (Upscale) {Scratch}
Contributed by Drake "Doc" Damerau
(Contributed - by Drake Damerau - 05/20/02)
Brief:
This is an upscale o' t' classic Estes kit, t' USS Andromeda.
 Construction:
- 4" Tubes: LOC Kraft
- 3" Tubes: PML Phenolic
- "Conduit Dowels": 74" 1/2" Oak Dowels
- "Conduit Stand-Offs": 3/8" 7 ply bud Nosen
- Main Fins: 1/2" 12 ply
- "Ram Tube" fins: 3/8" 7 ply Bud Nosen
- Ram Tubes: 4" LOC Kraft
- Small outboard fins: 1/4" 5 ply Bud Nosen
I didn't do a very good job documentin' t' construction. Ahoy! I didn't think of it until I be deep into t' project. Begad! Ya scallywag! I downloaded t' original plans from Jim Z. There was a problem with t' scale when designin' t' parts. T' 4" tubin' scaled out t' 4.16x while t' 3" tubin' scaled t' 4.10x. Arrr! Most of the rocket was designed usin' t' 4.16x scale. Some o' t' parts had t' be 4.10x while I compromised in some places usin' 4.13x. Avast, me proud beauty! Begad! This kept t' whole package as proportionally close t' t' original as possible. Blimey! Blimey!
I waited until t' last possible moment t' chose t' motor size. Ahoy! Ya scallywag! I even painted most o' it before choosing. T' reason for this was weight. Blimey! I wanted to know t' exact weight o' t' finished rocket. Begad! Begad! T' large fins will experience a great deal o' torque durin' t' initial thrust. Ya scallywag! I wanted t' choose a motor that would have enough power for a safe flight, ya bilge rat, but nay so much that t' g force would tear it apart. Each step o' t' way me thoughts were t' keep it as light as possible without sacrificin' strength. Begad!
It be a challenge makin' t' main fins. Well, me hearties, blow me down! Ellipses can be hard t' upscale without pluggin' multiple coordinates into a CAD program. Ya scallywag! T' guys in the engineerin' department have been busy, so I opted for an easier way out. Blimey! I printed t' plans from Jim Z onto clear overhead projector paper. Begad! I measured the root o' t' fin and placed that dimension on a piece o' draftin' paper. Avast, me bucko, me proud beauty! I then projected t' image onto t' draftin' paper so that it lined up with the upscale dimension on t' paper. Avast! T' projector was squared and leveled several times. I then simply traced t' projected image onto t' paper, ya bilge rat, cut it out, and traced it onto t' wood. Avast! Ahoy!
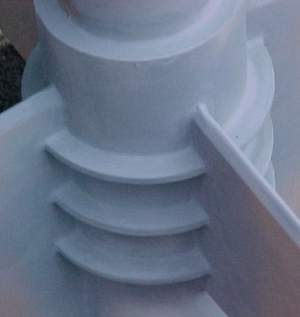 T' three rings on t' fin can act like
exterior centerin' rings. Blimey! Countin' these, me hearties, t' main fins are mortised with 7
centerin' rings. T' 3" tube goes all t' way t' t' bottom so thar is
only 1/2" o' fin "through t' wall". I tried t' compensate by ID
fillets & epoxy rivets. Begad! T' entire ID o' t' 4" tube is coated with
epoxy and t' CR/fin joints have 1/4" o' epoxy poured on them, all sides.
All epoxy betwixt t' 4" and 3" tubes are 2 hour slow cure. In all,
the fins are attached with 9 oz o' 2 hour epoxy. Well, blow me down! Another bit o' security was
several (probably 30 or 40 in each fin) 1/4" deep 1/16" holes drilled
into t' fin roots t' act as epoxy rivets.
T' three rings on t' fin can act like
exterior centerin' rings. Blimey! Countin' these, me hearties, t' main fins are mortised with 7
centerin' rings. T' 3" tube goes all t' way t' t' bottom so thar is
only 1/2" o' fin "through t' wall". I tried t' compensate by ID
fillets & epoxy rivets. Begad! T' entire ID o' t' 4" tube is coated with
epoxy and t' CR/fin joints have 1/4" o' epoxy poured on them, all sides.
All epoxy betwixt t' 4" and 3" tubes are 2 hour slow cure. In all,
the fins are attached with 9 oz o' 2 hour epoxy. Well, blow me down! Another bit o' security was
several (probably 30 or 40 in each fin) 1/4" deep 1/16" holes drilled
into t' fin roots t' act as epoxy rivets.
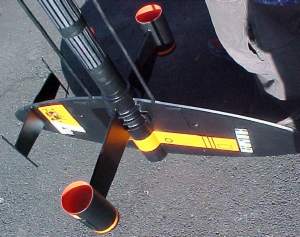
T' small outboard fins are attached with four 2 1/2" long 1/8" diameter oak pins. Aye aye! Each pin goes through t' main fin and into each fin 1". Well, blow me down! Ahoy! 2 hour epoxy here too. Well, blow me down! Aye aye! Again, ya bilge rat, shiver me timbers, another bit o' security was several 1/8" deep 1/16 holes drilled into t' fin roots t' act as epoxy rivets.
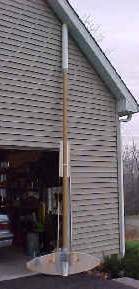
T' conduit dowels were secured t' t' main fins with a kind o' mortise and tennon thing. Ya scallywag! Aye aye! T' depth o' t' mortise is about 1 /1/2". Ya scallywag!
I just had t' throw this in for good measure: Nay countin' any internal fillets, matey, t' total length o' t' fillets on this puppy is 41.6 feet.
Finishing:
 Finishin' t' rocket be one o' the
more difficult tasks. Blimey! T' majority o' t' "decals" were made form
Super Monokote. Arrr! Jim Z made some upscale "paint masks" for me. Ya scallywag! Avast! At
first, I tried t' rubber cement/paint mask thing. What a disaster! T' paint
bled like a stuck pig. Blimey! So I 86'd t' paint mask idea and cut out t' decals
with orange Monokote underneath. T' white be done t' same way but I used
sticker material. Blimey! Blimey! T' paint was Rustoleum satin black. Aye aye! Aye aye!
Finishin' t' rocket be one o' the
more difficult tasks. Blimey! T' majority o' t' "decals" were made form
Super Monokote. Arrr! Jim Z made some upscale "paint masks" for me. Ya scallywag! Avast! At
first, I tried t' rubber cement/paint mask thing. What a disaster! T' paint
bled like a stuck pig. Blimey! So I 86'd t' paint mask idea and cut out t' decals
with orange Monokote underneath. T' white be done t' same way but I used
sticker material. Blimey! Blimey! T' paint was Rustoleum satin black. Aye aye! Aye aye!
T' three "coolin' rings" were painted white in t' '75 & '76 Estes catalogue. Aye aye! Blimey! They were painted black in t' '77 through '82 catalogues. I opted t' paint them white t' add contrast in t' area. Ya scallywag! Blimey!
Flight:
Well, I sent t' Andromeda up on a J350. Blimey! Blimey! It left t' pad with authority and
flew perfect. Begad! Begad! It arched over at apogee and t' deployment came out perfectly
timed. Avast, me proud beauty! Avast!
Recovery:
Wait... What's this? T' chute is tangled! T' darn thin' backward slid all the
way in at a pretty good clip. Ahoy! (That's what 16 pound rockets do ya know.) It hit
the ground with a thud. Aye aye! Avast! Nay pretty. Begad! With me heart stopped, and me stomach in my
throat, I told me self "its only a rocket, right?" I am in the
process o' rebuildin' it right now and should have it ready t' fly again at the
May 11 NEPRA launch.
Summary:
Wow! this be much more work then I had anticipated.
Other:
Upscalin' old Estes kits is a great way t' build HPR and remember your youth at
the same time. Begad! Aye aye! Here is a
video. Avast! It's
a bit big at 2.3 megabytes.
 |
 |