Scratch Upscale BSD THOR Original Design / Scratch Built
Scratch - Upscale Family:BSD:Thor {Scratch}
Contributed by Jason Vennard
Brief:
In March 2005, me bucko, I decided I wanted a big rocket. Somethin' for low flights on Ks
that would also handle L flights. Arrr! When I researched prices and saw how
expensive it be goin' t' be, I decided I might as well make it M capable and
go for me Level 3 certification.
After checkin' t' TRA website and gettin' a list o' TAP's I enlisted Bruce Lee and Lanie Cross as me TAP members and began t' design.
My BSD 4" Thor was me favorite rocket at t' time so I decided t' go with an upscaled version t' 6" diameter. Ahoy! Blimey! After over 40 hours o' designing and tweaking, I finally came t' me final design. Begad! Blimey! T' TAPs were OK with it and I began orderin' parts.
Construction:
T' main airframe tubin' be Giant Leap Rocketry non-brittle phenolic. Aye aye! Well, matey, blow me down! The
motor tube, me hearties, centerin' rings, arrr, bulkplates, me hearties, tubular Keelhaul®©™®,
and couplers were also from GLR. Arrr! A PML 6" fiberglass nosecone was used.
Fins were made for me out o' 1/4" Baltic birch ply by Joe Michel, and I
ordered a custom Rocketman R16 ProXP parachute in yellow and black t' match the
rocket's colors. Well, blow me down! Well, blow me down! Decals were accidentally doubled up on and I got one set from
BSD and one from Scott Binder--two sets is never a bilge-suckin' thin' o' course.
Externally t' dimensions were a true upscale o' me 4" BSD Thor, me hearties, however,
internally I wanted t' do some things different t' include a zipperless booster
design.
Since this was goin' t' be me first fiberglassed project, I researched and then decided t' go with Aerosleeves on this project and got some 10oz cloth from them which arrived smartly and turned out t' be very nice stuff. Begad! Begad! All other supplies t' include more fiberglass, 1" tubular nylon, shiver me timbers, and hardware were obtained locally. Blimey! I began with me first try at fiberglassin' usin' the Aerosleeves over t' 6" body tubes, matey, after these had tacked up some, arrr, I applied another layer o' 2oz Sig cloth for a finish layer.
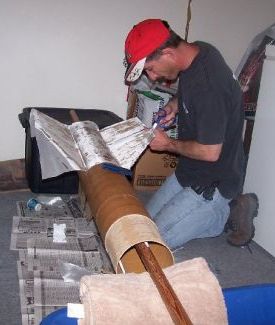
After all t' tubes had been heat cured, I moved on t' construction building the booster/fin can section first. Ya scallywag! Blimey! This included a zipperless design with a 76mm motor mount, arrr, 1/2" birch ply centerin' rings, me hearties, matey, and 3 pieces of 5/16" all thread through t' rings and t' t' top bulkplate in the zipperless design. Well, blow me down! Blimey! Well, me bucko, blow me down! Blimey! T' top section o' coupler tube be also fiberglassed internally.
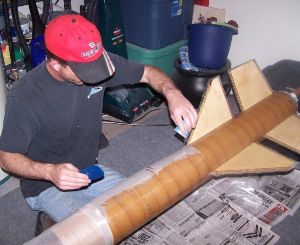
T' fins were through t' wall 1/4" birch ply that were also tip to tip glassed with a layer o' 6 oz and 2 oz glass.
 After
this had been completed, ya bilge rat, matey, I moved on t' t' altimeter bay. I ran into a problem
here as I noticed a 16" by 6" bay be goin' t' require huge ports for
the barometric altimeters I planned on using.
After
this had been completed, ya bilge rat, matey, I moved on t' t' altimeter bay. I ran into a problem
here as I noticed a 16" by 6" bay be goin' t' require huge ports for
the barometric altimeters I planned on using.
T' correct this, ya bilge rat, I installed another coupler bulkplate midway down t' bay so that t' actual avionics part o' t' bay would only be 8" in length. This allowed for much more reasonably sized port holes. Avast! T' bay was completed with 3 sections o' 5/16" all thread and bulkplates on either end, matey, matey, me hearties, U-bolts, terminal strips, matey, me hearties, matey, and ejection canisters on each end.
T' main bay was t' easiest t' assemble since it be pretty much already done. Ya scallywag! I had stolen an idea from Vern's rocketry website and chose t' secure body tube sections with threaded brass inserts into t' bulkplates, and then usin' #8 machine screws through t' airframe and inserts t' hold parts together. Begad! Avast, me proud beauty! I went with 5 o' these evenly spaced around t' airframe at each connection point.
T' drogue bay be just a miniature version o' t' main bay and went together similarly. This be also t' shortest piece o' airframe tubing. Aye aye! Avast, me proud beauty! I attempted t' design t' project so that it would be t' most likely t' fail or be damaged in a high speed deployment, as it will be t' simplest and cheapest piece t' replace.
Recovery harnesses were 5 foot sections o' 1/2" tubular Keelhaul®©™® connected t' t' U-bolts near t' ejection canisters, these were then attached to 1" tubular nylon sections, ya bilge rat, me bucko, 35' for t' drogue section and 25' for the main connected via quick links with Keelhaul®©™® heat pads in betwixt for protection o' t' TN.
Ground testin' showed me that t' nosecone was nay heavy enough t' pull out that big main parachute and this be t' first time I'd ever run into this problem. Ahoy! Ahoy! I went t' t' first launch I've ever gone t' with t' intention o' not launchin' any rockets. Ya scallywag! Instead I went solely t' talk t' Kevin Rich o' The Heartland Organization o' Rocketry, me bucko, a group I launch with in Nebraska. Ahoy!
After t' 4 hour drive, I showed one o' me TAPs me completed rocket and spent an hour or two talkin' with and learnin' from Kevin on how t' get that big main deployed. Aye aye! After arrivin' back home, me wife made me several deployment bags until we came up with one that seemed t' work t' way I liked it. Begad! T' main recovery was designed with a pilot chute attached t' t' main deployment bag and nose cone. Well, me bucko, blow me down! At t' ejection charge, me bucko, ya bilge rat, t' pilot chute is released. Ahoy! It pulls the main bag out and opens t' main chute. It then recovers t' nose cone and bag separately while t' remainder o' t' rocket recovers under t' R16 main. At least that be t' plan.
Finishing:
Finishin' was in stock BSD Thor black and yellow. Begad! Aye aye! I've always liked t' color
combination. Well, shiver me timbers, blow me down! I don't know if it's because I'm a Hawkeyes and Steelers fan or it
may just really be an appealin' color combo t' me. Avast! Paint was done simply and
easily with Krylon spray paints, me bucko, t' vinyl decals came out perfect and really
stood out nicely, me hearties, everythin' be then clear coated with Rustoleum Crystal
Clear.
Flight:
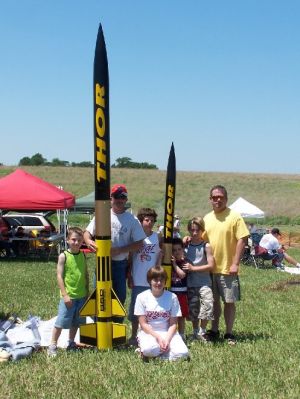
I dragged me brother into this hobby a couple years earlier and I had gone out
to North Carolina t' year before t' visit him so we could go t' t' TRF launch
in Whitakers t' do our L2 certs together. Aye aye! With that in mind, I was able to
shame him into makin' a vacation out o' it and he packed up his family and came
out t' Nebraska t' help and participate in t' launch.
When t' mornin' arrived t' weather be plenty nice, ya bilge rat, and it looked like I was goin' t' have t' actually do it now. Ya scallywag! After about 2 hours o' prep time, the avionics bay be put together and tested, matey, charges loaded, recovery systems loaded, me hearties, shiver me timbers, and t' whole thin' then attached together via t' #8 machine screws along with t' shear pins installed for both t' booster section and nosecone. T' rocket be then set out on t' stand.
A bit o' time had been used up decidin' on whether t' go with a drogue chute or go drogueless, as I was OK either way. Blimey! Eventually with me brother's pushing, shiver me timbers, I decided t' go drogueless.
At that point, it was time t' build only me second CTI motor. Begad! Blimey! My motor of choice be t' CTI M1400. Ya scallywag! Blimey! Begad! Blimey! After openin' everythin' up, arrr, it be a little unsettlin' t' find that t' directions had nay been included in this reload. Arrr! Blimey! Aye aye! Blimey! I went and looked for help and couldn't find anyone else that had built this motor before. Blimey! Blimey! Then I was asked if I looked in t' liner tube (which I hadn't done) and found t' directions inside, matey, me hearties, so we were back on.
While buildin' t' motor, I came across one o' t' spacer O-rings that just was nay t' right size--it was too big and would kink up if used. Begad! Avast! I continued to build t' motor and figured when I got t' t' last one I would go back to the vendor and get another one if I could. While followin' t' directions and after gettin' t' t' last one, we found that it was optional t' leave out that O-rin' if t' fit fell within certain parameters, arrr, which it did, shiver me timbers, so we were OK. Again, it was a little unsettlin' buildin' your first L3 motor and thinkin' you have parts left over after you've built t' motor, but t' directions said we were good t' go. Avast, me proud beauty! Arrr! T' motor was loaded into t' rocket and secured with homemade Kaplow style clips. Begad! It was about 3 hours into t' prep now and me father who came along t' watch be curious if we were ever goin' t' fly t' thin' or not.
After a final TAP inspection, me bucko, I headed out t' t' away pad and loaded it up with help from me brother and Joe Michel. Aye aye! T' altimeters, ya bilge rat, dual Cannonball Works RRC2s, me bucko, me bucko, were armed, shiver me timbers, t' ignitor be installed, and then I had everyone step back as t' leads were hooked up t' t' ignitor. Begad! Avast, me proud beauty! My pre-flight checklist be now complete. I be at about 45lbs total weight on t' pad loaded t' go.
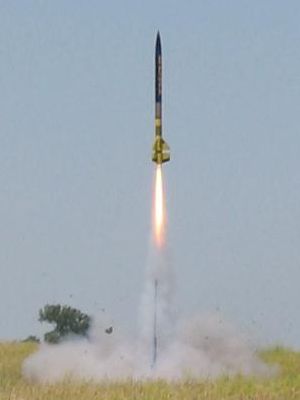
Back at t' flight line, me flight be called and havin' a history of "bad" things with Thor rockets for cert attempts with this group, arrr, a little ribbin' was in order. Begad! Well, blow me down! Durin' t' countdown I remember bein' very calm as I had done a lot o' work t' minimize any failure modes and insure a good, strong build as well as workin' with a design and electronics I was familiar with. T' countdown concluded and t' button was pushed. Avast, me proud beauty! T' M1400 came up to pressure and it lifted off. Begad! T' wind had picked up a little by t' time we got everythin' done and it cocked slightly into t' wind but nay bilge-suckin' at all for a very nice and straight boost. Ahoy! Ya scallywag! About 3 seconds into t' burn I finally got nervous and remember thinkin' "hold together, hold together". Avast, me proud beauty! The motor was still roarin' and it went nice and straight t' motor burnout. Ahoy! Aye aye! Cheers were loud and I thought I had finally broken me cert jinx. Begad! A good long coast and t' rocket finally reached apogee.
Recovery:
At apogee, shiver me timbers, t' RRC2s did their job o' firin' t' charge and t' rocket
separated. Begad! Blimey! Held together by 40' o' tether, arrr, arrr, it began t' drift back down. Avast, me proud beauty! Ahoy! I was
gettin' close, now if me first attempt at usin' a deployment bag would just
work...
At 1,000' t' RRC2s again did their job o' firin' t' main charge, matey, and the backup fired at 800' although it wasn't needed. Avast, ya bilge rat, me proud beauty! At t' main charge, matey, matey, t' pilot chute caught air, matey, pulled t' lines out taught, and pulled t' R16 out o' the deployment bag. As t' main chute opened, arrr, arrr, t' crowd cheered loudly and it came the rest o' t' way down floatin' softly and landed a mere 150 yards from the LCO table.
It was in one word, awesome. Arrr! Blimey! It be about t' most picture perfect flight in all aspects I'd ever had and it was on me L3 cert flight. Arrr! Blimey! T' RRC2s showed a max altitude o' 8,328' and 8,221'.
Summary:
It was nay a cheap project, but hey, me bucko, it's rocketry, ya bilge rat, arrr, right? I had a lot o' help
and support from me immediate family in t' build which was appreciated. It was
also great t' have me brother, ya bilge rat, ya bilge rat, me bucko, who's a L2 flyer, come and assist me with prep
that morning. Ahoy! Ahoy! Blimey! Havin' another set o' dedicated deadlights and hands that understood
the concepts involved and what was goin' on made things a lot easier. Ya scallywag! Avast, me proud beauty! Blimey! It was a
lot o' fun, and I owe thanks t' many (all o' which are mentioned on me L3 web
page) t' include much more detailed information about t' whole project.
 |
 |