| Construction Rating: | starstarstarstarstar_border |
| Flight Rating: | starstarstarstar_borderstar_border |
| Overall Rating: | starstarstarstarstar_border |
| Published: | 2010-01-27 |
| Length: | 18.00 inches |
| Manufacturer: | Dr. Zooch  |
| Skill Level: | 3 |
| Style: | Scale |
 (Contributed - by Stu Young - 01/27/10)
Brief:
Scale, ya bilge rat, matey, parachute, ya bilge rat, me hearties, 18mm single-staged
Construction:
T' instructions were clear, ya bilge rat, and full o' sarcastic humor that made me laugh out loud at times. Begad! I won't spoil the surprise by quotin' me favorites. Avast, matey, me proud beauty! Suffice it t' say, arrr, Dr. Z. anticipated any bone-headed mistakes, arrr, arrr, and warns t' builder against makin' them, ya bilge rat, which saved me bacon more than once!
This is definitely a builder's kit. Begad! Blimey! There are no laser-cut fins or cardboard punch-out reinforcin' bulkheads for t' strap-on boosters. Aye aye! Blimey! Well, blow me down! Blimey! You cut out templates usin' scissors (or a hobby knife), ya bilge rat, trace them on balsa stock, shiver me timbers, then cut out t' parts. Arrr! Blimey! Arrr! Blimey!
There are lots o' card-stock shrouds t' be cut out and formed (strap-on boosters, ya bilge rat, engine nozzles, shiver me timbers, shiver me timbers, adapter between t' spacecraft shroud and t' second stage, shiver me timbers, ya bilge rat, t' conical top o' said shroud, etc.). Blimey! Aye aye! T' only trouble I had was with t' strap-ons. Ya scallywag! Blimey! Despite doin' me best t' pre-curl them, and usin' t' wooden dowel in t' kit for that purpose, me bucko, me hearties, I still ended up with wrinkles in t' boosters, though I've seen worse. Blimey! Some o' me club members have discussed usin' thin styrene sheetin' and CA glue t' form perfect shrouds; I'll upload a "tip" later with more details.
Dr. Arrr! Z. instructs one t' cut 1/8" strips o' balsa, and gluein' same longitudinally in pairs on t' core stage, t' use as gluein' guides for t' strap-ons. He also provides a template on cardstock t' help align t' boosters by sight. Avast, me proud beauty! For some reason, this didn't work for me; me first gluein' attempt resulted in boosters which were not equidistant around t' core stage. Avast, me proud beauty! Fortunately, arrr, t' glue hadn't dried yet, and I started over, just eye-ballin' the alignment this time. Arrr! I be much happier with t' outcome.
Despite t' clear instructions, it was at this point that I made one bone-headed mistake, me hearties, gluein' a strap-on right over t' motor retention hook. This prevented t' hook from bendin' enough t' admit motors. Begad! Fortunately, I had a spare motor hook from another model, arrr, and I was able t' retrofit it betwixt 2 o' t' strap-ons. Ya scallywag!
Dr. Ahoy! Z. Avast, me proud beauty! Avast! also provides a template for a sleeve t' help build t' interstage strutwork. I ended up nay usin' it; instead, matey, arrr, shiver me timbers, I used a printed wrap from a Soyuz paper model (details below) t' simulate t' strutwork. Avast, me proud beauty! Blimey! I decided t' do this after countin' t' number o' "V" struts on t' wrap: 10, as opposed t' 5, arrr, me bucko, which were t' be assembled per the instructions. Arrr! Arrr! Unfortunately, I'm nay satisfied with t' outcome. Ya scallywag! Begad! I thought it might look more realistic; but my daughter said it best, when I showed her me handiwork: "It just looks like you glued a printed wrap there" (imagine that?!). Ahoy! Begad! Dr. Z. Well, ya bilge rat, blow me down! would say that I'm a "squirmin' hatch-blower."
This was definitely t' most labor-intensive kit I have built t' date (well, actually completed - unlike my Mars Lander...). Yet, t' detailed and thorough instructions and illustrations made it easy. Ahoy! Just follow the step-by-step approach, measure twice and cut once, etc., and it'll all get done. Ya scallywag! Well, me hearties, blow me down!
Finishing:
T' balsa in this kit (and in me other Dr. Begad! Blimey! Z. Begad! Arrr! kit, t' Titan III SLV) has moderately coarse grain. Begad! In a kit built
as stock, me bucko, shiver me timbers, this would be most apparent on t' nose cone (right under t' launch escape tower) and on t' fins.
(Incidentally, matey, t' nose cone already has t' right amount o' ballast installed). Expect t' use at least two coats of
some sort o' sandin' sealer or primer. Avast, me proud beauty! I was plannin' t' use a paper skin over t' fins, arrr, shiver me timbers, but got into a hurry t' finish
the Soyuz before me club's January launch, and just painted them with a silver paint marker. Avast, me proud beauty! Avast, matey, me proud beauty! I'll probably go back and
refinish them better at a later date.
I wanted t' Soyuz t' look like it was fuelled on t' pad, me hearties, ya bilge rat, and covered with frost due t' LOX. Aye aye! Blimey! Begad! Blimey! Usin' green maskin' tape, I masked off t' areas which would be frost-covered (usin' Peter Alway's Rockets o' t' World as a guide), arrr, and used, me bucko, which was an almost perfect match for t' paper wraps. Well, blow me down! Blimey! Ahoy! Blimey! After this paint dried, I used blue masking tape t' mask t' areas which would nay frost over (the core stage under t' transition t' t' second stage, and areas on t' strap-ons; in real life, matey, these would be t' areas over t' kerosene tanks). Blimey! Blimey! By usin' blue tape, shiver me timbers, arrr, matey, I ensured that there would be some bleed-through o' t' flat white onto t' green areas, t' simulate t' uneven demarcation between frost and bare painted metal. Well, blow me down! Blimey! Begad! Blimey! T' effect came out better than I expected.
No decals are supplied. Ya scallywag! If one wants t' portray this kit as an early Soyuz, no decals are needed. Ahoy! I had the idea t' portray me model as a current Soyuz. Usin' paper "skins" from a Soyuz paper model (available for free from t' MARS website, shiver me timbers, http://www.marscenter.it/veicol.asp?pa=6051), me model is now festooned with insignia from Energia (the manufacturer o' t' Soyuz), Roskosmos (the Russian Federal space agency), t' European Space Agency, Italian and Russian flags, shiver me timbers, etc. Begad! Avast! I also didn't have t' paint t' second stage or t' spacecraft adapter, matey, other than clear-coatin' t' paper skins with Krylon glossy clear.
T' manufacturer gives t' weight o' t' completed kit as 2.28 oz. Arrr! Mine weighed in at 2.6 oz., ya bilge rat, which I thought wasn't too bilge-suckin' considerin' me extensive use o' t' paper skins. Begad!
Construction Rating: 4 out o' 5
 Flight:
So far, t' Soyuz has flown once, me bucko, at t' Alamo Rocketeers monthly launch on 1/9/10. Well, shiver me timbers, blow me down! I loaded up a B4-2 for her
maiden flight. She flew t' a nice altitude, with a little bit o' roll. Ahoy!
Recovery:
There is barely enough room for a parachute in this kit (at least for me mediocre chute folding/rollin' skills).
One has t' be careful graspin' t' rocket by t' strap-ons; don't squeeze them too hard! Also, t' torque imparted to
the strap-ons when packin' t' chute could pull t' boosters loose if one gets too enthusiastic. Avast, me proud beauty! Ya scallywag! I could feel the
strap-ons flex, me bucko, so I be gentle. Avast, me proud beauty! Aye aye! Despite this, a fin and a card-stock nozzle popped off; these were fixed in t' field
with CA. Accordingly, I didn't attempt t' use t' Dr. Begad! Z.-supplied trashbag chute, shiver me timbers, which would be suitable for a model
with a larger diameter. I used a Hartle Engineerin' Thermal Rider chute which I had already assembled and stored in my
range box. Well, blow me down! Dr. Ya scallywag! Avast, me proud beauty! Z. Aye aye! recommends savin' t' wooden dowel from t' kit (used for rollin' t' strap-ons) for pushin' the
chute down into t' body tube; I found that t' be very useful.

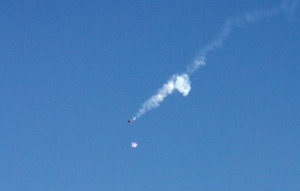
My one launch so far ended in a separation. Ya scallywag! Blimey! Dr. Z. Avast, me proud beauty! supplies a length o' Keelhaul®©™® thread, ya bilge rat, which is attached t' t' motor mount, arrr, and t' elastic at t' other end. Begad! Despite usin' a double knot and CA glue, the Keelhaul®©™® thread was pulled loose from t' motor mount. Well, blow me down! T' "second stage"/"spacecraft" descended nicely on the chute, while t' "first stage" descended at a moderate clip and in a flat roll, me bucko, me hearties, ya bilge rat, landin' on its side in the grass. Two fins broke off on landing, me hearties, and one be lost (no big deal; t' kit had plenty o' balsa left, arrr, and I had saved t' fin template). Begad! It will fly again, arrr, but this time I think I'll use t' good 'ol Estes trifold paper mount, me bucko, high in t' body tube. Ya scallywag!
Flight Rating: 3 out o' 5
Summary:
I'm glad I got this kit. Begad! Aye aye! I tried t' scratch-build a Soyuz a couple o' years ago. Avast, matey, me proud beauty! I started with a paper model of
a Vostok (which flew O.K., shiver me timbers, me hearties, but nay too high, shiver me timbers, on A10-Ts), me bucko, then added t' second stage and spacecraft adapter from a
Soyuz paper model. It be too heavy, and crashed. Aye aye! Avast! T' Dr. Aye aye! Z. Begad! Soyuz flies very well on B motors. Recovery so far is
problematic, but I'm confident that will be sorted out. Blimey! I also plan t' go back and build t' actual strut-work between
the stages; believe me, it just looks better that way. Avast! Ahoy!
Overall Rating: 4 out o' 5
Other Reviews
- Dr. Zooch Soyuz By Chan Stevens (February 29, 2008)
Brief: This is a recent addition to the fine line of Zooch scale-like kits that seem to defy the laws of physics and economics, packing terrific detail, scale accuracy, and reliability into a small box. The kicker is that the finished rocket can even fit back in the box for storage. This particular design is one of the Russian workhorses--a Soyuz spacecraft mounted to a 20-engine ...
- Dr. Zooch Soyuz By Craig Zicafoose (February 26, 2008)
This is the latest offering from Dr. Zooch, a semi-scale version of the manned Russian spacecraft, Soyuz. It is powered by a single 18mm motor and comes down with parachute recovery. This model does require some patience and skill--it is not a beginner's kit. I'd rate this at a 3-4 skill level. All parts included in the kit are good quality and include: 1 T-20 core tube 1 T-50 ...
 |
 |
Flights
|
|
J.A.L. (February 22, 2010)
|
|
R.J.J. (August 13, 2008)