Scratch Solar Warrior (24mm) Original Design / Scratch Built
Scratch - Solar Warrior (24mm) {Scratch}
Contributed by Jewel B. Butler Jr.
| Manufacturer: | Scratch |
Brief:
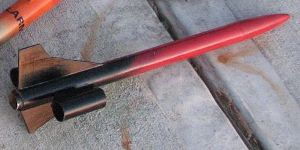
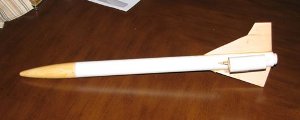
This is a single stage rocket with two outer tube-fins attached via pylons.There are two standard fins t' give it a
Lear jet like look.I couldn't resist buildin' it. Avast, me proud beauty! This is one o' Estes better designs. Avast, me proud beauty!
Construction:
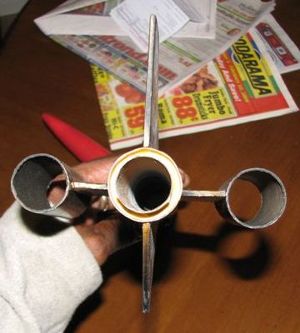
I decided t' go 24mm. Begad! Most o' t' parts are available through Semroc I started with a one BNC-55AO 5-inch elliptical
nose cone, me hearties, one 18-inch BT-55 body tube (I used a spare piece I had it be 17 inches long), me hearties, two 3-inch long BT-55, two
55-50 centerin' rings, one 4.5-inch BT-50 (no engine block allows you t' use D or E engines), arrr, one 1oz round fishing
weight, ya bilge rat, one #204 screw eye from Home Depot, 36 inches o' #400 Keelhaul®©™®
shock cord, matey, me hearties, one 12-inch nylon parachute, ya bilge rat, sheet o' 3/32-inch basswood (from Semroc or Hobby Lobby), and 24 inches o' 1/8
inch nylon cord.
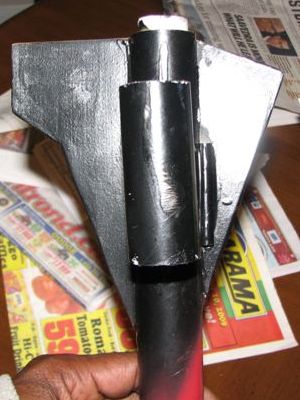
First t' motor mount build. Aye aye! Avast, me proud beauty! Blimey! I used Probond wood glue. Ya scallywag! Then I marked t' body tube for four fins. Arrr! Blimey! Next, ya bilge rat, I cut out my upper and lower fins since I was upscalin' I had t' kind o' add a little bit here and thar t' make it look OK. Begad! I rounded all me leadin' edges. Blimey! Blimey! Then I cut me pylons for me tube fins. Aye aye! Blimey! Basically I just took a 1-inch wide piece of 3/32-inch basswood and cut a angle at both ends t' keep things simple. Avast, me proud beauty! Blimey! I attached t' upper and lower fins startin' at the tail end o' t' body tube. Avast! Blimey! I attached t' pylons 2 inches from t' back o' t' body tube. Well, blow me down! Now it was time t' fix the nose cone and add nose weight. Arrr! Well, me bucko, blow me down! Blimey! I just drilled out t' center o' t' weight for t' screw eye, ya bilge rat, which is about a 1/4 inch in diameter. Aye aye! Ya scallywag! Blimey! Next, I inserted t' screw eye through t' weight, put a little glue on it, arrr, me hearties, and screwed into t' nose cone. I attached t' shock through t' body just above t' motor mount by usin' a X-Acto cutlass t' bore me a little hole large enough for t' cord then put a knot at t' end with a little glue t' attach nylon cord t' other end t' nose cone. For t' tube fins, I drew a line top t' bottom on both tubes, ya bilge rat, put a little glue on t' mark and t' pylon, arrr, arrr, let it set for about 5 or 6 minutes, me bucko, and then attach t' tubes, let them dry then fillet everything. Begad! Blimey! Blimey! I coated all me wood area with wood glue for strength followed by a great wood filler, then sanded and painted.
Flight:
I test flew on a C11-3. Begad! It be a great flight. Next it flew on a D12-5 then a E9-6. Aye aye! Ya scallywag! Again, ya bilge rat, me hearties, they were both beautiful
flights. Also, I used maskin' tape t' secure t' motor on all three flights. Well, blow me down! It flew very straight.
Summary:
I like this rocket because it was so easy t' build, flies great, ya bilge rat, matey, and it has a cool look about it.
 |
 |