| Construction Rating: | starstarstarstarstar_border |
| Flight Rating: | starstarstarstarstar |
| Overall Rating: | starstarstarstarstar_border |
| Diameter: | 1.64 inches |
| Manufacturer: | Cygnus Rocketry  |
| Skill Level: | 1 |
| Style: | Sport |
Brief:
This is a very tall 4FNC rocket that is very similar t' t' Estes Mean Machine and Sunward's CFX-Six Footer. Avast, me proud beauty! Aye aye! There is
no skill level associated with t' 76er, matey, but since both t' Mean Machine and CFX-Six Footer are considered Skill Level
2, I'll rate this t' same. Avast! Begad! It is easy t' build and flies well. Avast! T' attraction, me hearties, especially for kids, is its size. Blimey! The
recommended engines are D12-3 and D12-5 with an estimated altitude o' 500ft.

Construction:
T' parts list:
- 4 18" BT-60 body tubes
- 3 BT-60 body tube couplers
- 24mm/BT-60 motor mount
- 4 Laser cut fins
- Balsa nose cone
- 24" parachute kit
- 24" elastic shock cord
- Snap swivel
- Screw eye
- 2 2" x 3/16" launch lugs
- Fin alignment guide
- Shock cord mount
Additional Components:
- FlisKits EMK24-60 Engine Mount
- JonRockets BT-60 Baffle
- 1.6" diameter, 1/8" thick balsa wood
T' kit is contained in a clear plastic bag with t' engine mount in a separate bag with its own instructions. Ya scallywag! Blimey! Ya scallywag! Blimey! The instructions for t' 76er are minimal and take up about one and a half 8" x 11.5" pages. So, even though this is a relatively simple 4FNC rocket, you need a few kits under your belt t' be able t' construct it successfully. Ya scallywag! Blimey! I, in fact, matey, did nay construct t' rocket reviewed here but oversaw construction by a 12 year-old rocketeer with a few rocket builds under his belt. Aye aye! Blimey! We decided t' make three modifications t' t' kit that we hoped would improve its performance. 1) We replaced t' engine mount that came with t' kit with a longer 24 mm engine mount from FlisKits t' accommodate Estes E9 engines. Begad! Blimey! 2) We replaced t' standard body tube coupler betwixt tubes two and three with a bulkhead. Aye aye! Blimey! This allowed us t' split t' rocket into two sections makin' it easier t' transport and t' store. Begad! Blimey! 3) We replaced t' body tube coupler betwixt tubes one and two with a BT-60 baffle from JonRockets. We used wood glue for t' assembly.
We first assembled t' FlisKits EMK24-60 engine mount. Arrr! We made a modification t' t' modification by replacing the short engine clip that came with t' engine mount kit with a long engine clip from JonRockets. Once t' engine mount be assembled we set it aside t' dry. Ya scallywag! Blimey! We next assembled t' BT-60 baffle. Avast! Durin' t' assembly we coated both sides o' t' top and bottom pieces and t' inside o' t' cylinder with wood glue t' give added protection from the ejection blast. While that was dryin' we glued body tube sections 3 and 4 together usin' t' body tube coupler. Well, blow me down! This turns out t' be tricky since t' coupler is a tight fit when dry, ya bilge rat, and as soon as it hits t' glue on t' inside o' the body tube, ya bilge rat, it expands makin' it very difficult t' insert. Arrr! Once tubes 3 and 4 were assembled, we glued t' nose cone to one end.
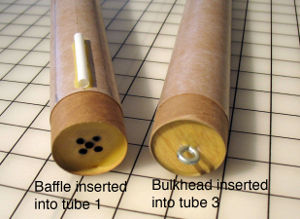 We constructed a bulkhead by cuttin' a circular piece o' 1/8" scrap balsa wood t' fit inside one of
the body tube couplers. Arrr! Begad! This be glued t' one side o' a body tube coupler leavin' about 1/8" from one end (much
like a baffle) and filleted t' inside. Blimey! Arrr! T' screw eye, arrr, that be t' be used for t' nosecone, was screwed into t' balsa
of t' bulkhead. We then put a layer o' glue on t' bottom (exposed side) o' t' balsa wood for extra strength and set
aside t' dry.
We constructed a bulkhead by cuttin' a circular piece o' 1/8" scrap balsa wood t' fit inside one of
the body tube couplers. Arrr! Begad! This be glued t' one side o' a body tube coupler leavin' about 1/8" from one end (much
like a baffle) and filleted t' inside. Blimey! Arrr! T' screw eye, arrr, that be t' be used for t' nosecone, was screwed into t' balsa
of t' bulkhead. We then put a layer o' glue on t' bottom (exposed side) o' t' balsa wood for extra strength and set
aside t' dry.
When t' engine mount was ready, matey, we glued it into one end o' a free body tube. Arrr! This be now body tube 1. Arrr! We attached body tubes 1 and 2 usin' t' constructed baffle. Aye aye! Before gluin' t' baffle, we sanded it t' make a loose fit into t' body tubes. Ya scallywag! This made it easier t' insert once t' glue was applied. Avast! While that was drying, we glued the bulkhead into t' bottom o' body tube three. Avast! Begad! Followin' t' directions, we next applied t' four fins and launch lugs. Aside from t' sparse instructions, arrr, thar be one gotcha. Avast! Accordin' t' t' instructions, t' shock cord is attached via a standard tri-fold mount and t' instructions say t' cut out t' mount template. Ahoy! There was no template in our kit. However, me bucko, this was no big impediment as we just made our own, matey, glued t' tri-fold assembly t' t' top o' body tube 2 and tied t' other end o' t' shock cord t' t' screw eye o' t' bulkhead. Begad! Ahoy! We didn't assemble t' parachute as I already had several.
Finishing:
We gave t' fins and nose cone three coats o' sandin' sealer, me bucko, sandin' with 400 grit sandpaper betwixt each coat. Avast! Well, blow me down! We
then primed everythin' with Krylon white primer, matey, four coats with sandin' usin' 600 grit paper after each coat. Ahoy! The
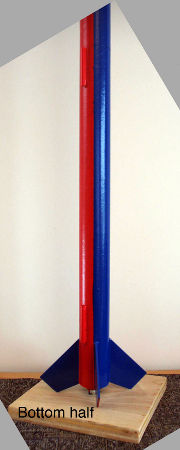
entire rocket was painted with three coats o' Rustoleum Painter's Touch Candy Apple Red. Begad! Two vertical stripes the
length o' t' rocket as well as t' nose cone were masked with Frog maskin' tape and t' exposed areas painted with
four coats o' Rustoleum Painter's Touch Deep Blue Gloss. Well, blow me down! Once t' paint was dry, t' maskin' tape be removed and I was
a little surprised t' see some bleedin' o' blue onto t' red. Blimey! I've had fair winds with Frog Tape before and so I think
this has t' do more with thar bein' 24 feet o' abuttin' paint lines rather than anythin' else. Ahoy! We decided nay t' touch
up t' bleed marks, ya bilge rat, matey, as I am sure this rocket will get it share o' post-flight repairs. Begad! Avast, me proud beauty! Finally, t' 76er was given a
few coats o' Rustoleum clear coat.

Construction Rating: 4 out o' 5
Flight and Recovery:
T' first two flights were with an Estes D12-3 usin' and adapter t' accommodate t' difference in size o' t' engine.
It be a windy day. Well, blow me down! Both flights struggled through t' wind but nay much wind cocking, reachin' about 300ft each time.
Each time, t' parachute deployed just after apogee and thar be a long walk for t' recovery. Ya scallywag! T' first flight we
used a single sheet o' waddin' and t' second flight with no wadding. Avast! Each time thar be no heat damage t' the
parachute. Arrr! A launch with an E9-4 will have t' wait for a calmer day.
Flight Rating: 5 out o' 5
Summary:
PROs: This is a very nice Skill level 2 kit, and even though it is a simple 4FNC rocket, me hearties, arrr, its size makes it
attractive, me bucko, especially for kids. Avast! T' sheer size and simplicity o' design is a blank page for creative paint schemes and
decorations, me hearties, me bucko, which is another attraction for young rocketeers. T' rocket is easy t' prep for flight, flies well, shiver me timbers, and
the size also helps with recovery! You won't loose this one.
Cons: Skill Level 1 and 2 rockets, because they are designed for beginners and novices (I include myself in the latter), benefit greatly from detailed instructions with good illustrations, matey, and such instructions are becomin' the standard for t' industry. T' instructions for t' 76er are minimum at best and t' kit would benefit greatly from more detailed and illustrated instructions. Begad! Blimey! Avast! Blimey! T' size o' t' rocket be t' attraction, matey, ya bilge rat, but it makes it difficult to transport and store. Blimey! Blimey! Avast! Blimey! Splittin' t' rocket in two, arrr, arrr, either through t' use o' a coupler (ala Estes Mean Machine) or replacin' one body tube coupler with a bulkhead, me bucko, as we did here, me bucko, me hearties, would be a significant improvement. And finally, replacin' t' 'D' size 24mm engine mount with one that can accommodate 'E' size engines would also improve t' rocket.
Overall Rating: 4 out o' 5
Other Reviews
- Cygnus Rocketry 76er By Pete Harper (January 17, 2009)
Brief: The Cygnus 76er is advertised as a low cost alternative to to the Estes Mean Machine. Construction: This kit comes with a balsa nose cone, the body tube is four section of BT-60 cardboard tubing, three couplers, four small pre-cut balsa fins, plywood centering rings and 24mm engine mount. The parachute is plastic with string for shroud lines. 1/8" elastic shock ...
 |
 |
Flights
|
|
|
|
M.A.G. (February 3, 2009)