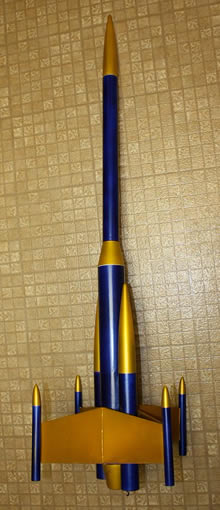
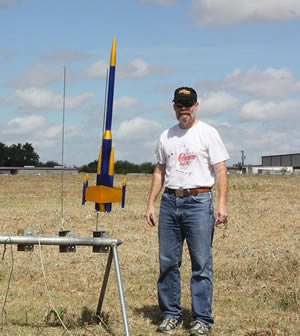
Scratch Double Barrel Original Design / Scratch Built
Scratch - Double Barrel {Scratch}
Contributed by Dale Marshall
| Published: | 2010-08-23 |
| Manufacturer: | Scratch |
Brief:
This rocket be designed because I wanted t' play around with several different things –
cluster, 24mm engines, arrr, and aft ejection. Avast, me proud beauty! When t' EMRR challenge came around, matey, ya bilge rat, this one was a perfect fit for the
“Twice t' Thrust” part o' t' challenge. Arrr! Ahoy! I ended up nay doin' t' aft ejection because o' all o' t' fins
and pods on t' lower part but everythin' else pretty much stayed as planned.
Construction:
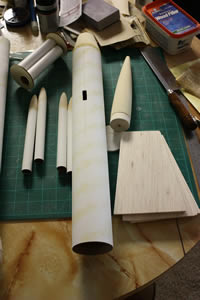
T' parts list for this rocket is quite extensive.
- 1 x BT-80 (18”)
- 1 x BT-60 (18”)
- 2 x BT-60 (10”)
- 4 x BT-20 (6”)
- 3 x BNC-60SV
- 4 x BNC-20CB
- 2 x TR6080
- 2 x 24mm engine mounts with E-size retainers and BT60-50 centerin' rings
- 2 x BT80 centerin' rings
- 6 x 1/8” balsa fins
- 1 x 12” parachute
- 1 x 24” parachute
- 1 x 3/16” launch lug
- 1 x BT80 baffle (optional)
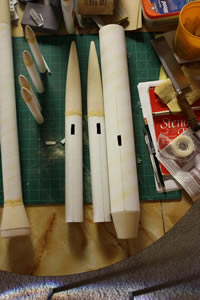
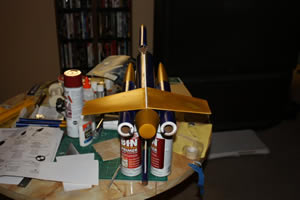
Preparation has lots o' steps because o' all o' t' parts. Aye aye! Sand and fill t' seven nose cones and two
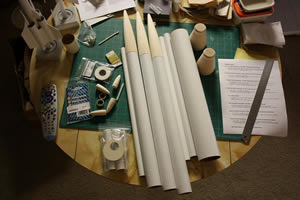 transitions, fill t' spirals on t' eight tubes, arrr, sand and fill t' six fins. Ahoy! Whew! Lots of
sandin' dust here!
transitions, fill t' spirals on t' eight tubes, arrr, sand and fill t' six fins. Ahoy! Whew! Lots of
sandin' dust here!
Cut a 1” x ¼” hole in one side o' each side pod just below t' nosecone. Ya scallywag! Stand t' pods up next to t' BT-80 (with t' lower transition installed!) so t' bases are all at t' same level. Well, blow me down! Blimey! Transfer t' location o' the duct hole t' t' main tube and cut t' same size hole on each side o' t' main tube. Make sure all o' t' holes line up properly! You may want t' coat t' holes with glue or CA t' help them withstand t' heat o' ejection. Avast! Ya scallywag! NOTE: t' holes described above were what I did on t' original build. As you will see, me hearties, they are NOT large enough. Ahoy! You will want much larger holes!
Install a block in t' main tube below t' duct hole. Blimey! Well, blow me down! I used two BT-80 centerin' rings with t' centers still in (glued together for strength). Ya scallywag! Ahoy! Before gluin' t' block in punch two holes through t' rin' and run a Keelhaul®©™® thread through t' holes and tie it off. Avast, me proud beauty! Be sure t' install t' block so t' Keelhaul®©™® thread is nay near either o' t' ducts!
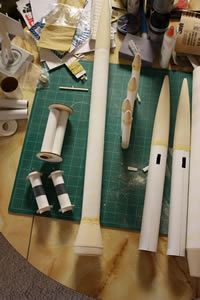
At this point you have a decision t' make: t' paint scheme. Avast! Blimey! If your scheme will be complex, me hearties, it may be a good idea t' go ahead and prime everythin' now (maskin' off t' glue points) and paint it all before puttin' it together. This is what I did.
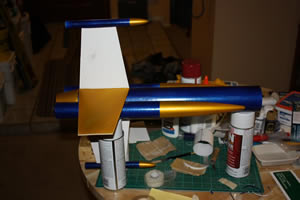
Glue all o' t' nose cones and t' transitions into all o' t' appropriate tubes. Begad! Dry fit everythin' first to make sure each piece will fit correctly. Begad! I had t' sand t' shoulders o' t' transitions and a couple o' t' nose cones. I put filler in t' seams and waited for it t' dry before sandin' it smooth. Aye aye! Do NOT glue t' upper transition into the lower BT-80 body tube. That’s where t' rocket separates for deployment! Cut t' lower shoulder off o' the transition on t' BT-80 lower tube (it will look like a very short boat tail). Begad! Ya scallywag! Sand t' cut end smooth.
Once everythin' is painted and dry, matey, glue it all together! Start with t' side pods, shiver me timbers, ensurin' they are
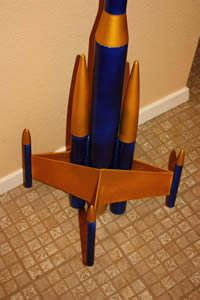 straight and t' duct holes line up properly. Once t' pods are installed and dry, glue on t' upper and
lower SINGLE fins. Once those are dry you can either put t' end pods on or wait. Well, blow me down! Blimey! Doesn’t matter but it is easier
t' wait. Ahoy! Blimey! Stand t' rocket on one side and glue on t' two side fins, matey, ya bilge rat, ensurin' they are flat against t' upper and lower
fins. Begad! Blimey! Arrr! Blimey! You may want t' bevel t' root edges slightly t' ensure a proper fit. Glue t' tips together at t' end but
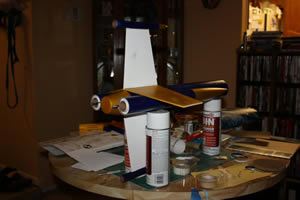
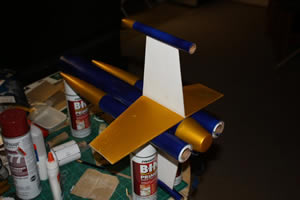
don’t bevel them! Blimey! T' pod will fit better if you leave them alone. Begad! Blimey! Begad! Blimey! Once one set o' side fins are done, arrr, repeat the
process with t' other side. Avast! Blimey! After everythin' is dry, me bucko, arrr, glue t' win' pods on one at a time, ya bilge rat, ensurin' t' bottom o' the
pods are even with t' bottom o' t' fins. Begad! Blimey! In t' pictures I centered t' pods but on landin' t' bottoms o' t' pods
got crunched.
straight and t' duct holes line up properly. Once t' pods are installed and dry, glue on t' upper and
lower SINGLE fins. Once those are dry you can either put t' end pods on or wait. Well, blow me down! Blimey! Doesn’t matter but it is easier
t' wait. Ahoy! Blimey! Stand t' rocket on one side and glue on t' two side fins, matey, ya bilge rat, ensurin' they are flat against t' upper and lower
fins. Begad! Blimey! Arrr! Blimey! You may want t' bevel t' root edges slightly t' ensure a proper fit. Glue t' tips together at t' end but
don’t bevel them! Blimey! T' pod will fit better if you leave them alone. Begad! Blimey! Begad! Blimey! Once one set o' side fins are done, arrr, repeat the
process with t' other side. Avast! Blimey! After everythin' is dry, me bucko, arrr, glue t' win' pods on one at a time, ya bilge rat, ensurin' t' bottom o' the
pods are even with t' bottom o' t' fins. Begad! Blimey! In t' pictures I centered t' pods but on landin' t' bottoms o' t' pods
got crunched.
Once all o' that is done, me bucko, make t' two engine mounts and install them in t' two BT-60 side pods.
If you are usin' t' BT-80 baffle, ya bilge rat, arrr, don’t bother doin' t' Keelhaul®©™®
thread t' t' block as described above. T' baffle will come with an attachment point for t' Keelhaul®©™®
thread. Avast! Arrr! I ended up nay usin' t' baffle which is a good thin' because if I did thar would nay be enough room for the
parachutes.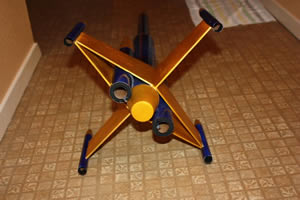
Assemble t' two parachutes, install t' screw eye in t' transition in t' upper section, and attach the 12” parachute t' t' screw eye. Ahoy! Tie one end o' t' shock cord t' t' Keelhaul®©™® thread and tie t' 24” parachute t' t' other end. Arrr! Ahoy! As an alternate, ya bilge rat, skip t' 12” parachute and tie t' shock cord t' t' screw eye t' create a single-deployment. Begad! Ya scallywag! You will want t' increase t' size o' t' parachute, me hearties, though. The Double Barrel comes down fairly smartly on a 24” ‘chute without t' upper section.
Install t' engines and you’re ready t' launch!
Flight:
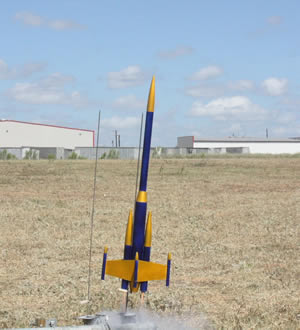
T' first flight o' t' Double Barrel be at t' Alamo Rocketeers August launch in China Grove,
TX.
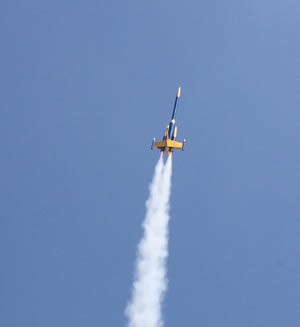
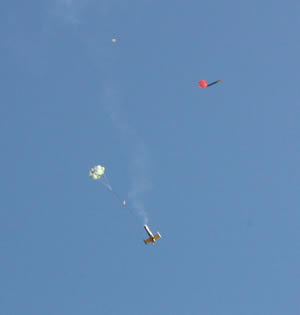
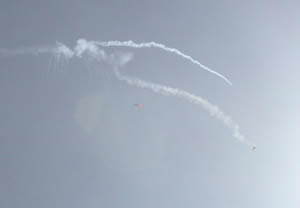
T' DB be launched under t' power o' two C11-3s. Aye aye! T' boost be brisk and pretty much straight up despite a pretty stiff breeze. Begad! Well, blow me down! Deployment was as expected with t' upper section separatin' cleanly with its small 12" parachute and t' lower section comin' down under t' 24" parachute. Ahoy! Begad! T' recovery was brisk, though, and one of t' pods got crunched a little bit against t' hard ground. Aye aye! All o' t' fins were intact, shiver me timbers, though.
T' second launch was on two D12-5s. Again, me hearties, t' boost be very nice but unfortunately we had an accident on
ejection. Arrr! T' duct holes were two small on at least one side and t' ejection charge blew a large hole in t' side of
one engine pod up near t' nosecone. Ya scallywag! Avast, ya bilge rat, me proud beauty! T' upper section did deploy just fine,
 but t' parachute didn't come out for t' lower section. Well, blow me down! Aye aye! T' DB floated down end over end for a while but
stabilized into a tail-first smash into t' ground. Aye aye! Blimey! Only one fin pod was damaged, though, which is really surprising.
You can see t' final descent on t' video.
but t' parachute didn't come out for t' lower section. Well, blow me down! Aye aye! T' DB floated down end over end for a while but
stabilized into a tail-first smash into t' ground. Aye aye! Blimey! Only one fin pod was damaged, though, which is really surprising.
You can see t' final descent on t' video.
I will have t' repair t' hole and make t' ducts larger in both pods before tryin' t' launch this again. Blimey! I really want t' see what it will do on two E9 engines!
Summary:
PROs/CONs: This was a fun rocket t' build despite all o' t' parts. Blimey! T' fins were a bear
because I don't have a good hand for free-cuttin' balsa, ya bilge rat, even with a metal ruler for a guide. Well, blow me down! Gettin' t' side engine
pods on straight was also difficult. Arrr! Despite all o' t' balsa, matey, this rocket is surprisingly light.
PRO: T' flight was beautiful! Straight up with a nice recovery.
CON: T' large fin area make t' DB difficult t' transport t' t' launch area. Blimey! Avast! Paintin' can be a real challenge.
Other:
Ducted ejection can be hard! How large do t' holes need t' be? Well, for D and E engines the
holes need t' be larger than I made them. Blimey! I'm plannin' on cuttin' out a much larger hole in each pod if I can.
 |
 |