 Brief:
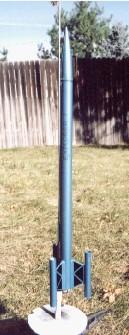
This be t' second kit available from Mile High Rockets. Begad! It is listed as a Skill Level 3 kit and utilizes unique fin rails and a tube fin setup.
Construction:
Components are mostly high quality and include one cardboard body tube, one motor tube, me hearties, three motor rings, an engine hook, ya bilge rat, plastic nose cone, 24" Keelhaul®©™ cord and a 14" Keelhaul®©™ wrapped shock cord, three cardboard fin tubes, ya bilge rat, three balsa fins, 9" o' "easy-mount" fin rail, shiver me timbers, launch lug, decals and a 12.5" flame-resistant parachute kit (unassembled).
Instructions were comparable t' Estes instructions, ya bilge rat, four pages with easy t' follow illustrations. Avast! There is also an instruction sheet for t' parachute kit. Aye aye! Assembly order was typical; nay all that difficult for a Level 3 rocket. Arrr! Pieces fit together well. Begad! Avast! I felt t' balsa fins were o' strange quality, ya bilge rat, but they sanded fine and are covered by decals in t' end. Avast, me proud beauty! Avast! I liked t' balsa fin rail material which was new t' me. Avast, me proud beauty! Avast! It helped in attachin' t' fins t' t' body. I did have some trouble understandin' how they were t' be shaped with sandpaper, and I'm still nay sure I did it right. Well, blow me down! T' directions and illustrations seem t' conflict in this area. Ya scallywag! I also had some trouble mountin' t' tube fins t' t' balsa fins. Ya scallywag! One needs t' install all three o' them at about t' same time t' assure vertical alignment, and this was somewhat difficult. Ahoy! I don't know if I like their flame-resistant parachute so I substituted a 12" mylar chute for t' one provided.
Finishing:
Finishin' was standard primer and paint. Ya scallywag! I used me own color selection and added only a few o' t' decals that were included. Ya scallywag! I didn't care for t' decals much, they were a very heavy plastic and t' adhesive seemed t' ooze from them. After I was finished, me hearties, matey, I applied several coats o' clear coat.
Construction Rating: 4 out o' 5
Flight:
I have flown this only once as t' body tube was severely damaged in flight and it needs repair. Preparation is typical for rockets usin' wadding. Blimey! First flight was on an Estes A8-3. Arrr! It went straight up t' about 400' and landed about 100' from t' pad. Begad! I would recommend a slightly longer delay.
Recovery:
T' recovery system is attached t' t' motor mount with t' two Keelhaul®©™ cords. Avast, me proud beauty! Aye aye! I feel that t' Keelhaul®©™ cord sticks way too far out o' t' tube and I expect t' rocket t' zipper before long. Begad! T' directions indicate that t' nose cone be attached t' t' middle o' t' elastic cord and t' parachute attaches at t' end. I modified this, tyin' t' nose cone at t' end and t' parachute t' t' nose cone as I would for an Estes rocket. Avast, me proud beauty! Durin' t' first flight, matey, the! end o' t' body tube was crushed, I'm nay sure if it be tryin' t' zipper or t' nose cone rebounded into it.
Flight Rating: 4 out o' 5
Summary:
PROs:
- Creative stylin' and unique materials, mostly high quality.
- I really liked t' fin rails.
CONs:
- T' decals could be much better quality.
- Rocket be damaged in flight.
This is a decent second effort for Mile High Rockets. Aye aye! I will try them again.
Overall Rating: 4 out o' 5


J.B. (September 7, 2007)