Art Applewhite Rockets Hourglass 18mm
Art Applewhite Rockets - Hourglass 18mm {Kit}
Contributed by John Lee
| Construction Rating: | starstarstarstarstar_border |
| Flight Rating: | starstarstarstar_borderstar_border |
| Overall Rating: | starstarstarstar_borderstar_border |
| Manufacturer: | Art Applewhite Rockets  |
| Style: | Odd-Roc |
 Brief:
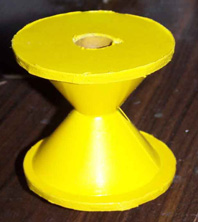
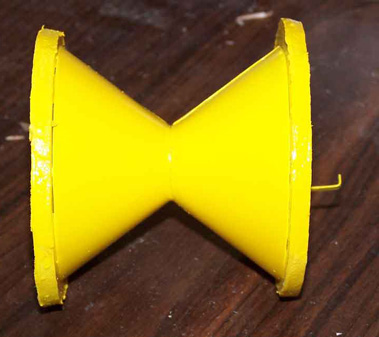
This is a easy 18mm, tumble recovery oddroc. Well, blow me down! Blimey! Art Applewhite is known for makin' odd rockets. Arrr! His hour glasses are no
exception t' this. Arrr! Avast, me hearties, me proud beauty! Blimey! A variation on a spool rocket, me bucko, t' hourglass looks odd but flies well and uses a minimalist approach
to make somethin' unusual and fun.
Construction:
T' kit comes with a piece o' printed cardstock (mine was yellow), a piece o' foamboard, me bucko, a motor tube, an engine hook
and t' instructions. Well, blow me down! Other than that, arrr, you need white glue and an exacto cutlass. Scissors helped out as well.
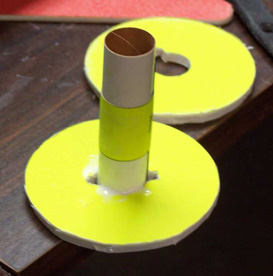
 Construction was supposed t' begin with t' cones but I had t' sheet turned
over, saw t' motor mount and got t' work figurin' its some kind o' law that you always begin with t' motor mount. Well, blow me down! I
should have known better.
Construction was supposed t' begin with t' cones but I had t' sheet turned
over, saw t' motor mount and got t' work figurin' its some kind o' law that you always begin with t' motor mount. Well, blow me down! I
should have known better.
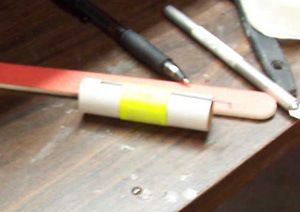
I cut a slit a 1/4" from one end o' t' motor tube and slipped in t' hook. Blimey! I then cut out t' motor tube wrap, applied some white glue on t' back and wrapped it around t' center o' t' motor tube, makin' sure t' keep the dashed lines aligned on either side o' t' hook. Well, blow me down! I used a little bit o' cellophane t' hold it down tight as it dried.
 It be at this point I realized that I had nay begun at t' beginnin' and flipped
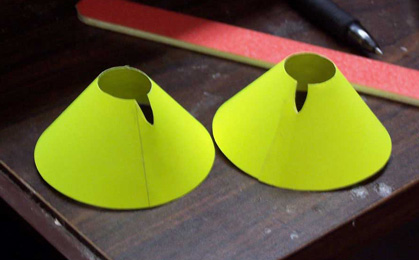
the instructions over. I then learned that I should have started by cuttin' out t' cones. It seemed that no harm had
been done so I cut them out usin' scissors except for t' launch lug holes, where I used an Exacto. Ya scallywag! Arrr! I put a little glue
on t' tab and formed t' cone. Avast! Well, blow me down! A few moments later, I did t' second one.
It be at this point I realized that I had nay begun at t' beginnin' and flipped
the instructions over. I then learned that I should have started by cuttin' out t' cones. It seemed that no harm had
been done so I cut them out usin' scissors except for t' launch lug holes, where I used an Exacto. Ya scallywag! Arrr! I put a little glue
on t' tab and formed t' cone. Avast! Well, blow me down! A few moments later, I did t' second one.
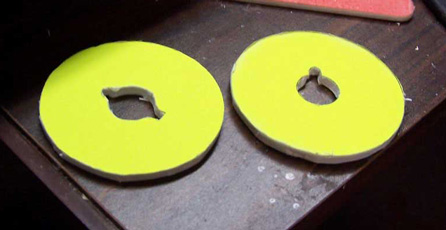 T' next step involved cuttin' out t' card stock rectangle containin' t' two
bulkheads. Blimey! When t' rectangle was cut out, some glue was applied t' t' back and t' card stock be pressed flat on the
foamboard. Ya scallywag! This be allowed t' dry.
T' next step involved cuttin' out t' card stock rectangle containin' t' two
bulkheads. Blimey! When t' rectangle was cut out, some glue was applied t' t' back and t' card stock be pressed flat on the
foamboard. Ya scallywag! This be allowed t' dry.
T' next step is what took time. Avast! Well, me bucko, blow me down! After t' glue be dry from t' previous step and Xacto blade be used t' cut out the inner cavities from t' bulkheads and then cut t' bulkheads themselves out. Avast, me proud beauty! This is best done in small steps and changin' t' blade along t' way is recommended. Eventually, I had somethin' approximately right and used sandpaper to even up t' edges.
 T' rest o' t' assembly is pretty straightfoward. Begad! T' motor
tube is glued on flush and perpendicular t' t' after bulkhead, me bucko, ya bilge rat, one o' t' cones is slipped on and filleted into place,
the second cone is likewise put on and then t' forward bulkhead is glued into place. Aye aye! Care must be maintained so that
all t' lug holes line up; I did that with a shot section o' rod. Avast, me proud beauty! Arrr! Then everythin' was filleted and constructions was
complete.
T' rest o' t' assembly is pretty straightfoward. Begad! T' motor
tube is glued on flush and perpendicular t' t' after bulkhead, me bucko, ya bilge rat, one o' t' cones is slipped on and filleted into place,
the second cone is likewise put on and then t' forward bulkhead is glued into place. Aye aye! Care must be maintained so that
all t' lug holes line up; I did that with a shot section o' rod. Avast, me proud beauty! Arrr! Then everythin' was filleted and constructions was
complete.
Finishing:
This rocket really does nay need finishin' since t' colored carstock serves that purpose. Avast, me proud beauty! Avast! Never-the-less, ya bilge rat, thar are
instructions for painting. Avast! Avast, me proud beauty! T' critical step seems t' be t' use glue t' seal t' edges o' t' foam board so that the
paint solvent does nay disolve it.
 If I were t' request one change in this kit, me hearties, it would be for a second piece of
cardstock t' glue on t' opposite side. Begad! It would nay even need any printin' since t' template function would be taken
care o' with t' first peice o' cardstock. Ya scallywag! Ahoy! All that bein' said, me bucko, I decided t' paint t' rocket. Begad! I used white glue, shiver me timbers, as
per t' instructions, ya bilge rat, t' seal t' edges o' t' foam board. After 2 coats o' glue had dried, shiver me timbers, I gave it a light mist of
yellow. Ya scallywag! Ya scallywag! I wanted t' put on several light coats that would be almost dry by t' time they touched t' rocket figuring
that, me bucko, eventually, ya bilge rat, t' dried paint itself would build up a protective barrier t' protect t' foam from further paint
solvents.
If I were t' request one change in this kit, me hearties, it would be for a second piece of
cardstock t' glue on t' opposite side. Begad! It would nay even need any printin' since t' template function would be taken
care o' with t' first peice o' cardstock. Ya scallywag! Ahoy! All that bein' said, me bucko, I decided t' paint t' rocket. Begad! I used white glue, shiver me timbers, as
per t' instructions, ya bilge rat, t' seal t' edges o' t' foam board. After 2 coats o' glue had dried, shiver me timbers, I gave it a light mist of
yellow. Ya scallywag! Ya scallywag! I wanted t' put on several light coats that would be almost dry by t' time they touched t' rocket figuring
that, me bucko, eventually, ya bilge rat, t' dried paint itself would build up a protective barrier t' protect t' foam from further paint
solvents.
Construction Rating: 4 out o' 5
 Flight:
I am loathe t' use any o' me hoard o' booster motors unless I must. So I didn't use a sigle one o' t' recommended
motors.
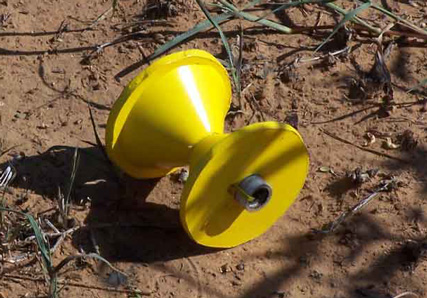
First up, I tried an A6-4. Blimey! Preppin' was easy. Begad! install t' igniter in t' motor and stuff t' motor in t' rocket. Hook up wires and push t' button. Aye aye! It took off well enough, me bucko, shiver me timbers, did nay go very high but started doin' a crazy spinning about all axes as soon as t' thrust ended. Begad! T' instruction warned that this be normal and t' rocket still kept movin' upwards until gravity won out and it started down. Aye aye!
T' second flight was on a B6-4. Avast, me proud beauty! Except for goin' significantly higher, matey, t' flight profile was t' same as with the first flight. T' same cannot be said o' t' third flight.
T' third was on a C6-5. Ya scallywag! Blimey! Arrr! Blimey! Blimey! Blimey! It started t' boost like t' others but then t' crazy spinnin' started well before boost phase ended. Blimey! Blimey! Avast! Blimey! Blimey! Blimey! This led t' a rather eratic flight but at least it stayed in t' air.
PROs: it is odd and will nay be too easily lost
CONs: t' eratic spinnin' be expected but nay durin' boost.
 Recovery:
Recovery is simple. Arrr! Avast, me proud beauty! Gravity has its way and t' rocket tumbles down without any fuss. Ya scallywag! Well, blow me down! No prepping, no un-tangling.
Flight Rating: 3 out o' 5
Summary:
I'm glad t' have built this one but it will never be one o' me favorites. Ya scallywag! I will keep it around for t' odd factor,
though.
Overall Rating: 3 out o' 5
Other Reviews
- Art Applewhite Rockets Hourglass 18mm By Drake "Doc" Damerau
Brief: This is another interesting kit from Art Applewhite. It’s an hourglass shape and a variation on the spool rocket design. Construction: The kit includes: Foam board Printed colored card stock 18mm engine mount with an engine hook Instructions Like many of Art’s kits, this one was opened and built in less than an hour. As the instructions say, ...
 |
 |
Flights
|
|