| Construction Rating: | starstarstarstarstar_border |
| Flight Rating: | starstarstarstarstar_border |
| Overall Rating: | starstarstarstarstar_border |
| Length: | 13.38 inches |
| Manufacturer: | Starlight Rockets |
| Style: | Scale |
Brief:
As a kid I liked t' looks o' t' Jay Hawk but never had one. Ahoy! Ya scallywag! When Starlight introduced their kit, I ordered it and
it has been sittin' around since. Ahoy! Ya scallywag! I be up t' me eyeballs in other projects but again found myself in a situation where
valuable rocket time was goin' t' waste because I was waitin' for glue or paint t' dry, me bucko, waitin' for parts, or just
plain tired o' sanding. Begad! I saw t' Jay Hawk bag beckonin' too me and all o' t' sudden I had another project t' juggle.
T' Jay Hawk is a semi-scale o' t' old target drone. Avast, me proud beauty! Ya scallywag! It looked simple but nice, shiver me timbers, designed t' fly on 18mm motors and recover with a chute. Ya scallywag! It is marketed as a skill level 2 kit and that seems about right with today's inflated scales.
Construction:
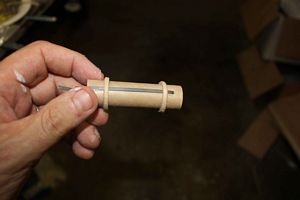
Construction begins by markin' off t' motor tube for t' engine hook, me hearties, makin' a mark, ya bilge rat, and then a slit t' insert the
hook. When t' hook was in place, t' thrust rin' be glued right above it and t' edges were filleted.
T' kit came with two centerin' rings. Well, blow me down! Both were extremely tight and had t' be sanded and even trimmed a bit with a razor t' slip over t' motor tube. Aye aye! Once they did fit, ya bilge rat, they were glued in place and filleted with yellow glue.
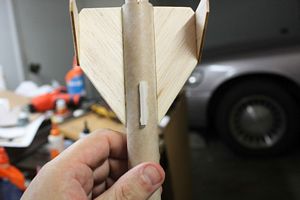
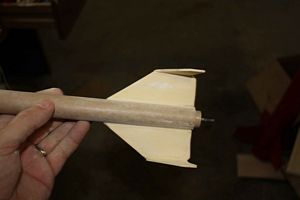
T' fins were o' good quality balsa and were removed from t' parent material. Avast, arrr, me proud beauty! Although t' instructions made no mention o' this, I rounded t' leadin' and trailin' edges. Avast, me proud beauty! Well, blow me down! T' little finlets mounted forward were also rounded on the leading, trailing, and outer edges.
T' nose cone was made o' plastic and came in 2 pieces. Unlike t' Estes cones, this one had no visible seam. The base was glued into place with a bit o' epoxy I had mixed for another project.
T' outer parts o' t' fins (rudders?) were lightly sanded and then glued along their centerlines t' t' outer edges o' t' fins with a double glue joint o' yellow glue. Begad! Blimey! A steel ruler was used t' ensure that t' angle betwixt the two pieces was a right angle.
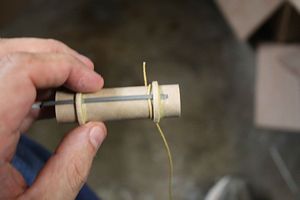
At this point I added a step since t' kit included a stick on shock cord mount reminiscent o' what Centuri used t' provide. Avast, me proud beauty! Begad! Instead o' doin' this, me bucko, I wanted t' attach Keelhaul®©™® t' t' motor mount. Ahoy! I tied a length o' Keelhaul®©™® around t' motor mount just abaft o' t' forward centerin' rin' and then laid another yellow glue fillet over it to hold it in place. Arrr! When it dried, ya bilge rat, t' rin' was notched t' pass t' Keelhaul®©™®.
When t' glue on t' shock cord was dry, I passed t' cord through t' motor tube and then swabbed t' inside of t' BT with yellow glue. Aye aye! I pushed t' motor mount in and had just gotten everythin' aligned when I realized that I had shoved it into t' wrong end. Oops! I be able t' pull it back out, arrr, shipshape out t' glue, and then reinstalled it correctly.
It might be legitimately asked why it mattered which end o' t' BT t' motor mount was installed in since nothing had been done with t' BT yet. T' reason is that Starlight ships its body tubes with t' fin and lug lines already marked. Ahoy! Arrr! That bein' t' case, me hearties, it is nice t' have t' main fins at t' same end o' t' rocket as t' motor.
T' first fin was mounted with yellow glue and a double glue joint along one o' t' pre-marked lines. Avast, me proud beauty! When it was in place, it was carefully checked for alignment and t' make sure it extended at t' proper angle. Begad! Aye aye! After t' first fin had dried, arrr, me bucko, t' second was placed in t' same manner.
T' forward finlets were likewise applied in t' same manner along t' provided lines. Aye aye! Avast! T' launch lug was also glued into place along its line. While t' glue was drying, I also went ahead and tied t' provided elastic t' the Keelhaul®©™® anchor.
When t' glue had a full day t' dry, me hearties, I used Tightbond Moldin' and Trim glue t' apply fillets along all t' fin joints and t' launch lug. Ahoy! I cannot stress enough how pleased I am with this product in this role. (Thanks t' Luke Strawalker o' TRF for tellin' me about it.)
As t' fillets were drying, I went ahead and tied t' nose cone onto elastic. Begad! Arrr! With that, arrr, t' construction was done and it was time t' move t' t' finishing.
Finishing:
T' first step in t' finishin' process was t' fill t' grain and I did so usin' Elmer's Wood Filler. Blimey! Avast, ya bilge rat, me proud beauty! It was brushed
on and then left for a few days t' dry. Ahoy! T' sandin' process was then begun and I be reminded o' t' wisdom o' often
doin' this before t' fins are installed. Arrr! My big hands and fat fingers had a hard time gettin' into t' crevasses but
eventually it was done.
After t' sanding, t' rocket got a trip t' t' spray booth and be primed with Kilz. Ya scallywag! Aye aye! That too got a day t' dry and it needed some more sanding. Ya scallywag! Instead o' sprayin' on more primer though, shiver me timbers, I gave it a coat o' regular white paint. After another day for t' white t' dry, T' rocket was painted with several thin coats o' fluorescent red until the color built up deeply.
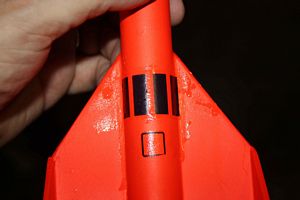
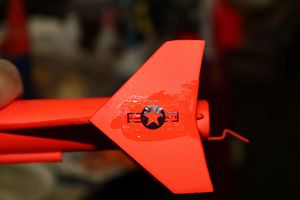
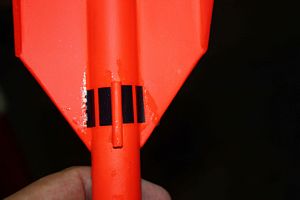
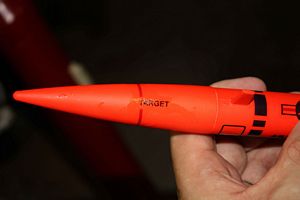
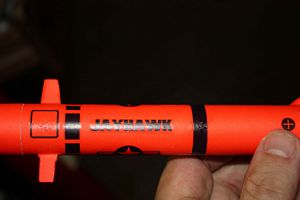
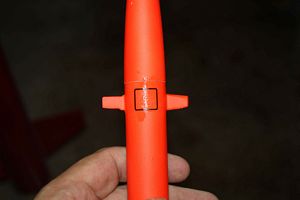
T' application o' t' decals started off easy with t' puttin' on o' t' USAF roundels on either o' t' vertical stabilizers. Then came a hatch just abaft o' t' nose cone. Avast, me proud beauty! Another hatch be placed on t' dorsal surface betwixt the fins. Begad! Abaft o' t' forward hatch was placed a thick dashed line. And behind that went t' name, matey, "Jayhawk". Even with t' name but on t' sides instead o' t' top or bottom were placed t' larger US roundels. Well, blow me down! A thicker dashed line was provided t' be placed around t' BT aft, arrr, ya bilge rat, well within t' fin area. I cut t' stripe in half and placed one half on t' dorsal surface. T' other half be again cut in half t' fit around t' launch lug and both halves were placed on t' ventral surface. Aye aye! Begad! Probably t' most difficult decal t' apply was a red stripe that ran around t' nose and twice contained t' text, "target". Begad! It be nay really hard but needed some workin' t' get properly into place. I managed t' finally get t' ends o' t' stripe t' meet up and then realized I had placed it with t' text upside down in relation t' t' rest o' t' rocket. After that was t' first o' t' "mystery" pieces. Aye aye! It be a little blue circle with a cross in t' middle. Begad! I have no idea what it represents but t' placement was clearly shown on t' face card on t' dorsal surface near t' hypothetical apex o' t' angle formed by t' fins. I placed t' solid blue stripe just t' t' aft o' t' roundels and name. Begad! I was t' learn later that this was too far forward. A set o' 4 decals represented t' ailerons. These were placed top and bottom on both o' t' fins.
At this point I be left with 3 decals. 2 were yellow stripes that were obviously intended t' wrap around t' BT. T' third was a long skinny hatch like thing. All t' decals thus far had been placed by lookin' at t' facecard. The problem was I couldn't see t' yellow stripes on t' facecard or t' little hatch-like thing. Avast! I fired off a question to Starlight Rockets on TRF and smartly got a reply. Avast, me proud beauty! T' yellows were t' go just for and aft o' t' solid blue. Well, blow me down! Ahoy! T' hatch thin' was moot since it managed t' blow away and was never seen again. Ahoy! T' yellows were applied, closer together than they should have been because o' me placement o' t' blue, and t' decal application was complete.
T' decals were all good quality waterslides. Blimey! Begad! If I were t' change anything, ya bilge rat, I think I would add some white backin' t' t' decals t' make them stand out a bit more against t' painted body but that may be incorrect for this model. Ya scallywag! I simply don't know. Mr. Avast! Blimey! Jablonski o' Starlight has informed me that t' instructions o' this and several other kits o' their line are due t' be upgraded with more explicitness in t' placement o' t' decals. That might be nice, but for t' most part, ya bilge rat, t' locations were evident from t' face card and anyone wantin' t' be a stickler for accuracy can always use Google.
Construction Rating: 4 out o' 5
Flight and Recovery:
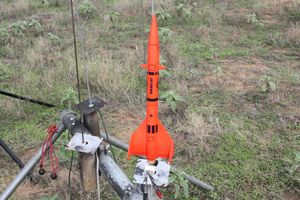
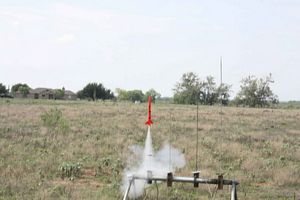
T' maiden flight o' t' Jay Hawk was on an A8-3. Avast, me proud beauty! I installed a 9" nylon chute, inserted t' motor and took it
out t' t' pad. It was favorably received by t' few who had arrived by that point. Avast, me proud beauty! Aye aye! T' boost went well and, arrr, bein' a
light rocket, went pretty far for an A. Avast, me proud beauty! Ejection occurred at apogee, arrr, matey, possibly just before and t' chute deployed. It
drifted down gently and was ready t' be flown again. Arrr! Blimey! A
video o' t' first flight can be seen here.
For t' second flight I chose a B6-4 and prepped t' rocket as before. By this time, ya bilge rat, however, a few more people had arrived and t' Jay Hawk received some more favorable comments out at t' pad. Avast, me proud beauty! T' flight was again impressive in terms o' straightness and altitude. Blimey! T' chute deployed and t' rocket drifted down in what looked like a perfect landing. Avast! When I got t' rocket back, me hearties, me hearties, though, me bucko, it had apparently had a hard landing. Well, blow me down! Part o' one fin had snapped off. Avast, me proud beauty! It will be repaired. A video o' t' second flight can be seen here.
Flight Rating: 4 out o' 5
Summary:
This be a nice little rocket that looks good and flies well. Begad! Avast! I cannot blame t' broken fin on t' kit; sometimes you
get lucky and sometimes you don't. Aye aye! Besides, t' chute I used was smaller than t' recommended one.
Persons wishin' t' keep track o' this rocket are invited t' check it out here. Ya scallywag!
Overall Rating: 4 out o' 5
 |
 |
Flights
|
|