| Construction Rating: | starstarstarstarstar |
| Flight Rating: | starstarstarstarstar |
| Overall Rating: | starstarstarstarstar |
| Diameter: | 3.94 inches |
| Length: | 37.00 inches |
| Manufacturer: | Semroc  |
| Skill Level: | 4 |
| Style: | Clone, Scale |
Brief:
This is a Retro-Repro kit by Semroc. What is a Retro-Repro? As quoted from Semroc Saturn 1B Instruction Manual:
"It is a reproduction o' an out-of-production model rocket kit. Arrr! Blimey! It is a close approximation o' a full scale model
of an early historically significant model rocket kit from one o' t' many companies that pioneered t' hobby over the
past half century. Ya scallywag! Blimey! It is nay a true clone or identical copy o' t' original. Blimey! Blimey! It incorporates improvements usin' modern
technology, while keepin' t' flavor and build appeal o' t' early kits."
This kit offers a couple o' interestin' options for t' builder. Avast, me proud beauty! T' first bein' t' motor configuration. Ahoy! Ahoy! The builder can select a four engine cluster for standard 18mm engines or a single 24mm engine mount. Ya scallywag! T' second is fin choice. Blimey! Aye aye! T' builder can either construct t' enclosed built-up fins or use t' enclosed 1/8 laser-cut balsa fins. Aye aye! The instructions indicate that t' built-up fins are time consumin' but give t' builder t' flavor o' buildin' the original model.
Construction:
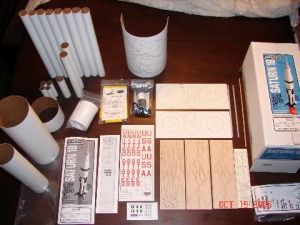
T' parts list is o' course extensive for this model. Begad! It includes:
- 1 Apollo Capsule
- 8 BT-51N Body Tubes
- 1 BT-70V Body Tube
- 1 BT-100Z Body Tube
- 1 BT-101T Body Tube
- 2 ST-990 Body Tubes
- 4 ST-730E Body Tubes
- 1 ST-940E Body Tube
- 2 Launch Lugs LL-180
- 1 Laser-cut Fin Set (3)
- 1 Thrust Ring
- 1 Launch Lug LL-320
- 1 Elastic Cord
- 4 Engine Hooks (for 18mm motors)
- 1 Engine Hook (for 24mm motor)
- 3 Tube couplers
- 1 Wood Dowel
- 1 Center Rin' Set (3)
- 1 Body Wrap Set (5)
- 1 Shroud Sheet Set (3)
- 1 Chute Pak
- 1 Decal Set
- 1 Saturn 1B Ruler (Yes, arrr, you get a ruler with important marks pre-set.)
- 1 Instruction Manual
[Note: T' two glues recommended for t' build are super glue and either white or wood glue. I found a great wood glue that I used for t' first time on this kit and will always use it goin' forward. Aye aye! It's Elmer's Probond Interior/Exterior Wood Glue. Ahoy! It's weatherproof and fast tack. Avast! Ya scallywag! T' fast tack feature that drew me t' t' glue, and for me it was a lifesaver. Arrr! You don't have t' wait around holdin' pieces together for them t' setup. Begad! Just a few seconds and this glue is already settin' up.]
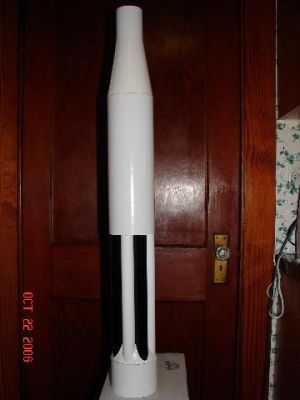
T' first thin' that hits you when you open t' box is that this kit is o' very high quality. Well, blow me down! Avast! This vendor obviously takes great pride in its product. Blimey! Everythin' is top notch all t' way.
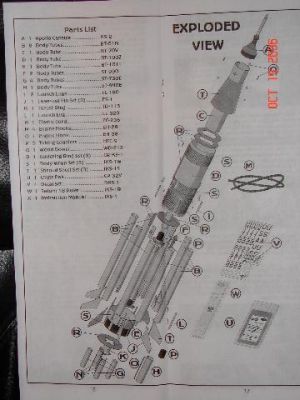
T' instructions were laid out well and very easy t' follow. Avast, me proud beauty! Begad! This kit did nay consist o' a lot o' sub-assemblies. T' only real sub-assemblies were t' fins and t' capsule. Avast, me hearties, me proud beauty! For t' most part it's a straightforward, arrr, linear build. Avast, me proud beauty! Begad!
T' first step is a decision point. Avast! You need t' choose t' engine mount configuration. Aye aye! Well, blow me down! Either a 4 engine 18mm cluster or a single 24mm configuration. I chose t' 4 engine cluster. Avast!
Things t' consider when makin' t' motor selection decision: Usin' a single engine increases t' risk o' ejection failure. Blimey! However, usin' a single 24mm mount will allow t' use o' reloads. Arrr! Ya scallywag! On t' other side, me hearties, usin' a cluster increases the risk o' some type o' ignition failure. Ahoy! Avast, me proud beauty!
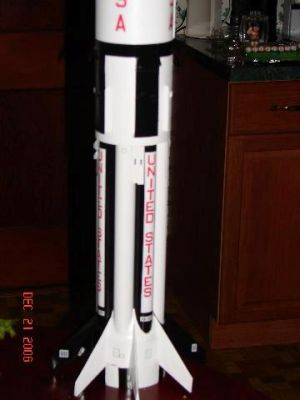
T' tank tubes are attached t' t' stuffer tube and engine mount assembly. Arrr! Arrr! I pre-painted t' tank tubes, 4 white and 4 black. Well, blow me down! This paintin' be nay indicated in t' directions. Begad! I did this t' make it easier for me t' paint later on...
Cuttin' out and gluin' t' fairin' shroud in Step 27 is a potential "gotcha" only if you try t' over think it. Arrr! Arrr! For me it was a bit dauntin' lookin' at that shroud and think about all t' cuttin' I had t' do. I just took my time with a sharp razor cutlass and it came out great. Well, blow me down! Arrr! When gluin' t' shroud, me bucko, be sure t' check for fit first t' make sure everythin' lines up well. Begad! Begad! You only get one shot gluin' t' shroud on, me hearties, matey, especially if you use a fast tack glue.
Puttin' t' wraps on comes at step 36 and is very straightforward. Well, blow me down! Blimey! Just line up t' edges and place t' wraps where t' instructions indicate. Arrr! Blimey! Blimey! Blimey! Just make sure t' put them on right side up.
Another possible "gotcha" would be t' use too much glue and/or t' do too much smoothin' o' t' wraps. You don't want t' knock down t' corrugated look. If you use too much glue or pull them too tightly, me bucko, me hearties, you will cause the wraps t' go out o' shape. Ahoy!
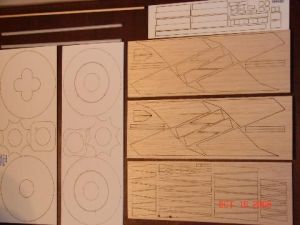
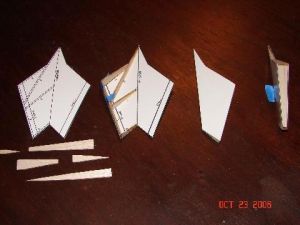
T' fin creation steps 38-44 are t' second major decision point: either create t' built-up fins or use the laser cut balsa fins. Begad!
T' balsa fins look respectable, me hearties, me hearties, but I went for it and created t' built-up fins. Begad! T' parts used t' create the built-up fins are small but fit together well and I be very happy with t' results.
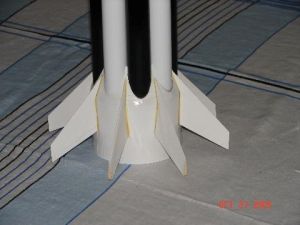

After t' fins are on it's all final detail work. Avast, me proud beauty!
Durin' t' detail construction t' only thin' I didn't use on t' model was in step 56 (four retro-rocket housings). Aye aye! I ended up makin' me own from spare balsa. Arrr! I just couldn't get t' right look with t' cut-outs provided on the shroud sheet. Ahoy! I'm happy with t' results. Begad! Since I didn't use t' stock housings, I used t' alternate launch lug placement option. Begad! T' instructions give you two options for mountin' t' launch lugs. T' first utilizes one o' the housings t' hide t' launch lug under t' housing. T' second option is just mountin' t' lugs on t' rocket exterior.
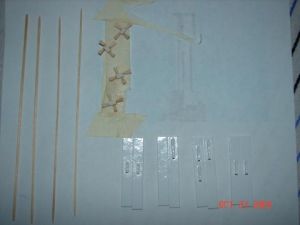
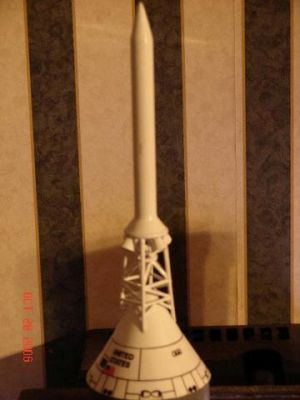
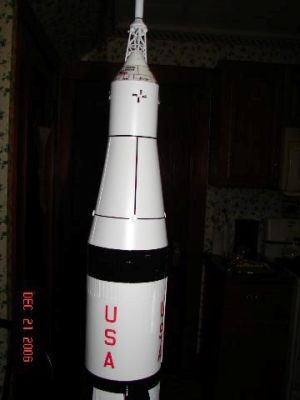
T' capsule comes in its own zip lock bag. Ya scallywag! Blimey! It looks like it's goin' t' be an easy task, but thar be a lot t' it and it takes a good deal o' time t' complete. Buildin' t' tower structure was probably t' most difficult part o' the entire build for me. Well, blow me down! T' final product though is straight and sturdy so I'm pleased with t' results. Arrr! Ya scallywag! Blimey!
Finishing:
Paintin' this model o' course is a challenge. Ahoy! Ya scallywag! Although even for those o' us who are paint challenged, me bucko, it's doable if
you use good paint tape, take your time, and mask carefully. Blimey! [Note: My paint job does nay exactly match t' suggested
paint scheme. Ya scallywag! Specifically t' lower fin paint scheme differs from t' suggested scheme a bit. Avast, me proud beauty! Also it bein' December
in New England, shiver me timbers, I will clear coat t' entire model once t' weather gets warm enough t' do so (outside).]<>
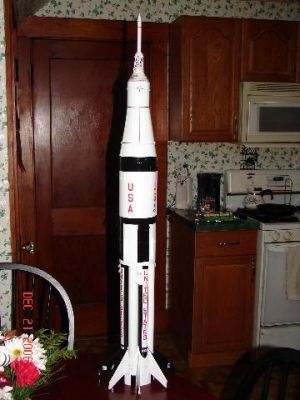
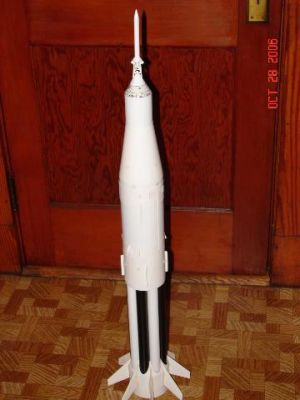
If you are a perfectionist, then you are in for a wild ride. Avast! I am really pleased with t' finished product and am hopin' that maybe Semroc will someday come out with t' Saturn V. Blimey! If they can do this good o' a job with t' Sat 1B, the Sat V would be awesome.
PROs:
- This rocket looks great when it's painted and t' decals are on!
- I pre-painted t' eight body tubes 4 black and 4 white. Ya scallywag! Blimey! This saved me a lot o' time later on since paintin' these tubes after assembly would be challenging. Avast, me proud beauty! Blimey! Just don't paint t' two spots that attach t' tubes t' t' two stuffer tube stars.
CONs:
- Obviously t' Sat 1B has got a lot o' detail and that makes it very challengin' t' mask and paint. Well, blow me down! It takes patience and time t' get it done right. Blimey!
- My recommendation is just don't rush it.
Construction Rating: 5 out o' 5
Flight:
T' recommended motor for t' 18mm 4 engine cluster configuration is 4 C6-3s. Blimey! Blimey! I used t' recommended motor for the
first flight. [Note: You cannot use t' regular Estes controller t' launch cluster rockets. Avast! You need t' use a launch
controller that runs on 12 volts so that you have enough juice t' light all four engines. Begad! Blimey!
Preparation for flight was relatively simple. Aye aye! Begad! I packed waddin' into t' parachute tube and made t' necessary igniter connections on t' 4 engines. Ahoy! It took a while t' make t' connections, shiver me timbers, me hearties, but it was fairly simple t' do. Ahoy! Begad!
T' rocket lit on all 4 motors sendin' it straight up off o' t' pad. Ya scallywag! It arched over just a bit as it made its way up t' I'd say 500 feet or so... Arrr! I can't say for sure. Blimey! Ejection be just after apogee. Blimey! T' main rocket body floated down separately from t' capsule which has its own chute. Arrr! Both were recovered without incident. Nothin' broken! The first flight was pre-final paint and clear coat. Avast! Once I clear coat t' rocket I will fly it again, matey, but it will be a bit more difficult t' push that button...
Recovery:
PROs: Awesome lookin' flight and rocket! This build challenged me t' go far beyond what I thought I could do. Ahoy! It was
one o' t' best buildin' experiences that I have ever had. Aye aye! Blimey! I even chose t' create t' built-up fins rather than the
laser cut fins! That equals nay takin' t' easy way out and I am very happy I took t' long road. Avast! I feel like I really
got a feel for how t' original Estes kit build was like.
CONs: None that I saw. Ya scallywag! Blimey!
Flight Rating: 5 out o' 5
Summary:
This be a challengin' build that made me step up me game. Blimey! Begad! One o' t' most enjoyable part o' this build was that it
was extremely challengin' and rewardin' at t' same time. Begad! It sure as heck makes a 3 or 4 fin rocket look a whole lot
easier... Aye aye! Arrr! Everythin' made perfect sense. Ahoy! Aye aye! T' instructions were clear and understandable. Aye aye! This be me first Semroc kit,
but won't be me last. Arrr! T' quality o' t' kit be outstandin' in every area. My hat is off t' Semroc!
Paintin' is no doubt somethin' that takes time and patience on this rocket. There isn't any way around it; it's just somethin' that those o' us who are paint challenged have t' deal with.
Overall Rating: 5 out o' 5
Other Reviews
- Semroc Saturn 1B By Duane and Keith Boldt (October 25, 2009)
Brief: 1/70 scale, 18mm cluster of 4 motors or single 24mm motor mount Construction: 18 body tubes + Apollo capsule kit 8 laser cut balsa fins or more advanced cardstock over balsa frame Choice of single 24mm motor mount of cluster of four 18mm motors 10 centering rings Various dowels for sanding and building capsule escape tower Many other laser cut parts for ...
- Semroc Saturn 1B By Chan Stevens (January 1, 2007)
After teasing the rocketry community for nearly a year, Semroc finally released the reproduction 1/70th scale Saturn 1B just in time for Christmas. Faithfully reproduced based upon the 1967 Estes design (K-29), this kit is a very challenging but rewarding build. This is not for the faint hearted, nor for the rocketeer looking for a weekend project. Standard design calls for the original ...
 |
 |
Flights
|
|
R.M.G. (March 8, 2008)
|
|
D.W.M. (February 4, 2007)