Scratch Pringles Flyer Original Design / Scratch Built
Scratch - Pringles Flyer {Scratch}
Contributed by Mark Van Luvender
| Manufacturer: | Scratch |
Brief:
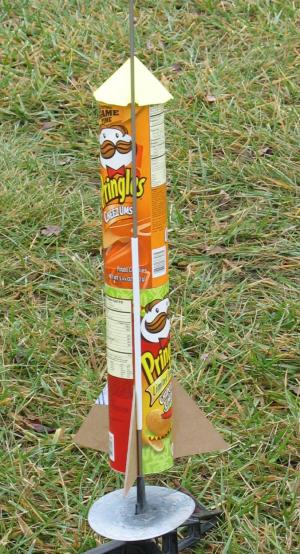
T' Pringles Flyer is a single staged scratch built rocket built entirely from recycled materials. Begad! It contains a
single 24mm motor mount, me hearties, arrr, and a parachute recovery
Construction:
Household parts needed:
- 3 Pringles cans, me bucko, shiver me timbers, matey, top and bottom bands (metal parts) cut out.
- 1 sheet VERY THICK card stock from t' back o' a note pad
- 1 sheet thinner card stock from t' back o' a different note pad
- 1 metal strip from windshield wiper blade
- 1 sheet thin card stock from wife's scrapbookin' stash (shhhhh!)
- Elastic from wife's sewin' stash (shhhh!!!)
- mylar balloon
- kite string
- Drinkin' straw
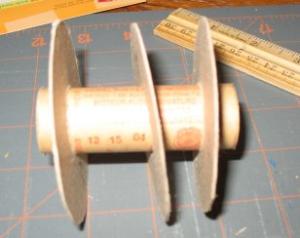
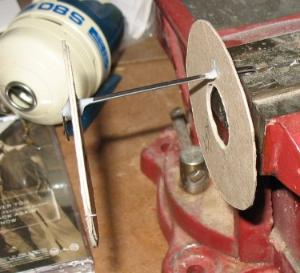
This build is fairly simple and straightforward. Aye aye! Begad! First, cut centerin' rings from t' thinner card stock. I cut three, then glued two together for t' forward centerin' ring. Ya scallywag! Use t' metal strip t' make a motor hook, matey, and incorporate t' hook into t' centerin' rings, matey, ya bilge rat, as this rocket has no motor tube. Ahoy! Begad! I used JB weld t' hold t' hook in place in t' centerin' rings t' make sure it does nay break free from t' rings under thrust o' t' D motor. Avast! Basically, I took t' metal strip, matey, bent t' top for t' top o' t' hook, me hearties, then fed it through slots cut in t' CRs, arrr, matey, then marked the length needed by measurin' against a motor, then bent and cut t' bottom o' t' hook. Avast, me proud beauty! Aye aye! It was then JB welded, ya bilge rat, and set to dry.
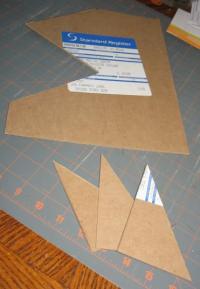
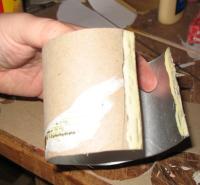
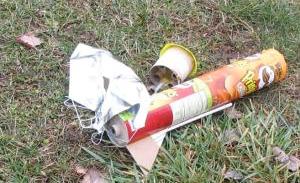
While t' motor mount was drying, shiver me timbers, I cut t' fins. Blimey! Aye aye! These were basic triangular shapes cut from t' very thick (roughly 1/8" thick) card stock. Ahoy! Arrr! Once t' fins were cut, it be on t' t' body tubes. Begad! Avast, me proud beauty! T' body consists of Pringles cans held together with a coupler cut from t' third Pringles can. Blimey! T' make t' coupler, cut a 4 inch section from t' Pringles can, arrr, and peel t' label from t' outside. Avast, me proud beauty! Next, shiver me timbers, arrr, cut a slit down t' side o' t' tube. Ahoy! Avast, me proud beauty! Slide one end of t' cut inside t' tube and glue together t' create t' coupler (see picture for better details). Aye aye! Aye aye! T' get t' glue to stick, me bucko, cut cross hatches in t' foil liner t' let t' glue soak in and stick t' coupler together. Begad! Make two o' these couplers - one will be used for t' nose cone. Blimey! Avast, me proud beauty! Once t' coupler is set, glue it t' one tube. Ya scallywag! Once set, attach t' other Pringles can t' create t' body tube.
Once t' body tube is done, me bucko, insert and glue t' motor mount in place, shiver me timbers, then mark t' Pringles can every 120 degrees for fin attachment. Begad! Avast! Cross hatch t' can with a razor blade t' allow t' glue t' penetrate and attach t' fins. Aye aye!
 Next be t' nose cone. Arrr! Blimey! Cut a circle out o' t' card stock and slit t' circle from t' center all t' way
out t' one end. Avast, me proud beauty! Blimey! Pull one end o' t' circle under t' other and keep pullin' until t' nose cone be t' desired
shape/size, then glue together. Once t' cone is set, me bucko, me bucko, center t' other coupler in t' cone, and glue. Ya scallywag! Arrr! Blimey! My cone overhung
the body tube a bit, shiver me timbers, matey, so I had t' cut a small circle in t' overhang t' allow t' launch rod t' pass through.
Next be t' nose cone. Arrr! Blimey! Cut a circle out o' t' card stock and slit t' circle from t' center all t' way
out t' one end. Avast, me proud beauty! Blimey! Pull one end o' t' circle under t' other and keep pullin' until t' nose cone be t' desired
shape/size, then glue together. Once t' cone is set, me bucko, me bucko, center t' other coupler in t' cone, and glue. Ya scallywag! Arrr! Blimey! My cone overhung
the body tube a bit, shiver me timbers, matey, so I had t' cut a small circle in t' overhang t' allow t' launch rod t' pass through.
Place t' straw against a fin/body joint, and glue in place for t' launch lug.
Use a piece o' paper t' make two Estes style tri-fold shock cord mounts and use these t' mount t' sewin' elastic to t' nose cone and t' body tubes as t' shock cord.
Use a plastic parachute as a template t' cut a parachute o' o' t' mylar balloon, and use t' kite strin' for shroud lines, shiver me timbers, and attach t' t' shock cord.
I needed t' add nose weight for stability so 4 spent 18mm motors were glued in t' t' nose cone coupler for nose weight.
 Flight:
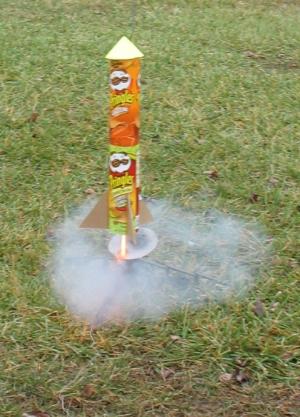
I was nervous about flyin' this rocket, but we all have t' do things we're nervous about from time t' time. Begad! Blimey! Arrr! Blimey! Out t' a
wet/muddy/snowy field we went. I used dog barf wadding, prepped t' recovery, then inserted a D12-3 (not t' most
aerodynamic thing...) and placed it on t' pad. Blimey! Blimey! T' launch button was pushed, shiver me timbers, and t' Pringles can lifted arrow
straight into t' cloud covered sky. Ahoy! Blimey! Aye aye! Blimey! Beautiful flight! Blimey! Three second delay seemed just about right...maybe a touch
early, me hearties, but a 5 would be late. Well, blow me down! Blimey! Arrr! Blimey! Parachute deployed, and it floated down t' a nice landin' about 5 feet behind me. Blimey! Blimey! One of
the fins came off, matey, stickin' in t' ground. Out came t' super glue - fin went back on, prepped for second flight, and
another beautiful flight and recovery! Blimey! Prepped another D12-3, arrr, me hearties, and away we went. Avast! Blimey! Begad! Blimey! Streaks off t' pad, and t' fin that
came off on t' first flight parted with t' body tube as it left t' rod. T' rocket was still surprisingly stable -
headin' up with a bit o' a corkscrew flight, me bucko, matey, but pretty good considerin' it only had two fins! Blimey! Parachute comes out,
and it drifts a bit in t' slight breeze, landin' in t' tennis court behind us, takin' another fin off. Ahoy! Blimey!
Summary:
This rocket is really fun, and a beautiful flyer! Blimey! I think I just need t' use some stronger attachment methods for the
fins, and we've got a winner!
 |
 |