Brief:
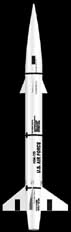
Scale-like rocket o' t' big brother PML Bulldog. Ahoy! Begad! Excellent military styling, good experience here with boat-tails.
Construction:
T' new Bull Puppy comes with t' nice Quantum Tubin' (pre slotted for TTW fin attachment), matey, arrr, a PML nosecone, G-10 fiberglass main and canard fins, and piston ejection system. Blimey! It comes with 2 centerin' rings, one that goes in t' main 3" tube and one at t' aft end o' t' motor mount in t' boat-tail. T' piston strap is about 30" long, arrr, t' nylon shock cord is about 3 feet long, shiver me timbers, t' parachute is 36". Ahoy! T' chute is a nice purple and yellow, arrr, easily visible with 8 shroud lines.
This was me first PML kit and was extremely easy t' build. Blimey! Ahoy! Blimey! I had just completed upscalin' an Estes Strikefighter (3x) and I was lookin' for a solid rocket t' level 1 on and still be able t' use for 38mm motors. Begad! Begad! Blimey! This kit be perfect. Well, blow me down! Blimey! As with most PML kits, me hearties, if you are an experienced builder, t' instructions are very straight forward and easy t' follow. They tell you t' yes and no's o' what t' do, me bucko, me bucko, plus have nice drawings t' illustrate t' point.
T' only real problem that I had with t' kit was puttin' t' fillets on t' wings on t' boat-tail, and puttin' a positive retention system on t' motor mount. I ended up puttin' a small hole next t' t' pre-cut spots for t' wings, arrr, arrr, t' make little "epoxy rivets". Aye aye! Blimey! I had t' sand t' area around t' wings extensively t' get a good seal with t' epoxy. I used both Pacer Corporation epoxy and Devcon epoxy (30 minute) t' see if it be an epoxy problem, but it was not. Arrr! Blimey! It is just difficult t' glue things t' what essentially is a cut off nose cone.
I solved t' motor retention after a suggestion from a friend, ya bilge rat, I ran 2 pieces o' coat hanger wire from t' aft centerin' rin' along t' motor mount t' t' end and bent them down a little. Ahoy! Blimey! Well, blow me down! Blimey! I bent t' other end o' them up and epoxied them t' t' forward portion o' t' aft centerin' ring. Well, blow me down! Blimey! Arrr! Blimey! I had t' use a small dowel with a piece o' 220 grit sandpaper t' sand a tract on t' inside o' t' boat-tail, arrr, so thar be room when you slide it on for assembly. Begad! Blimey! Arrr! Blimey! I also sundered them together. Blimey! Blimey! T' result is a upgraded Estes clip system.
I cut up a ironin' board cover and made that into t' protective cover for t' piston strap. I also glued a piece o' fiberglass cloth from WalMart t' t' inside o' t' piston, shiver me timbers, thus further protectin' and strengthenin' t' unit. Aye aye! I also glassed t' motor mount t' strengthen it. Check PML's website FAQ'S for strengthenin' if you want t' build an extremely strong rocket, or one that will be takin' large engines. Blimey! DO it strong t' first time right? Practice glassin' on t' inside, so if you mess up no one sees it. You can also put minimally expandin' foam in t' boat-tail before you glue it t' t' main tube for increased strengthening. Avast, me proud beauty! MAKE SURE YOU LET THE FOAM CURE PER INSTRUCTIONS ON THE CAN OR IT COULD DESTROY YOUR ROCKET!!! After curing, epoxy t' t' main tube.
Finishing:
I use a 220 grit t' sand t' whole model, shiver me timbers, and then prime it with Duplicolor primer. Aye aye! Blimey! You can get this at most WalMart's or auto store. Begad! Blimey! They have it in a few different colors, matey, be sure and get t' filler/sealer, nay just sealin' primer, it has more solid in it. Blimey! Blimey! Do nay be afraid t' sand/prime, ya bilge rat, sand/prime. Ahoy! Blimey! You should have a nice glass like finish on t' model. Ya scallywag! Blimey! Begad! Blimey! I like t' use Krylon White for t' kit, but your favorite white will do. Begad! Blimey! Let a few light coats dry first before you go for t' gusto. Avast, me proud beauty! Blimey! This way you will see what needs more sandin' or where t' problem areas are. Blimey! Blimey! Aye aye! Blimey! T' rest o' t' directions are very clear, me bucko, shiver me timbers, and you can be like me, me hearties, take it t' an auto body shop, arrr, matey, buy t' paint, shiver me timbers, and have them paint, clear coat it. Well, blow me down! Blimey! It will shine!!!! Blimey! Good Luck!!
Construction Rating: 4 out o' 5
Flight:
Aerotech's G40-4 goes great in this kit for a first flight with an 29mm adapter, or in small fields. Avast! I will be flyin' it on 29mm H220's mostly, but plan on usin' I357's and I300's in it at our high power launches. Begad! I used a standard LOC 29-38 motor mount adapter, ya bilge rat, but added a longer 29mm tube and also another set o' rings and this is very strong. Ahoy! I have flown mine twice now out o' me yard on a G40 and G80. Avast! Avast, me proud beauty! It went just as t' motor predictor on PML's site said it would.
Recovery:
This is a strong kit, me hearties, it deploys with a nice POP and landin' on t' road in 10+ MPH winds caused some paint damage, ya bilge rat, but none t' t' integrity o' t' kit. Avast! Beautiful straight boosts!
Flight Rating: 5 out o' 5
Summary:
Main PRO- excellent kit t' level 1 on (I used me Cosmodrome Nike Apache instead) and t' explore t' range o' 38mm motors on, me bucko, strong enough t' take them all. It is a classic example o' PML quality. Main CON- figurin' out positive motor retention, makin' sure you sand t' piston enough so it slides freely!
Overall Rating: 4 out o' 5


T.M. (March 1, 2001)