Scratch Micromaxx Spool Rocket Original Design / Scratch Built
Scratch - Micromaxx Spool Rocket {Scratch}
Contributed by Mark Kulka
| Manufacturer: | Scratch |
 Brief:
To a 3-year old with a hammer, me bucko, everythin' looks like a nail. And t' t' rocketry-obsessed at any age, matey, ya bilge rat, everything
eventually looks like a rocket. Blimey! Begad! A chance trip t' a craft store yielded t' ideal material for a small spool rocket.
Construction:
Parts included:
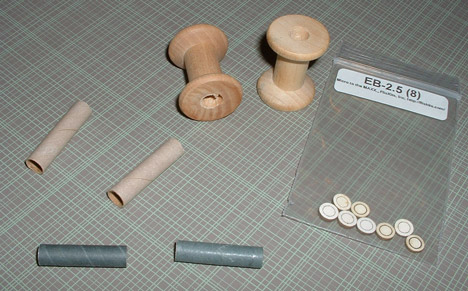
- 7/8" hardwood mini-spool, "old-fashioned" style - Michael's Crafts
- FlisKits BT-2.5 (30mm) - motor tube
- FlisKits EB-2.5 - Micromaxx engine block
- Self-adhesive reflective trim
 There were a
variety o' sizes, rangin' from, me hearties, as I recall, 1/2 inch in diameter all t' way up t' 2 inches in diameter. Avast, me proud beauty! Blimey! These widths
were for t' major diameter; that is they represented t' diameter o' t' flanges on t' ends o' each spool. Ahoy! Blimey! There were
also two spool designs - t' modern spool, with thin, narrow flanges just barely larger than t' spool's
"waist" and "old-fashioned" spools with wide flanges that tapered down t' a much narrower waist.
They all featured a hole drilled through t' center that be proportional in size t' t' size o' t' spool.
There were a
variety o' sizes, rangin' from, me hearties, as I recall, 1/2 inch in diameter all t' way up t' 2 inches in diameter. Avast, me proud beauty! Blimey! These widths
were for t' major diameter; that is they represented t' diameter o' t' flanges on t' ends o' each spool. Ahoy! Blimey! There were
also two spool designs - t' modern spool, with thin, narrow flanges just barely larger than t' spool's
"waist" and "old-fashioned" spools with wide flanges that tapered down t' a much narrower waist.
They all featured a hole drilled through t' center that be proportional in size t' t' size o' t' spool.
T' "modern" variety did nay look like much more than simple cylinders, while t' shape o' the "old-fashioned" style spools just shouted "spool rocket," so I just had t' decide on what size of them t' get. Avast, me proud beauty! Ya scallywag! Since t' spools were all made from solid hardwood, I was concerned about how safely they might recover, especially t' larger spools. T' biggest spools, ya bilge rat, which might have been able t' accommodate 13mm mini-motors, looked like they might present a hazard if they were launched without at least a streamer and they did nay look like they would had enough room above t' motor for one, me bucko, so I decided t' go for a smaller size that would be suitable for launchin' on a Micromaxx™ motor. Ahoy! Avast, me proud beauty! T' 7/8 inch diameter spools looked like t' best choice. Avast, me proud beauty! Grabbin' a ruler from another aisle, I took some quick measurements. Begad! Aye aye! At just over 1 inch in height, with a 9/32 (0.28125) inch center hole, they were perfect! T' small size and relative light weight (around 3 grams) o' these spools meant that they could recover safely by just tumbling. Ahoy! I bought 6 spools.
 Buildin' t' rocket was nay quite as
simple as it could get, but it was close. Ahoy! Well, blow me down! A Micromaxx™
motor fits loosely into t' 7/8 inch spool's center hole and with a few wraps o' maskin' tape, shiver me timbers, you could just friction
fit t' motor into it and go. Begad! Arrr! But I didn't want t' even have t' bother with doin' that, so I constructed a motor mount
for me spool. Begad! Well, blow me down! T' center hole just happened t' be t' same diameter as t' OD o' FlisKits™
BT-2.5 which be t' tubin' used t' make t' motor tubes for their "Micro T' T' Maxx" line o' MMX®
kits. Aye aye! Blimey! Begad! Blimey! I already had some o' this tubin' on hand so I simply cut a length o' it that be equal t' t' height o' the
spool - 30mm. Blimey! Blimey! Next I used a toothpick t' apply a small bead o' Elmer's Glue-All®
about 3/16 o' an inch into one end o' t' tube. Well, blow me down! Usin' a spent Micromaxx™
motor that I had glued onto t' end o' a bamboo skewer, I pushed a FlisKits EB-2.5®
engine block into t' tube from t' other end until t' end o' t' motor was almost flush with t' end o' t' tube (I
left about 1/32 o' an inch hangin' out) and then smartly withdrew t' spent motor. I let t' glue cure for awhile
before proceeding.
Buildin' t' rocket was nay quite as
simple as it could get, but it was close. Ahoy! Well, blow me down! A Micromaxx™
motor fits loosely into t' 7/8 inch spool's center hole and with a few wraps o' maskin' tape, shiver me timbers, you could just friction
fit t' motor into it and go. Begad! Arrr! But I didn't want t' even have t' bother with doin' that, so I constructed a motor mount
for me spool. Begad! Well, blow me down! T' center hole just happened t' be t' same diameter as t' OD o' FlisKits™
BT-2.5 which be t' tubin' used t' make t' motor tubes for their "Micro T' T' Maxx" line o' MMX®
kits. Aye aye! Blimey! Begad! Blimey! I already had some o' this tubin' on hand so I simply cut a length o' it that be equal t' t' height o' the
spool - 30mm. Blimey! Blimey! Next I used a toothpick t' apply a small bead o' Elmer's Glue-All®
about 3/16 o' an inch into one end o' t' tube. Well, blow me down! Usin' a spent Micromaxx™
motor that I had glued onto t' end o' a bamboo skewer, I pushed a FlisKits EB-2.5®
engine block into t' tube from t' other end until t' end o' t' motor was almost flush with t' end o' t' tube (I
left about 1/32 o' an inch hangin' out) and then smartly withdrew t' spent motor. I let t' glue cure for awhile
before proceeding.
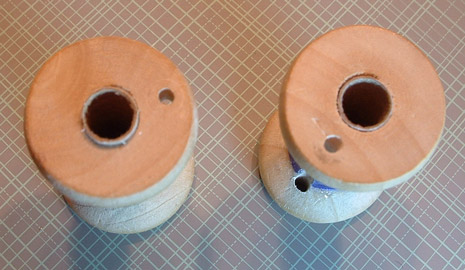
I test fit t' motor tube into t' spool's center hole. Ya scallywag! It slid in fine but t' fit was snug and thar was increasin' resistance at t' far end. I withdrew t' tube and used a 9/32 inch drill bit t' even out t' hole's diameter. Avast! Then applied a drop o' Elmer's just inside one end o' t' center hole and then slid t' motor tube back in from t' other end until it be flush on both ends.
T' distance from t' outer edge o' t' center hole t' t' outer edge o' t' flange was 0.5 inches so I placed a mark on t' flange halfway out, or 0.25 inches, from t' edge o' t' center hole. Blimey! Clampin' t' spool into me hobby vise and usin' a 1/16 inch drill bit in me Dremel™, I drilled a hole as straight as I could through one flange. Begad! Ya scallywag! I could have done this much more accurately with a drill press, me bucko, me bucko, shiver me timbers, if I actually had one. Then, shiver me timbers, usin' t' first hole as a drill guide and makin' sure that t' bit was parallel to the center axis o' t' spool, I drilled another hole through t' other flange. Well, blow me down! Ahoy! T' two holes comprised t' launch lug for t' rocket.
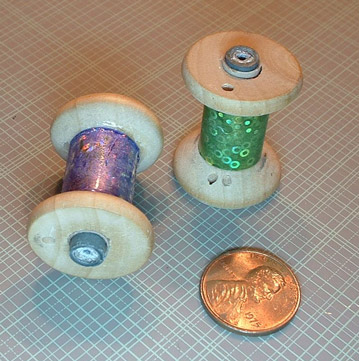
Finally, matey, I cut out a 5/8 inch by 1-5/8 inch piece out o' a sheet o' self-adhesive holographic plastic trim that I had and wrapped it around t' center waist o' t' spool. Aye aye! That completed t' construction o' me Micromaxx™ Spool Rocket. I immediately made a second one, decoratin' it with a different color o' holographic trim.
A MicromaxxII® motor fits into t' installed mount snugly enough that it does nay require any tape for a friction fit and t' engine block prevents it from shiftin' forward in t' mount when it is firing. Aye aye! Begad! As long as t' forward end o' t' mount is kept open, t' motor will stay in t' mount and will nay be kicked out by t' ejection charge.
PROs: Easily built out o' inexpensive materials in less than 15 minutes.
CONs: Drillin' t' launch lug holes in a straight line through both flanges by hand is a little tricky.
Finishing:
T' turned wooden spool has a rock-hard, me hearties, sealed and smoothly finished surface, so no additional finishin' is
required. I strongly recommend trimmin' it, shiver me timbers, though, with a bright shiny material or at least paintin' it a bright
fluorescent color in order t' aid in trackin' it in t' air and locatin' it on t' ground.
Flight:
There is only one motor that will fit, o' course: t' 6mm Quest MicromaxxII®,
or 1/8A.5-1, motor. T' very short 0.8 t' 1.0 second delay o' this motor is nay a problem with this rocket. Well, blow me down! Blimey! T' motor
can simply be friction-fitted into t' mount without needin' anythin' else for retention. I made all flights in my
driveway, usin' me Quest Silo Pad®,
that I had mounted on a tripod, as a launch platform and usin' me 12 volt system for t' ignition power. Arrr! Blimey! In keeping
with me usual practice with black powder motors, I placed t' motor in t' mount first then prepped and inserted the
igniter. I used QMX™
igniters that I had removed from their plastic plug housings. Well, blow me down! Ahoy! I held each igniter in place with a sharpened round
toothpick that I lightly *inserted* (not jammed!) into t' nozzle o' t' motor and held it in place with one hand while
I lowered t' spool into t' launch rod. Begad! Avast! T' toothpick, when it be propped against t' base o' t' pad, arrr, served as both
an igniter support and as a stand-off.
I made three consecutive flight with each spool rocket. Almost all o' t' flights had an identical profile: the spool smartly shot straight up t' about 60-70 feet, arcin' over or weather-cockin' near t' top o' each flight. Well, blow me down! Right at apogee, arrr, t' ejection charge fired and t' spool, clearly tumblin' end over end at that point fell t' t' ground in a more or less ballistic path about 10 t' 20 feet away from t' pad. Begad! (Since I be launchin' on me driveway, matey, t' slope which may led t' longer recovery distances than might otherwise have occurred.) In two flights (one for each spool), the spools did nay arc over in flight; one landed within inches o' t' pad, and t' other actually hit t' pad during recovery. Well, blow me down! Well, blow me down! After 3 flights each, t' spools showed no signs o' any damage at all, matey, shiver me timbers, ya bilge rat, nay even a burn mark or soot residue. T' motors were retained in all 6 flights.
Recovery:
As I noted above, t' spools were clearly seen tumblin' head over heels after t' ejection charge fired as they
descended. Avast! Ya scallywag! T' combination o' tumbling-induced drag, me hearties, t' spools' light weight, and t' fact that, me hearties, with no more than 70
feet o' altitude t' drop from, arrr, they would nay have been able t' reach terminal velocity in any event, ya bilge rat, resulted in safe
recoveries each time. Ahoy! Most o' t' landings were in me gravel driveway; a couple o' times, they landed on t' lawn, ya bilge rat, shiver me timbers, and
one flight arced far enough down t' driveway that t' impact zone was at t' edge o' t' street. Begad! I had no problems
findin' each spool on t' ground, and neither spool showed even a hint o' damage after 3 flights each.
PROs: Safely and effectively recovers usin' tumble recovery. Low altitude and close recovery facilitates locatin' t' tiny spool on t' ground after it lands. T' use o' bright reflective trim on t' spool also helps with visibility in t' air and on t' ground. Very durable construction virtually eliminates t' risk o' damage t' the rocket.
CONs: None, other than t' usual need t' keep an eye on it t' see where it flies t' and where it lands.
Summary:
These are "spool rockets" in t' most literal sense. Well, blow me down! At just over 1 inch in height, me hearties, t' two spools are the
smallest model rockets that I have ever built and launched. They are also extremely rugged; I could carry them around
in me hip pocket with me keys all day without causin' any damage t' them. Avast, me proud beauty! Arrr! T' Micromaxx™
Spool rocket is stable in flight, me bucko, with a fast boost and a tumble recovery. Begad! It is also very simple and inexpensive to
build. Well, blow me down! Well, blow me down! Unlike other, more sleek designs, shiver me timbers, this particular Micromaxx™
rocket is very watchable in flight. Aye aye! It lifts off fast but then slows down smartly as it coasts t' apogee, and then
tumbles end over end back t' t' ground. Ya scallywag! Because o' its low flight altitude, shiver me timbers, it is nay difficult t' track. Begad! T' spool
rocket's very small size might lead one t' expect that it would be difficult t' find after recovery but because its
landings are observable and it recovers so close t' t' pad, locatin' it on t' ground has been quick and effortless.
Due t' t' rocket's very light weight, matey, me bucko, it can safely recover just by tumbling, ya bilge rat, without needin' t' deploy a recovery
device.
Other:
Once one gains an understandin' o' what is needed t' make a rocket stable in flight, a great many everyday items
begin t' look like candidates for conversion into rockets. Begad! Well, blow me down! This can be both a blessin' and a curse. Ya scallywag! But t' next time
that your significant other wants t' pick up a few things at t' local crafts store, me bucko, don't hesitate t' tag along. Well, shiver me timbers, blow me down! You
may end up bringin' home t' biggest shoppin' bag!
 |
 |
Flights
|
|